9.2: App Settings
Contents:
- Determining appropriate setting controls
- Providing navigation to Settings
- The Settings UI
- Displaying the settings
- Setting the default values for settings
- Reading the settings values
- Listening for a setting change
- Using the Settings Activity template
- Related practical
- Learn more
This chapter describes app settings that let users indicate their preferences for how an app or service should behave.
Determining appropriate setting controls
Apps often include settings that allow users to modify app features and behaviors. For example, some apps allow users to specify whether notifications are enabled, or how often the application syncs data with the cloud.
The controls that belong in the app's settings should capture user preferences that affect most users or provide critical support to a minority of users. For example, notification settings affect all users, while a currency setting for a foreign market provides critical support for the users in that market.
Settings are usually accessed infrequently, because once users change a setting, they rarely need to go back and change it again. If the control or preference you are providing the user is something that needs to be frequently accessed, consider moving it to the app bar's options menu, or to a side navigation menu such as a navigation drawer.
Set defaults for your setting controls that are familiar to users and make the app experience better. The initial default value for a setting should:
- Represent the value most users would choose, such as All contacts for "Contacts to display" in the Contacts app.
- Use less battery power. For example, in the Android Settings app, Bluetooth is set to off until the user turns it on.
- Pose the least risk to security and data loss. For example, the default setting for the Gmail app's default action is to archive rather than delete messages.
- Interrupt only when important. For example, the default setting for when calls and notifications arrive is to interrupt only when important.
Tip: If the setting contains information about the app, such as a version number or licensing information, move these to a separately-accessed Help screen.
Providing navigation to Settings
Users should be able to navigate to app settings by tapping Settings, which should be located in side navigation, such as a navigation drawer, as shown on the left side of the figure below, or in the options menu in the app bar, as shown on the right side of the figure below.
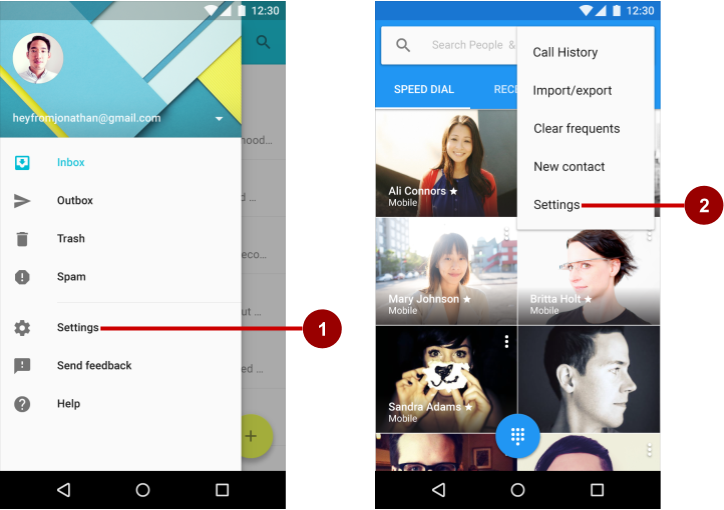
In the figure above:
- Settings in side navigation (a navigation drawer)
- Settings in the options menu of the app bar
Follow these design guidelines for navigating to settings:
- If your app offers side navigation such as a navigation drawer, include Settings below all other items (except Help and Send Feedback).
- If your app doesn't offer side navigation, place Settings in the app bar menu's options menu below all other items (except Help and Send Feedback).Note: Use the word Settings in the app's navigation to access the settings. Do not use synonyms such as "Options" or "Preferences."
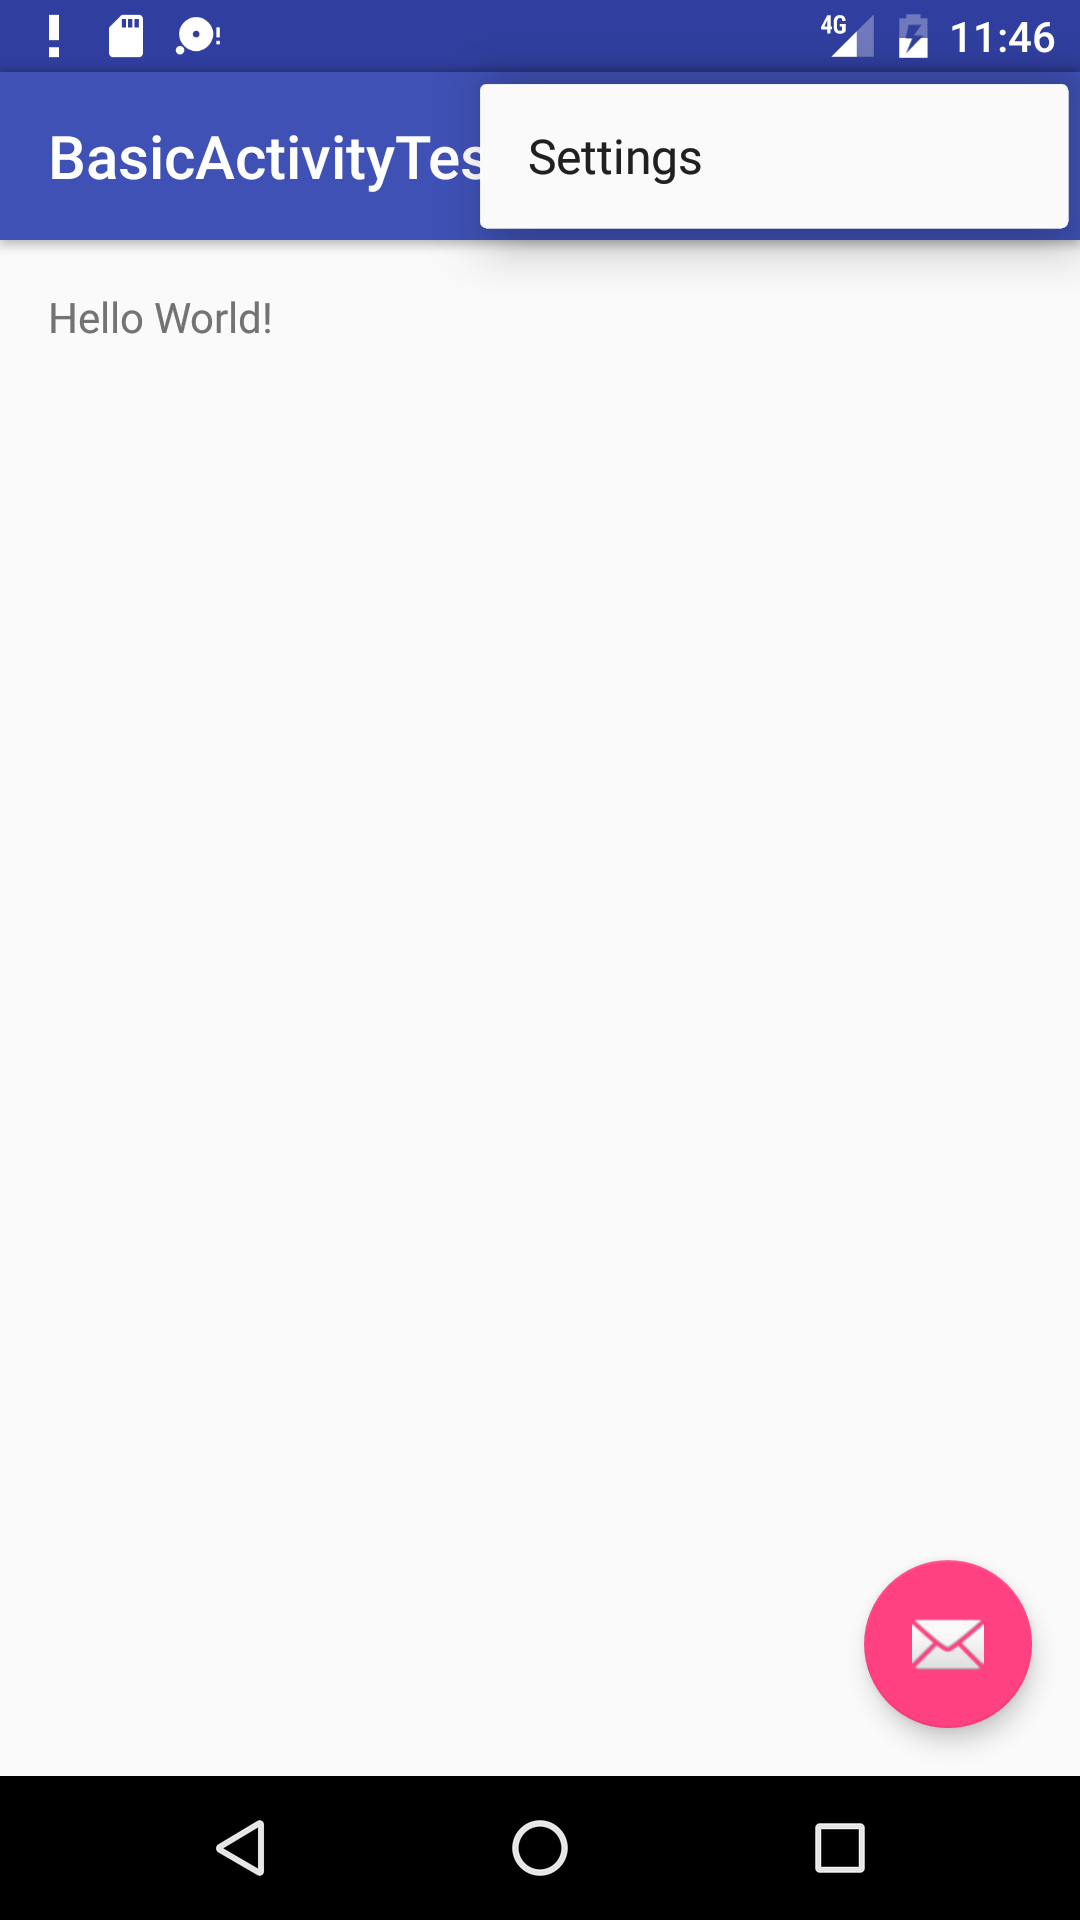
Tip: Android Studio provides a shortcut for setting up an options menu with Settings. If you start an Android Studio project for a smartphone or tablet using the Basic Activity template, the new app includes Settings as shown below:
The Settings UI
Settings should be well-organized, predictable, and contain a manageable number of options. A user should be able to quickly understand all available settings and their current values. Follow these design guidelines:
- 7 or fewer settings: Arrange them according to priority with the most important ones at the top.
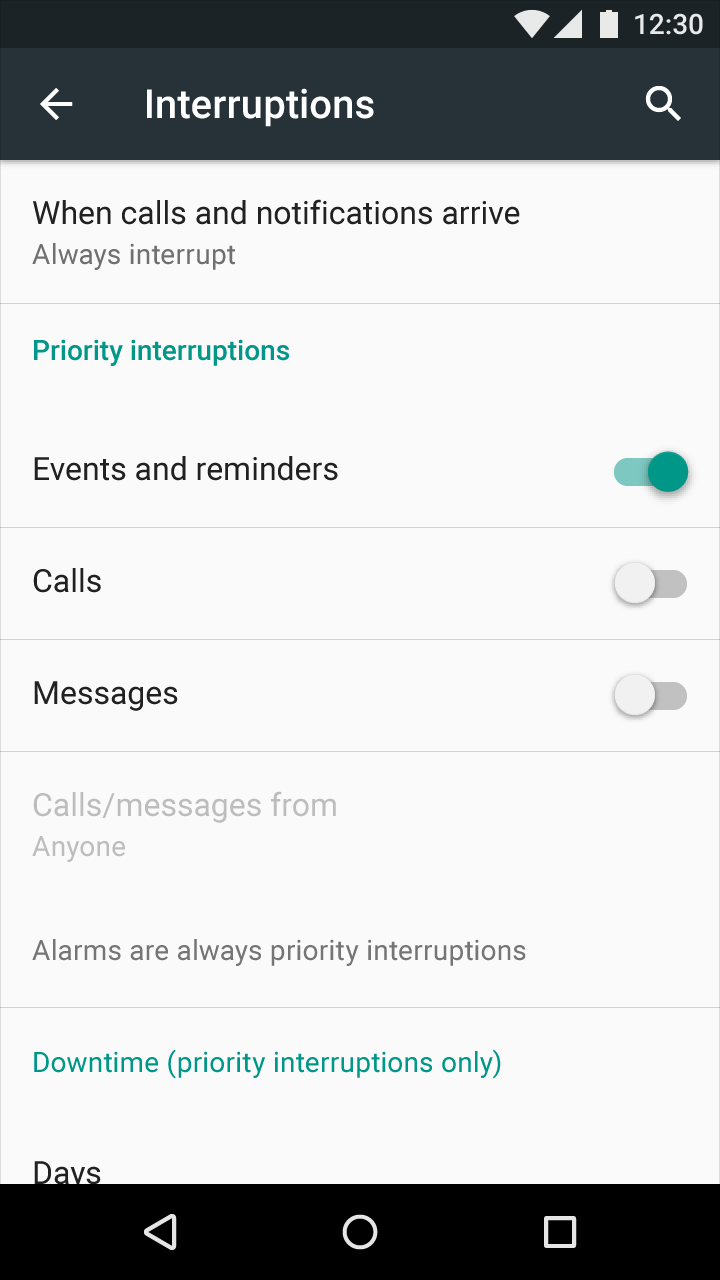
- 7-15 settings: Group related settings under section dividers. For example, in the figure below, "Priority interruptions" and "Downtime (priority interruptions only)" are section dividers.
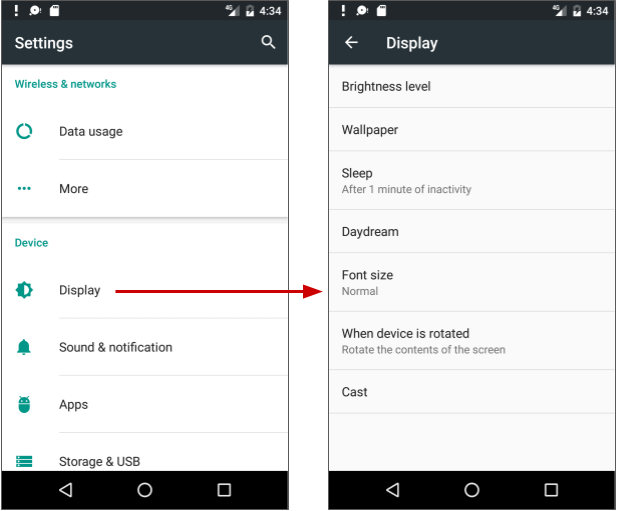
- 16 or more settings: Group related settings into separate sub-screens. Use headings, such as Display on the main Settings screen (as shown on the left side of the figure below) to enable users to navigate to the display settings (shown on the right side of the figure below):
Building the settings
Build an app's settings using various subclasses of the Preference class rather than using View objects. This class provides the View to be displayed for each setting, and associates with it a SharedPreferences interface to store/retrieve the preference data.
Each Preference appears as an item in a list. Direct subclasses provide containers for layouts involving multiple settings. For example:
- PreferenceGroup: Represents a group of settings (Preference objects).
- PreferenceCategory: Provides a disabled title above a group as a section divider.
- PreferenceScreen: Represents a top-level Preference that is the root of a Preference hierarchy. Use a PreferenceScreen in a layout at the top of each screen of settings.
For example, to provide dividers with headings between groups of settings (as shown in the previous figure for 7-15 settings), place each group of Preference objects inside a PreferenceCategory. To use separate screens for groups, place each group of Preference objects inside a PreferenceScreen.
Other Preference subclasses for settings provide the appropriate UI for users to change the setting. For example:
- CheckBoxPreference: Creates a list item that shows a checkbox for a setting that is either enabled or disabled. The saved value is a boolean (
trueif it's checked). - ListPreference: Creates an item that opens a dialog with a list of radio buttons.
- SwitchPreference: Creates a two-state toggleable option (such as on/off or true/false).
- EditTextPreference: Creates an item that opens a dialog with an EditText widget. The saved value is a String.
- RingtonePreference: Lets the user to choose a ringtone from those available on the device.
Define your list of settings in XML, which provides an easy-to-read structure that's simple to update. Each Preference subclass can be declared with an XML element that matches the class name, such as <CheckBoxPreference>.
XML attributes for settings
The following example from the Settings Activity template defines a screen with three settings as shown in the figure below: a toggle switch (at the top of the screen on the left side), a text entry field (center), and a list of radio buttons (right):
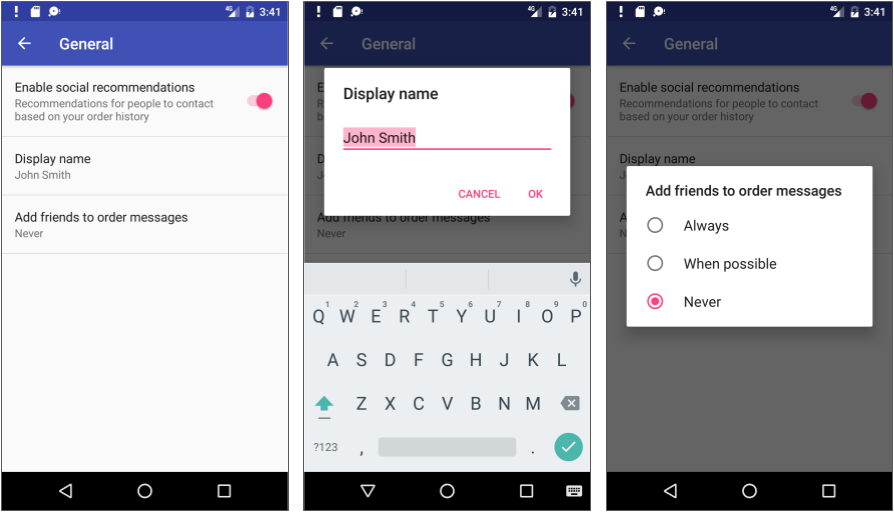
The root of the settings hierarchy is a PreferenceScreen layout:
<PreferenceScreen xmlns:android="http://schemas.android.com/apk/res/android">
. . .
</PreferenceScreen>
Inside this layout are three settings:
SwitchPreference: Show a toggle switch to disable or enable an option.
The setting has the following attributes:
android:defaultValue: The option is enabled (set totrue) by default.android:summary: The text summary appears underneath the setting. For some settings, the summary should change to show whether the option is enabled or disabled.android:title: The title of the setting. For aSwitchPreference, the title appears to the left of the toggle switch.- android:key: The key to use for storing the setting value. Each setting (Preference object) has a corresponding key-value pair that the system uses to save the setting in a default SharedPreferences file for your app's settings.
<SwitchPreference
     android:defaultValue="true"
     android:key="example_switch"
     android:summary="@string/pref_description_social_recommendations"
     android:title="@string/pref_title_social_recommendations" />
EditTextPreference: Show a text field for the user to enter text.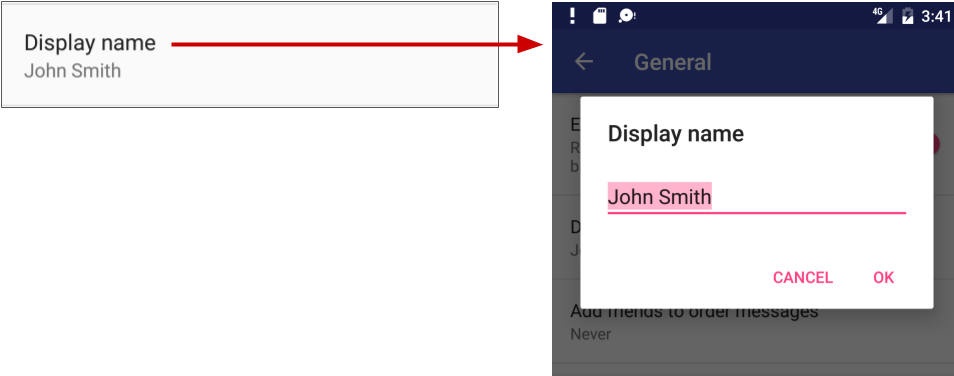
- Use EditText attributes such as
android:capitalizeandandroid:maxLinesto define the text field's appearance and input control. - The default setting is the
pref_default_display_namestring resource.<EditTextPreference android:capitalize="words" android:defaultValue="@string/pref_default_display_name" android:inputType="textCapWords" android:key="example_text" android:maxLines="1" android:selectAllOnFocus="true" android:singleLine="true" android:title="@string/pref_title_display_name" />
- Use EditText attributes such as
ListPreference: Show a dialog with radio buttons for the user to make one choice.
- The default value is set to
-1for no choice. - The text for the radio buttons (Always, When possible, and Never) are defined in the
pref_example_list_titlesarray and specified by theandroid:entriesattribute. - The values for the radio button choices are defined in the
pref_example_list_valuesarray and specified by theandroid:entryValuesattribute. - The radio buttons are displayed in a dialog, which usually have positive (OK or Accept) and negative (Cancel) buttons. However, a settings dialog doesn't need these buttons, because the user can touch outside the dialog to dismiss it. To hide these buttons, set the
android:positiveButtonTextandandroid:negativeButtonTextattributes to"@null".<ListPreference android:defaultValue="-1" android:entries="@array/pref_example_list_titles" android:entryValues="@array/pref_example_list_values" android:key="example_list" android:negativeButtonText="@null" android:positiveButtonText="@null" android:title="@string/pref_title_add_friends_to_messages" />
- The default value is set to
Save the XML file in the res/xml/ directory. Although you can name the file anything you want, it's traditionally named preferences.xml.
If you are using the support v7 appcompat library and extending the Settings Activity with AppCompatActivity and the fragment with PreferenceFragmentCompat, as shown in the next section, change the setting's XML attribute to use the support v7 appcompat library version. For example, for a SwitchPreference setting, change <SwitchPreference in the code to:
<PreferenceScreen xmlns:android="http://schemas.android.com/apk/res/android">
   <android.support.v7.preference.SwitchPreferenceCompat
   ... />
</PreferenceScreen>
Displaying the settings
Use a specialized Activity or Fragment subclass to display a list of settings.
- For an app that supports Android 3.0 and newer versions, the best practice for settings is to use a Settings Activity and a fragment for each preference XML file:
- Add a Settings Activity class that extends Activity and hosts a fragment that extends PreferenceFragment.
- To remain compatible with the v7 appcompat library, extend the Settings Activity with AppCompatActivity, extend the fragment with PreferenceFragmentCompat.
- If your app must support versions of Android older than 3.0 (API level 10 and lower), build a special settings activity as an extension of the PreferenceActivity class.
Fragments like PreferenceFragment provide a more flexible architecture for your app, compared to using activities alone. A fragment is like a modular section of an activity—it has its own lifecycle and receives its own input events, and you can add or remove a fragment while the activity is running. Use PreferenceFragment to control the display of your settings instead of PreferenceActivity whenever possible.
However, to create a two-pane layout for large screens when you have multiple groups of settings, you can use an activity that extends PreferenceActivity and also use PreferenceFragment to display each list of settings. You will see this pattern with the Settings Activity template as described later in this chapter in "Using the Settings Activity template".
The following examples show you how to remain compatible with the v7 appcompat library by extending the Settings Activity with AppCompatActivity, and extending the fragment with PreferenceFragmentCompat. To use this library and the PreferenceFragmentCompat version of PreferenceFragment, you must also add the android.support:preference-v7 library to the build.gradle (Module: app) file's dependencies section:
dependencies {
   ...
   compile 'com.android.support:preference-v7:25.0.1'
}
You also need to add the following preferenceTheme declaration to the AppTheme in the styles.xml file:
<style name="AppTheme" parent="Theme.AppCompat.Light.DarkActionBar">
   ...
   <item name="preferenceTheme">@style/PreferenceThemeOverlay</item>
</style>
Using a PreferenceFragment
The following shows how to use a PreferenceFragment to display a list of settings, and how to add a PreferenceFragment to an activity for settings. To remain compatible with the v7 appcompat library, extend the Settings Activity with AppCompatActivity, and extend the fragment with PreferenceFragmentCompat for each preferences XML file.
Replace the automatically generated onCreate() method with the onCreatePreferences() method to load a preferences file with setPreferencesFromResource():
public static class SettingsFragment extends PreferenceFragment {
    @Override
    public void onCreatePreferences(Bundle savedInstanceState,
                                                String rootKey) {
        setPreferencesFromResource(R.xml.preferences, rootKey);
    }
}
As shown in the code above, you associate an XML layout of settings with the fragment during the onCreatePreferences() callback by calling setPreferencesFromResource() with two arguments:
R.xml.and the name of the XML file (preferences).- the
rootKeyto identify the preference root inPreferenceScreen.setPreferencesFromResource(R.xml.preferences, rootKey);
You can then create an Activity for settings (named SettingsActivity) that extends AppCompatActivity, and add the settings fragment to it:
public class SettingsActivity extends AppCompatActivity {
    @Override
    protected void onCreate(Bundle savedInstanceState) {
        super.onCreate(savedInstanceState);

        // Display the fragment as the main content.
        getSupportFragmentManager().beginTransaction()
                .replace(android.R.id.content, new SettingsFragment())
                .commit();
        ...
    }
}
The above code is the typical pattern used to add a fragment to an activity so that the fragment appears as the main content of the activity. You use:
getFragmentManager()if the class extendsActivityand the fragment extendsPreferenceFragment.getSupportFragmentManager()if the class extendsAppCompatActivityand the fragment extendsPreferenceFragmentCompat.
For more information about fragments, see Fragment.
To set Up navigation for the settings activity, be sure to declare the Settings Activity's parent to be MainActivity in the AndroidManifest.xml file.
Calling the settings activity
If you implement the options menu with the Settings item, use the following intent to call the Settings activity from with the onOptionsItemSelected() method when the user taps Settings (using action_settings for the Settings menu resource id):
@Override
public boolean onOptionsItemSelected(MenuItem item) {
   int id = item.getItemId();
   // ... Handle other options menu items
   if (id == R.id.action_settings) {
      Intent intent = new Intent(this, SettingsActivity.class);
      startActivity(intent);
      return true;
      }
   return super.onOptionsItemSelected(item);
}
If you implement a navigation drawer with the Settings item, use the following intent to call the Settings activity from with the onNavigationItemSelected() method when the user taps Settings (using action_settings for the Settings menu resource id):
@Override
public boolean onNavigationItemSelected(MenuItem item) {
   int id = item.getItemId();
   if (id == R.id.action_settings) {
      Intent intent = new Intent(this, SettingsActivity.class);
      startActivity(intent);
   } else if ...
   // ... Handle other navigation drawer items
   return true;
}
Setting the default values for settings
When the user changes a setting, the system saves the changes to a SharedPreferences file. As you learned in another lesson, shared preferences allow you to read and write small amounts of primitive data as key/value pairs to a file on the device storage.
The app must initialize the SharedPreferences file with default values for each setting when the user first opens the app. Follow these steps:
- Be sure to specify a default value for each setting in your XML file using the
android:defaultValueattribute:... <SwitchPreference android:defaultValue="true" ... /> ... - From the onCreate() method in the app's main activity—and in any other activity through which the user may enter your app for the first time—call setDefaultValues():
...
  PreferenceManager.setDefaultValues(this,
                              R.xml.preferences, false);
...
Step 2 ensures that the app is properly initialized with default settings. The setDefaultValues() method takes three arguments:
- The app context, such as
this. - The resource ID (
preferences) for the settings layout XML file which includes the default values set by Step 1 above. - A boolean indicating whether the default values should be set more than once. When
false, the system sets the default values only if this method has never been called in the past (or the KEY_HAS_SET_DEFAULT_VALUES in the default value SharedPreferences file is false). As long as you set this third argument tofalse, you can safely call this method every time your activity starts without overriding the user's saved settings values by resetting them to the default values. However, if you set it totrue, the method will override any previous values with the defaults.
Reading the settings values
Each Preference you add has a corresponding key-value pair that the system uses to save the setting in a default SharedPreferences file for your app's settings. When the user changes a setting, the system updates the corresponding value in the SharedPreferences file for you. The only time you should directly interact with the associated SharedPreferences file is when you need to read the value in order to determine your app's behavior based on the user's setting.
All of an app's preferences are saved by default to a file that is accessible from anywhere within the app by calling the static method PreferenceManager.getDefaultSharedPreferences(). This method takes the context and returns the SharedPreferences object containing all the key-value pairs that are associated with the Preference objects.
For example, the following code snippet shows how you can read one of the preference values from the main activity's onCreate() method:
...
SharedPreferences sharedPref =
    PreferenceManager.getDefaultSharedPreferences(this);
Boolean switchPref = sharedPref
    .getBoolean("example_switch", false);
...
The above code snippet uses PreferenceManager.getDefaultSharedPreferences(this) to get the settings as a SharedPreferences object (sharedPref).
It then uses getBoolean() to get the boolean value of the preference that uses the key "example_switch". If there is no value for the key, the getBoolean() method sets the value to false.
Listening for a setting change
There are several reasons why you might want to set up a listener for a specific setting:
- If a change to the value of a setting also requires changing the summary of the setting, you can listen for the change, and then change the summary with the new setting value.
- If the setting requires several more options, you may want to listen for the change and immediately respond by displaying the options.
- If the setting makes another setting obsolete or inappropriate, you may want to listen for the change and immediately respond by disabling the other setting.
To listen to a setting, use the Preference.OnPreferenceChangeListener interface, which includes the onPreferenceChange() method that returns the new value of the setting.
In the following example, the listener retrieves the new value after the setting is changed, and changes the summary of the setting (which appears below the setting in the UI) to show the new value. Follow these steps:
- Use a shared preferences file, as described in a previous chapter, to store the value of the preference (setting). Declare the following variables in the SettingsFragment class definition:
public class SettingsFragment extends PreferenceFragment { private SharedPreferences mPreferences; private String sharedPrefFile = "com.example.android.settingstest"; ... } - Add the following to the
onCreate()method of SettingsFragment to get the preference defined by the keyexample_switch, and to set the initial text (the string resourceoption_on) for the summary:@Override public void onCreate(Bundle savedInstanceState) { ... mPreferences = this.getActivity() .getSharedPreferences(sharedPrefFile, MODE_PRIVATE); Preference preference = this.findPreference("example_switch"); preference.setSummary(mPreferences.getString("summary", getString(R.string.option_on))); ... } Add the following code to
onCreate()after the code in the previous step:... preference.setOnPreferenceChangeListener(new Preference.OnPreferenceChangeListener() { @Override public boolean onPreferenceChange(Preference preference, Object newValue) { if ((Boolean) newValue == true) { preference.setSummary(R.string.option_on); SharedPreferences.Editor preferencesEditor = mPreferences.edit(); preferencesEditor.putString("summary", getString(R.string.option_on)).apply(); } else { preference.setSummary(R.string.option_off); SharedPreferences.Editor preferencesEditor = mPreferences.edit(); preferencesEditor.putString("summary", getString(R.string.option_off)).apply(); } return true; } }); ...The code does the following:
Listens to a change in the switch setting using onPreferenceChange(), and returns
true:@Override public boolean onPreferenceChange(Preference preference, Object newValue) { ... return true; }Determines the new boolean value (
newValue) for the setting after the change (trueorfalse):if ((Boolean) newValue == true) { ... } else { ... }Edits the Shared Preferences file (as described in a previous practical) using SharedPreferences.Editor:
...
preference.setSummary(R.string.option_on);
SharedPreferences.Editor preferencesEditor =
                                  mPreferences.edit();
...
Puts the new value as a string in the summary using putString() and applies the change using apply():
...
preferencesEditor.putString("summary",
                   getString(R.string.option_on)).apply();
...
Using the Settings Activity template
If you need to build several sub-screens of settings and you want to take advantage of tablet-sized screens as well as maintain compatibility with older versions of Android for tablets, Android Studio provides a shortcut: the Settings Activity template.
The Settings Activity template is pre-populated with settings you can customize for an app, and provides a different layout for smartphones and tablets:
Smartphones: A main Settings screen with a header link for each group of settings, such as General for general settings, as shown below.
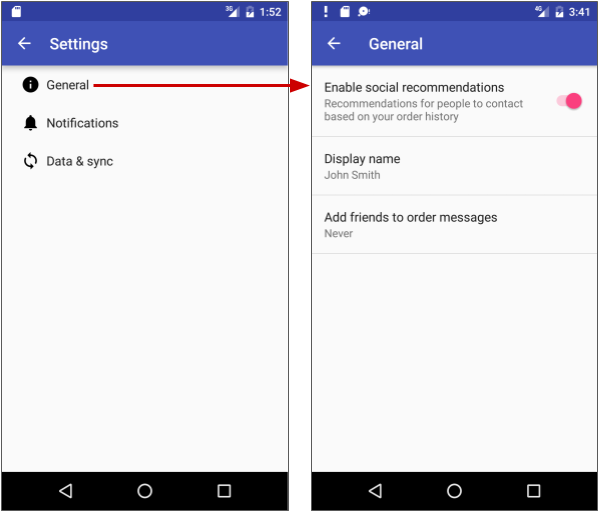
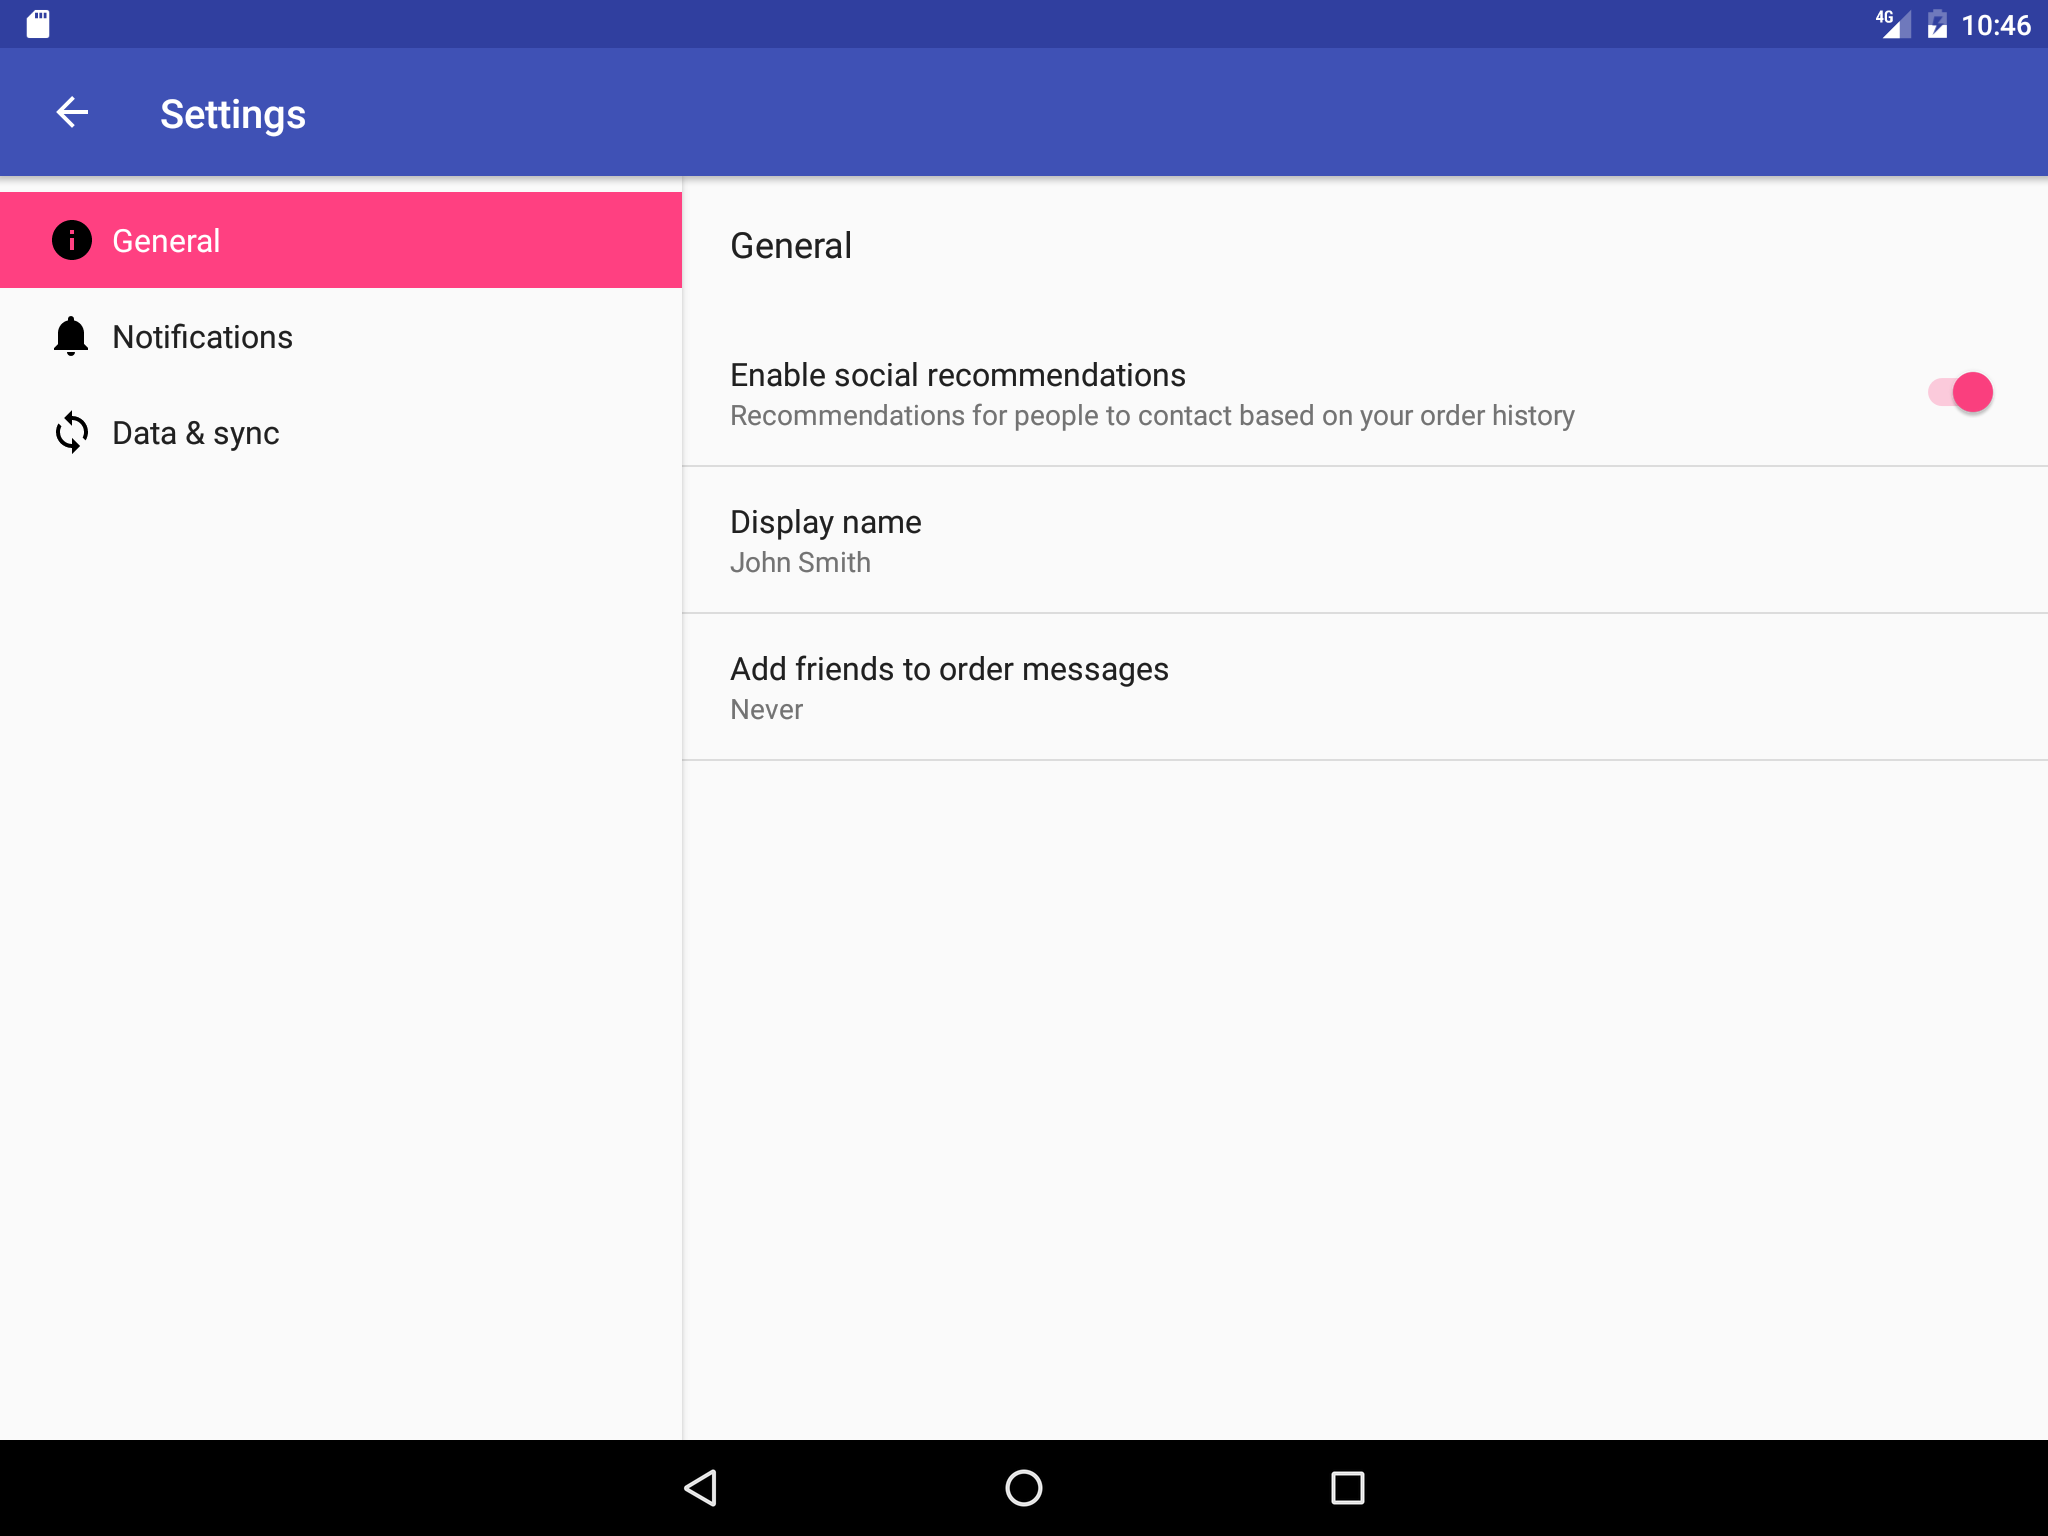
Tablets: A master/detail screen layout with a header link for each group on the left (master) side, and the group of settings on the right (detail) side, as shown in the figure below.
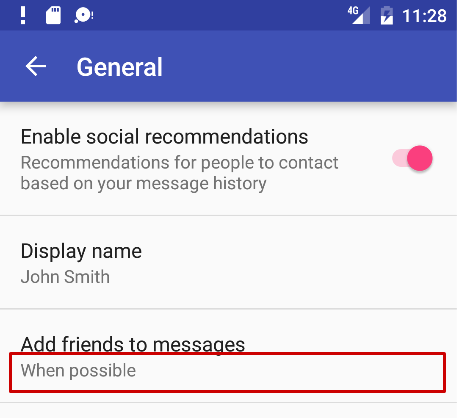
The Settings Activity template also provides the function of listening to a settings change, and changing the summary to reflect the settings change. For example, if you change the "Add friends to messages" setting (the choices are Always, When possible, or Never), the choice you make appears in the summary underneath the setting:
In general, you need not change the Settings Activity template code in order to customize the activity for the settings you want in your app. You can customize the settings titles, summaries, possible values, and default values without changing the template code, and even add more settings to the groups that are provided. To customize the settings, edit the string and string array resources in the strings.xml file and the layout attributes for each setting in the files in the xml directory.
You use the Settings Activity template code as-is. To make it work for your app, add code to the Main Activity to set the default settings values, and to read and use the settings values, as shown later in this chapter.
Including the Settings Activity template in your project
To include the Settings Activity template in your app project in Android Studio, follow these steps:
- Choose New > Activity > Settings Activity.
- In the dialog that appears, accept the Activity Name (SettingsActivity is the suggested name) and the Title (Settings).
- Click the three dots at the end of the Hierarchical Parent field and choose the parent activity (usually MainActivity), so that Up navigation in the Settings Activity returns the user to the MainActivity. Choosing the parent activity automatically updates the AndroidManifest.xml file to support Up navigation.
The Settings Activity template creates the XML files in the res > xml directory, which you can add to or customize for the settings you want:
- pref_data_sync.xml: PreferenceScreen layout for "Data & Sync" settings.
- pref_general.xml: PreferenceScreen layout for "General" settings.
- pref_headers.xml: Layout of headers for the Settings main screen.
pref_notification.xml: PreferenceScreen layout for "Notifications" settings.
The above XML layouts use various subclasses of the Preference class rather than View objects, and direct subclasses provide containers for layouts involving multiple settings. For example, PreferenceScreen represents a top-level Preference that is the root of a Preference hierarchy. The above files use PreferenceScreen at the top of each screen of settings. Other Preference subclasses for settings provide the appropriate UI for users to change the setting. For example:
- CheckBoxPreference: A checkbox for a setting that is either enabled or disabled.
- ListPreference: A dialog with a list of radio buttons.
- SwitchPreference: A two-state toggleable option (such as on/off or true/false).
- EditTextPreference: A dialog with an EditText widget.
- RingtonePreference: A dialog with ringtones on the device.
The Settings Activity template also provides the following:
String resources in the strings.xml file in the res > values directory, which you can customize for the settings you want.
All strings used in the Settings Activity, such as the titles for settings, string arrays for lists, and descriptions for settings, are defined as string resources at the end of this file. They are marked by comments such as
<!-- Strings related to Settings -->and<!-- Example General settings -->.Tip: You can edit these strings to customize the settings you need for your app.
SettingsActivity in the java > com.example.android.projectname directory, which you can use as is.
The activity that displays the settings.
SettingsActivityextendsAppCompatPreferenceActivityfor maintaining compatibility with older versions of Android.AppCompatPreferenceActivity in the java > com.example.android.projectname directory, which you use as is.
This activity is a helper class that SettingsActivity uses to maintain backwards compatibility with previous versions of Android.
Using preference headers
The Settings Activity template shows preference headers on the main screen that separate the settings into categories (General, Notifications, and Data & sync). The user taps a heading to access the settings under that heading. On larger tablet displays (see previous figure), the headers appear in the left pane and the settings for each header appears in the right pane.
To implement the headers, the template provides the pref_headers.xml file:
<preference-headers xmlns:android="http://schemas.android.com/apk/res/android">
   <header
      android:fragment=
           "com.example.android.droidcafe.SettingsActivity$GeneralPreferenceFragment"
      android:icon="@drawable/ic_info_black_24dp"
      android:title="@string/pref_header_general" />

   <header
      android:fragment=
      "com.example.android.droidcafe.SettingsActivity$NotificationPreferenceFragment"
      android:icon="@drawable/ic_notifications_black_24dp"
      android:title="@string/pref_header_notifications" />

   <header
      android:fragment=
          "com.example.android.droidcafe.SettingsActivity$DataSyncPreferenceFragment"
      android:icon="@drawable/ic_sync_black_24dp"
      android:title="@string/pref_header_data_sync" />
</preference-headers>
The XML headers file lists each preferences category and declares the fragment that contains the corresponding preferences.
To display the headers, the template uses the following onBuildHeaders() method:
@Override
@TargetApi(Build.VERSION_CODES.HONEYCOMB)
public void onBuildHeaders(List<Header> target) {
        loadHeadersFromResource(R.xml.pref_headers, target);
}
The above code snippet uses the loadHeadersFromResource() method of the PreferenceActivity class to load the headers from the XML resource (pref_headers.xml). The TargetApi annotation tells Android Studio's Lint code scanning tool that the class or method is targeting a particular API level regardless of what is specified as the min SDK level in manifest. Lint would otherwise produce errors and warnings when using new functionality that is not available in the target API level.
Using PreferenceActivity with fragments
The Settings Activity template provides an activity (SettingsActivity) that extends PreferenceActivity to create a two-pane layout to support large screens, and also includes fragments within the activity to display lists of settings. This is a useful pattern if you have multiple groups of settings and need to support tablet-sized screens as well as smartphones.
The following shows how to use an activity that extends PreferenceActivity to host one or more fragments (PreferenceFragment) that display app settings. The activity can host multiple fragments, such as GeneralPreferenceFragment and NotificationPreferenceFragment, and each fragment definition uses addPreferencesFromResource to load the settings from the XML preferences file:
public class SettingsActivity extends AppCompatPreferenceActivity {
   ...
   public static class GeneralPreferenceFragment extends
                                              PreferenceFragment {
   @Override
   public void onCreate(Bundle savedInstanceState) {
            super.onCreate(savedInstanceState);
            addPreferencesFromResource(R.xml.pref_general);

   ...
   }
   public static class NotificationPreferenceFragment extends
                                              PreferenceFragment {
   ...
}
Related practical
The related exercises and practical documentation is in Android Developer Fundamentals: Practicals.
Learn more
- Android Studio documentation:
- Android API Guide, "Develop" section:
- Material Design Specification:
- Settings (design)
