13.1: Permissions, Performance and Security
Contents:
You've now learned the fundamental core skills you need to build Android applications. This lesson discusses best practices as they relate to permissions, performance and security. This lesson does not have a corresponding practical.
Permissions
As you have worked through the practicals, there were times when your app needed to get permission to do something, including when it needed to:
- connect to the Internet.
- use a content provider in another app.
This section gives a brief overview of permissions so that you understand how and when your app needs to ask for permission before it can perform and action.
Ask permission if it isn't yours
An app is free to use any resources or data that it creates, but must get permission to use anything—data, resources, hardware, software—that does not belong to it. For example, your app must get permission to read the user's Contacts data, or to use the device's camera. It makes sense that an app needs permission to read a user's Contacts, but you might wonder why it needs permission to use the camera. It is because the camera hardware does not belong to the app, and your app must always get permission to use anything that is not part of the app itself.
Requesting permission
To request permission, add the <uses-permission> attribute to the Android manifest file, along with the name of the requested permission. For example, to get permission to use the camera:
<uses-permission android:name="android.permission.CAMERA"/>
Examples of permissions
The Android framework provides more than 100 predefined permissions. These include some obvious things including permission to access or write the user's personal data such as:
- reading and writing a user's Contacts list, calendar, or voicemail
- accessing the device's location
- accessing data from body sensors
Some of the other pre-defined permissions are less obvious, such as permission to collect battery statistics, permission to connect to the internet, and permission to use hardware such as the camera or fingerprint hardware.
Android includes pre-defined permissions for initiating a phone call without requiring the user to confirm it, reading the call log, capturing video output, rebooting the device, changing the date and time zone, and many more.
You can see all the system-defined permissions at https://developer.android.com/reference/android/Manifest.permission.html.
Normal and dangerous permissions
Android classifies permissions as normal or dangerous.
A normal permission is for actions that do not affect user privacy or user data, such as connecting to the Internet.
A dangerous permission is for an action that does affect user privacy or user data, such as permission to write to the user's voicemail.
Android automatically grants normal permissions but asks the user to explicitly grant dangerous permissions.
How users grant and revoke permissions
The way users grant and revoke permissions depends on:
- the version of Android that the device is running.
- the version of Android that the app was created for.
Before Marshmallow (Android 6.0)
If an app was created for a version of Android before 6.0 (Marshmallow) or it is running on a device that uses a version of Android before Marshmallow, Google Play asks the user to grant required dangerous permissions before installing the app.
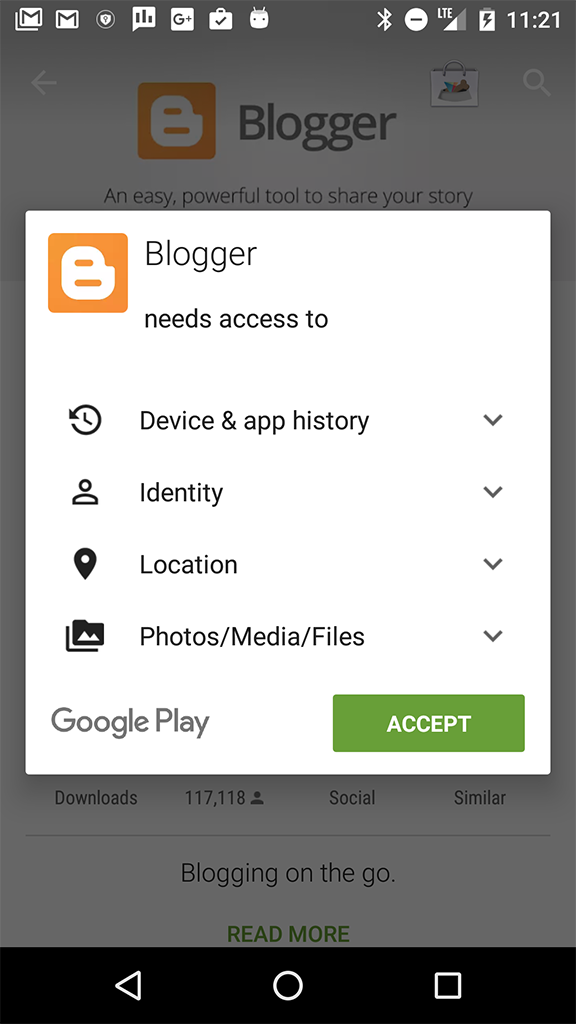
If the user changes their mind and wants to deny permissions to the app after it is installed, the only thing they can do is to uninstall the app.
Marshmallow onwards
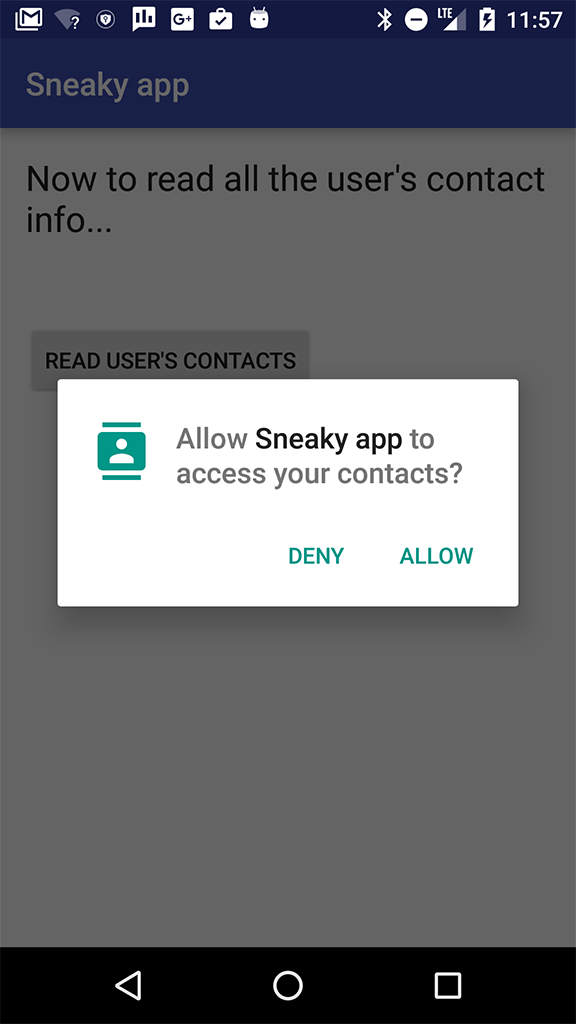
If an app was created for a version of Android from Android 6.0 (Marshmallow) onwards and it is running on a device that uses a version of Android from Marshmallow onwards, then Google Play does not ask the user to grant dangerous permissions to the app before installing it. Instead, when the user starts to do something in the app that needs that level of permission, Android shows a dialog box asking the user to grant permission.
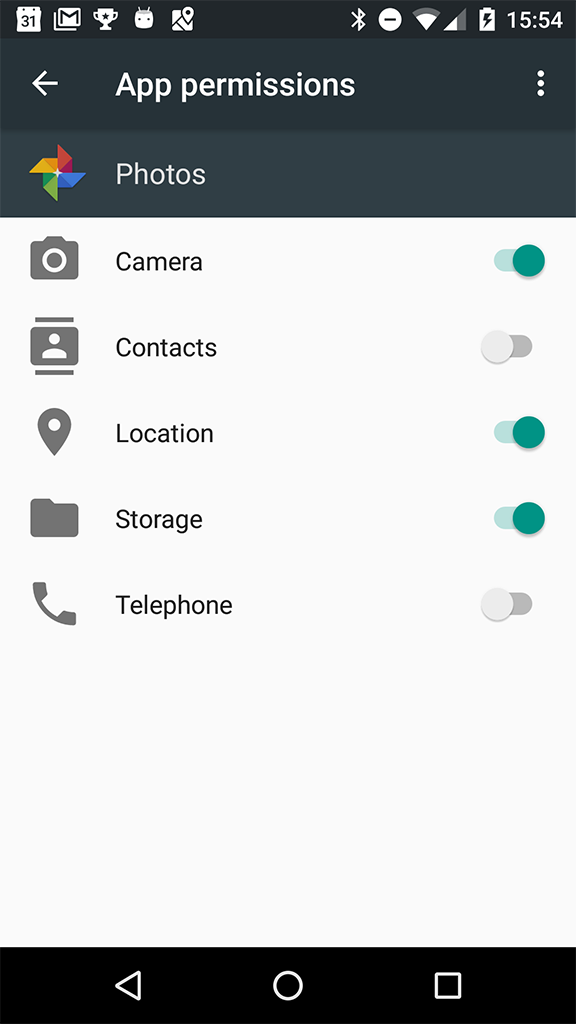
The user can grant or revoke individual permissions at any time. They do this by going to the Settings App, choosing Apps, and selecting the relevant app. In the Permissions section, they can enable or disable any of the permissions that the app uses.
How differences in the permissions models affect developers
In the "old" permissions model, Google Play and the Android Framework worked together to get permission from the user. All that the developer needed to do was to make sure that the app listed the permissions it needed in the Android manifest file. The developer could assume that if the app was running, then the user had granted permission. The developer did not need to write code to check if permission had been granted or not.
In the "new" permissions model, you can no longer assume that if the app is running, then the user has granted the needed permissions. The user could grant permission the first time they run the app, then, at any time, change their mind and revoke any or all of the permissions that the app needs.
So, the app must check whether it still has permission every time it does something that requires permission. The Android SDK includes APIs for checking if permission has been granted. Here is a code snippet that checks if the app has permission to write to the user's calendar:
// Assume thisActivity is the current activity
int permissionCheck = ContextCompat.checkSelfPermission(thisActivity,
   Manifest.permission.WRITE_CALENDAR);
The Android framework for Android 6.0 (API level 23) includes methods for checking for and requesting permissions. The Support Library also includes methods for checking for and requesting permission.
We recommend that you use the support library methods for handling permissions, because the permission methods in the support library take care of checking which version of Android your app is running on, and taking the appropriate action. For example, if the user's device is running an older version, then the checkSelfPermission() method in the support library checks if the user already granted permission at runtime, but if the device is running Marshmallow or later, then it checks if permission is still granted, and if not, shows the dialog to the user to ask for permission.
This lesson does not go into detail on how to use the APIs for handling permissions. See Requesting Permission at Runtime for details.
Best practices for permissions
When an app asks for too many permissions, users get suspicious. Make sure your app only requests permission for features and tasks it really needs, and make sure the user understands why they are needed.
Wherever possible, use an Intent instead of asking for permission to do it yourself. For example, if your app needs to use the camera, send an Intent to the camera app, and that way the camera app will do all your work for you and your app does not need to get permission to use the camera (and it will be much easier for you to write the code than if you accessed the camera APIs directly).
Learn more about Permissions in Android
Performance
You have made your app as useful, interesting, and beautiful as possible. However, to make it stand out from the crowd, you should also make it as small, fast, and efficient as possible. Consider the impact your app might have on the device's battery, memory, and disc space. And most of all, be considerate of users' data-plans. The following recommendations are only the tip of the iceberg where performance is concerned, but they give you an idea on where to start.
Keep long-running tasks off the main thread
This course has already talked about moving work off the main thread into the background to help keep the UI smooth and responsive for the user. The hardware that renders the display to the screen typically updates the screen every 16 milliseconds, so if the main thread is doing work that takes longer than 16 milliseconds, the app might skip frames, stutter or hang, all of which are likely to annoy your users.
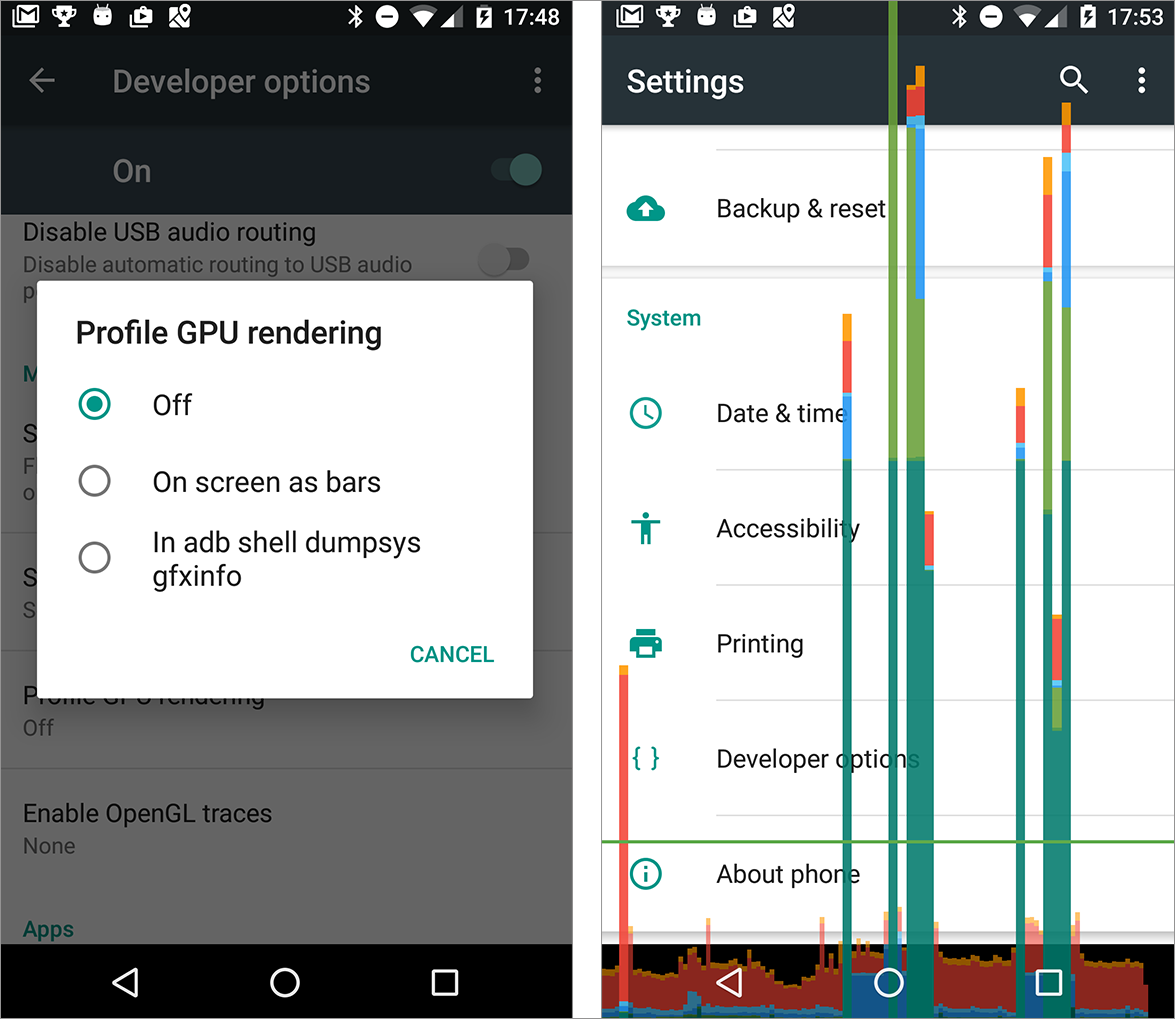
You can check how well your app does at rendering screens within the 16 millisecond limit by using the Profile GPU Rendering tool on your Android device.
- Go to Settings > Developer options.
- Scroll down to the Monitoring section.
- Select Profile GPU rendering.
- Choose On screen as bars in the dialog box.
Immediately you will start seeing colored bars on your screen.
Open your own app, and watch the colored bars.
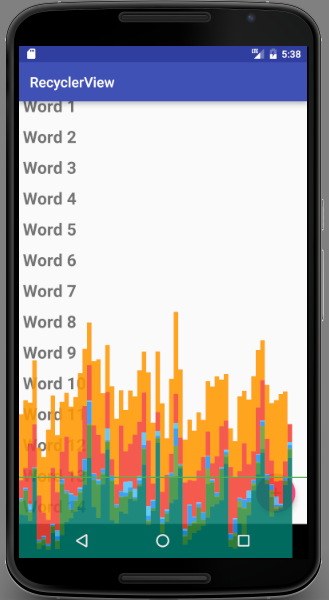
One bar represents one screen rendered. If a bar goes above the green line, it took more than 16 ms to render. The colors in the bar represent the different stages in rendering the screen.

Read about how to interpret the results and what the different stages mean at Analyzing with Profile GPU Rendering. If you spend time using the Profile GPU rendering tool on your app, it will help you identify which parts of the UI interaction are slower than might be expected, and then you can take action to improve the speed of your app's UI.
For example, if the green Input portion of the bar is large, your app spends a lot of time handling input events, that is, executing code called as a result of input event callbacks. To fix this, consider when and how you request user input, and whether you can handle it more efficiently.
Simplify your UI
This course has talked about how to make your apps interesting and visually compelling using material design guidelines, and it's taught you how to use the Layout Editor to create your layouts. You've learned that you can create nested hierarchies of layouts. You've learned how to use drawables as background elements for your views. These elements allow you to create complex nested layouts with diverse backgrounds and views overlapping each other throughout your app.
However, your layouts will draw faster and use less power and battery if you spend time designing them in the most efficient way.
Try to avoid:
- Deeply nested layouts—If your layouts are narrow and deep, the Android system has to perform more passes to lay out all the views than if your view hierarchy is wide and shallow. Consider how you can combine, flatten, or even eliminate views.
- Overlapping views—this results in "overdraw" where the app wastes time drawing the same pixel multiple times, and only the final rendition is visible to the user. Consider how you can size and organize your views so that every pixel is only drawn once or twice.
Simplify layouts
Make sure your layouts include only the views and functionality your app needs. Simple layouts are generally more visually appealing to users, and they draw faster, giving you a double win.
Flatten your layouts as much possible, which means reducing the number of nested levels in your app's view hierarchy. For example, if your layout contains a LinearLayout inside a LinearLayout inside a LinearLayout, you may be able to arrange all the views inside a single ConstraintLayout.
See the guide Optimizing your UI for more information on improving the performance of your app's UI.
Minimize overlapping views
Imagine that you are painting the door of your house in red. They you paint it again in green. Then you paint it again in blue. In the end, the only color you see is blue, but you wasted a lot of energy painting the door multiple times.
Each layout in your app is like the door. Every time your app "paints" (draws) a pixel, it takes time. If your layout has overlapping views, then your app is using time and resources drawing pixels that it then draws over again. Try to reduce the amount of times your app overdraws pixels, by reducing overlapping views. Be careful about using drawable backgrounds on overlapping views and only use them when they are visible.
See the guide Reducing Overdraw for more information.
Monitor the performance of your running app
Android Studio has tools to measure your app's memory usage, GPU, CPU, and Network performance. App crashes are often related to memory leaks, which is when your app allocates memory and does not release it. If your app leaks memory, or uses more memory than the devices makes available, it will eventually use up all the available memory on the device. Use the Memory Monitor tool that comes with Android Studio to observe how your app uses memory.
- In Android Studio, at the bottom of the window, click the Android Monitor tab. By default this opens on logcat.
- Click the Monitors tab next to logcat. Scroll or make the window larger to see all four monitors: Memory, CPU, Networking, and GPU.
- Run your app and interact with it. The monitors update to reflect the app's use of resources. Note that to get accurate data, you should do this on a physical, not virtual, device.
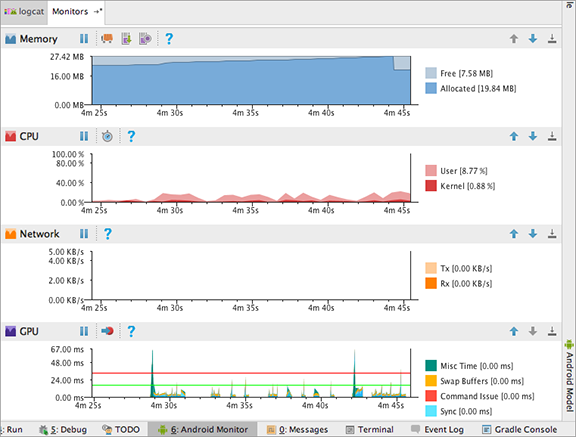
The monitors are:
- Memory monitor—Reports how your app allocates memory and helps you to visualize the memory your app uses.
- CPU monitor—Lets you monitor the central processing unit (CPU) usage of your app. It displays CPU usage in real time.
- GPU monitor—Gives a visual representation of how long the graphical processing unit (GPU) takes to render frames to the screen.
- Network Monitor—Shows when your application is making network requests. It lets you see how and when your app transfers data, and optimize the underlying code appropriately.
Read the Android Monitor page to learn more about using the monitors.
Learn more about improving your app's performance
Overdraw:
Tools:
Security best practices
Much of the burden of building secure apps is handled for you by the Android Framework. For example, apps are isolated from each other so they can't access each other or use each other's data without permission.
However, as an app developer, you have the responsibility to make sure your app treats the user's data safely and with integrity. Your app is also responsible for keeping its own data safe.
Handling user data
This lesson has already discussed how Android uses permissions to make sure apps cannot access the user's personal data without their permission. But even if the user gives your app permission to access their private data, do not do so unless absolutely necessary. And if you do, treat the data with integrity and respect. For example, just because the user gives your app permission to update their calendar does not mean you have permission to delete all their calendar entries.
Android apps operate on a foundation of implied trust. The users trust that the apps will use their data in a way that makes sense within the context of the app.
If your app is a messaging app, it's likely that the user will grant it permission to read their contacts. That does not mean your app is allowed to read all the user's contacts and send everyone a spam message.
Your app must only read and write the user's data when absolutely necessary, and only in a way that the user would expect the app to do so. Once your app has read any private data, you must keep it safe and prevent any leakage. Do not share private data with other apps.
Depending on how your app uses user data, you might also need to provide a written statement regarding privacy practices when you publish your app in the Google Play store.
Be aware that any data that the user acquires, downloads, or buys in your app belongs to them, and your app must store it in a way that the user still has access to it even if they uninstall your app.
Public Wi-Fi
Many people use mobile apps over public Wi-Fi. When did you last access the Internet from your mobile phone over the public Wi-Fi at a coffee shop, an airport, or a railway station?
Design your app to protect your user's data when they are connected on public Wi-Fi. Use https rather than http whenever possible to connect to websites. Encrypt any user data that gets transmitted, even data that might seem innocent like their name.
For transmitting sensitive data, implement authenticated, encrypted socket-level communication using the SSLSocket class. This class adds a layer of security protections over the underlying network transport protocol. Those protections include protection against modifications of messages by a wiretapper, enhanced authentication with the server, and increased privacy protection.
Validating user input
If your app accepts input (and almost every app does!) you need to make sure that the input does not bring anything harmful in with it.
If your app uses native code, reads data from files, receives data over the network, or receives data from any external source, it has the potential to introduce a security issue. The most common problems are buffer overflows, dangling pointers, and off-by-one errors. Android provides a number of technologies that reduce the exploitability of these errors, but they do not solve the underlying problem. You can prevent these vulnerabilities by carefully handling pointers and managing buffers.
If your app allows users to enter queries that are submitted to an SQL database or a content provider, you must guard against SQL injection. This is a technique where malicious users can inject SQL commands into a SQL statement by entering data in a field. Injected SQL commands can alter SQL statement and compromise the security of the application and the database.
Read about using parameterized queries to defend against SQL injections in the content providers section of the Security Tips guide.
Another thing you can do to limit the risk of SQL injection is to use or grant either the READ_ONLY or WRITE_ONLY permission for content providers.
WebViews
One of the View classes in Android is WebView, which displays a web page.
This course has not discussed WebView, but you might have found it and tried it out for yourself. We are mentioning it here because even though it is very cool to quickly display a web page in your app, WebView does come with security concerns.
Because WebView consumes web content that can include HTML and JavaScript, it can introduce common web security issues such as cross-site-scripting (JavaScript injection).
By default, a WebView provides no browser-like widgets, does not enable JavaScript, and ignores web page errors. If your goal is only to display some HTML as a part of your UI, this is acceptable as the user won't need to interact with the web page beyond reading it, and the web page won't need to interact with the user. If you want a fully functional web browser, invoke the Browser application with a URL Intent rather than showing the page with a WebView. This is also a more secure option than extending the WebView class and enabling features such JavaScript.
Security, like performance, is a large topic that cannot be covered in a few paragraphs. It is your responsibility to treat user data with care and keep it safe at all times. Use the resources below to learn as much as you can about treating your users and their data with the highest regard.
