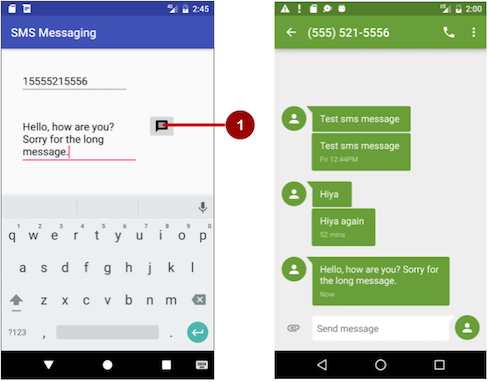
2.1 - Part 1: Sending and Receiving SMS Messages
Contents:
- What you should already KNOW
- What you will LEARN
- What you will DO
- App overview
- Task 1: Launch a messaging app to send a message
- Task 2: Send an SMS message from within an app
Android smartphones can send and receive messages to or from any other phone that supports Short Message Service (SMS). You have two choices for sending SMS messages:
- Use an implicit Intent to launch a messaging app with the ACTION_SENDTO intent action.
- This is the simplest choice for sending messages. The user can add a picture or other attachment in the messaging app, if the messaging app supports adding attachments.
- Your app doesn't need code to request permission from the user.
- If the user has multiple SMS messaging apps installed on the Android phone, the App chooser will appear with a list of these apps, and the user can choose which one to use. (Android smartphones will have at least one, such as Messenger.)
- The user can change the message in the messaging app before sending it.
- The user navigates back to your app using the Back button.
- Send the SMS message using the sendTextMessage() method or other methods of the SmsManager class.
- This is a good choice for sending messages from your app without having to use another installed app.
- Your app must ask the user for permission before sending the SMS message, if the user hasn't already granted permission.
- The user stays in your app during and after sending the message.
- You can manage SMS operations such as dividing a message into fragments, sending a multipart message, get carrier-dependent configuration values, and so on.
To receive SMS messages, use the onReceive() method of the BroadcastReceiver class.
What you should already KNOW
You should already be able to:
- Create an onClick method for a button with the
android:onClickattribute. - Use an implicit intent to perform a function with another app.
- Use a broadcast receiver to receive system events.
What you will LEARN
In this practical, you will learn to:
- Launch an SMS messaging app from your app with a phone number and message.
- Send an SMS message from within an app.
- Check for the SMS permission, and request permission if necessary.
- Receive SMS events using a broadcast receiver.
- Extract an SMS message from an SMS event.
What you will DO
In this practical, you will:
- Create an app that uses an implicit intent to launch a messaging app.
- Pass data (the phone number) and the message with the implicit intent.
- Create an app that sends SMS messages using the SmsManager class.
- Check for the SMS permission, which can change at any time.
- Request permission from the user, if necessary, to send SMS messages.
- Receive and process an SMS message.
App overview
You will create two new apps based on apps you created previously for the lesson about making phone calls:
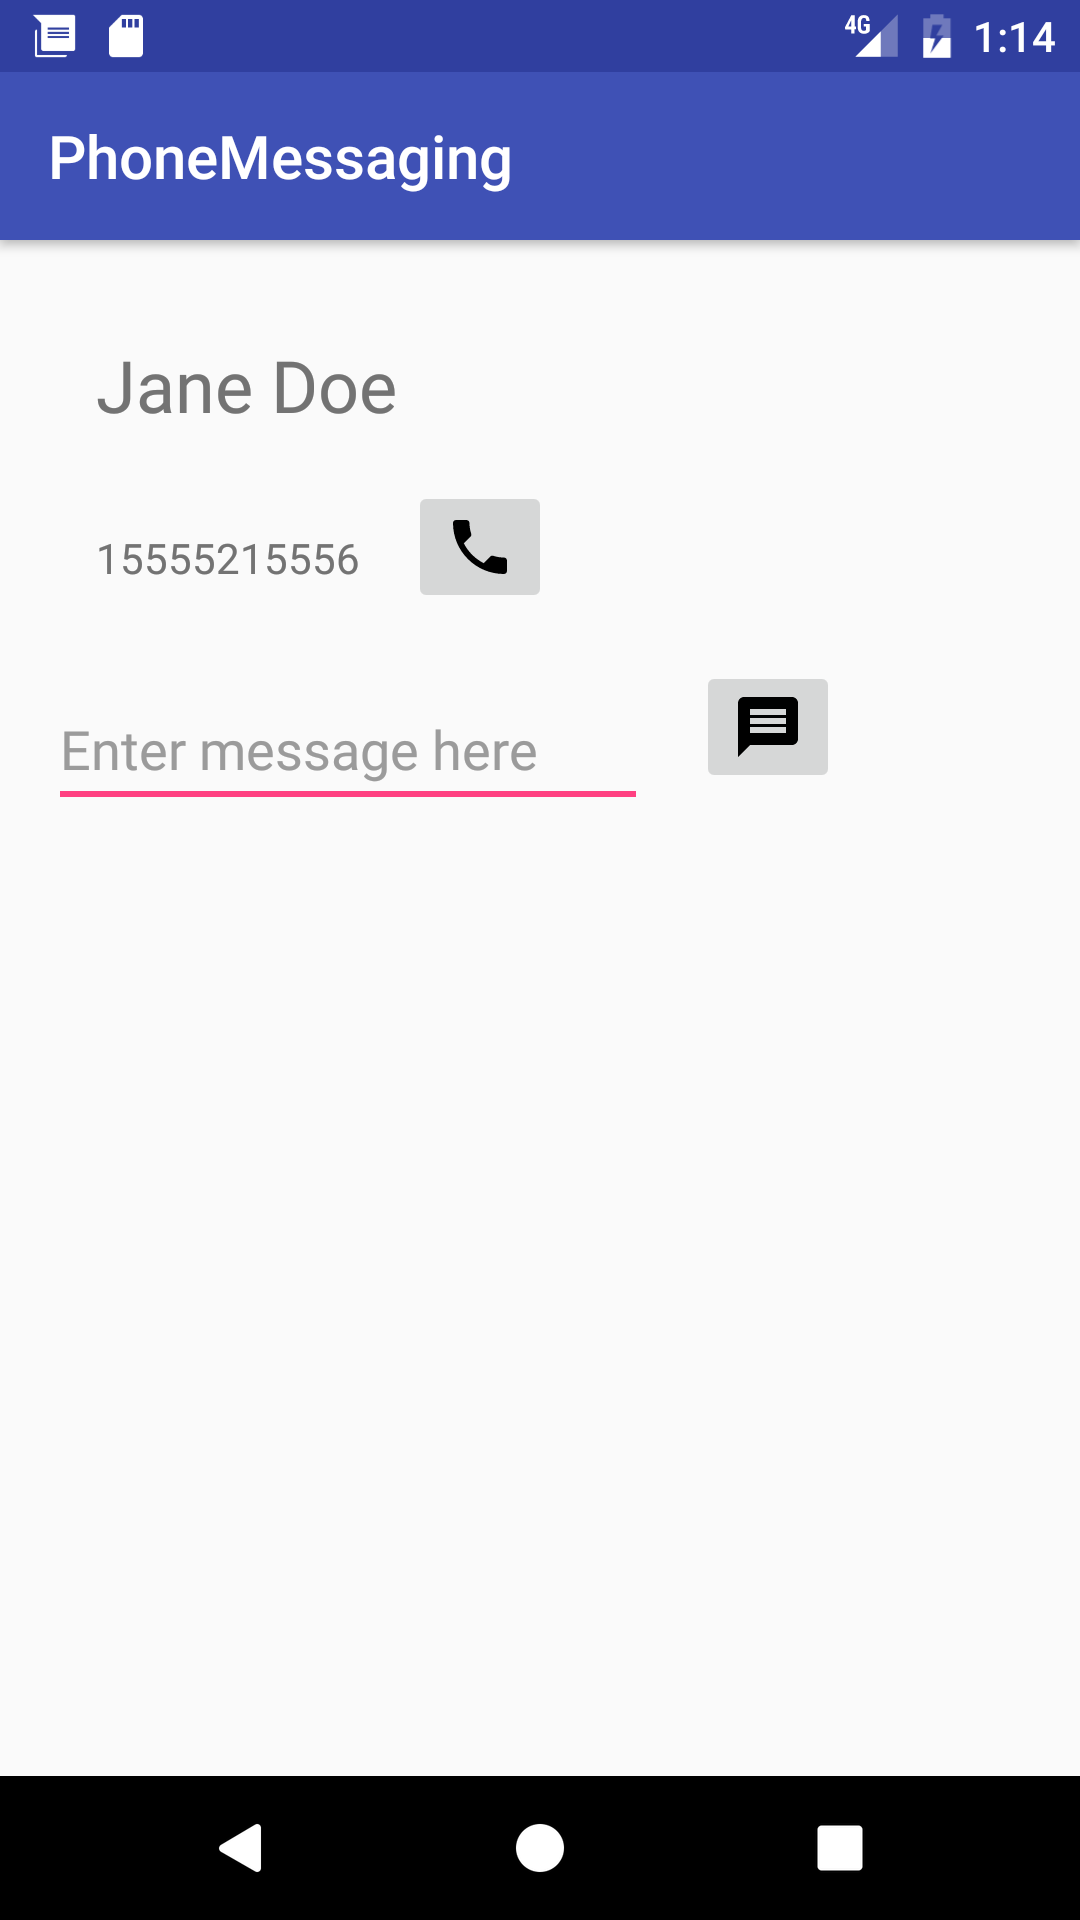
PhoneMessaging: Rename and refactor the PhoneCallDial app from the previous chapter, and add code to enable a user to not only dial a hard-coded phone number but also send an SMS message to the phone number. It uses an implicit intent using
ACTION_SENDTOand the phone number to launch a messaging app to send the message.As shown in the figure below, the PhoneCallDial app already has TextEdit views for the contact name and the hard-coded phone number, and an ImageButton for making a phone call. You will copy the app, rename it to PhoneMessaging, and modify the layout to include an EditText for entering the message, and another ImageButton with an icon that the user can tap to send the message.
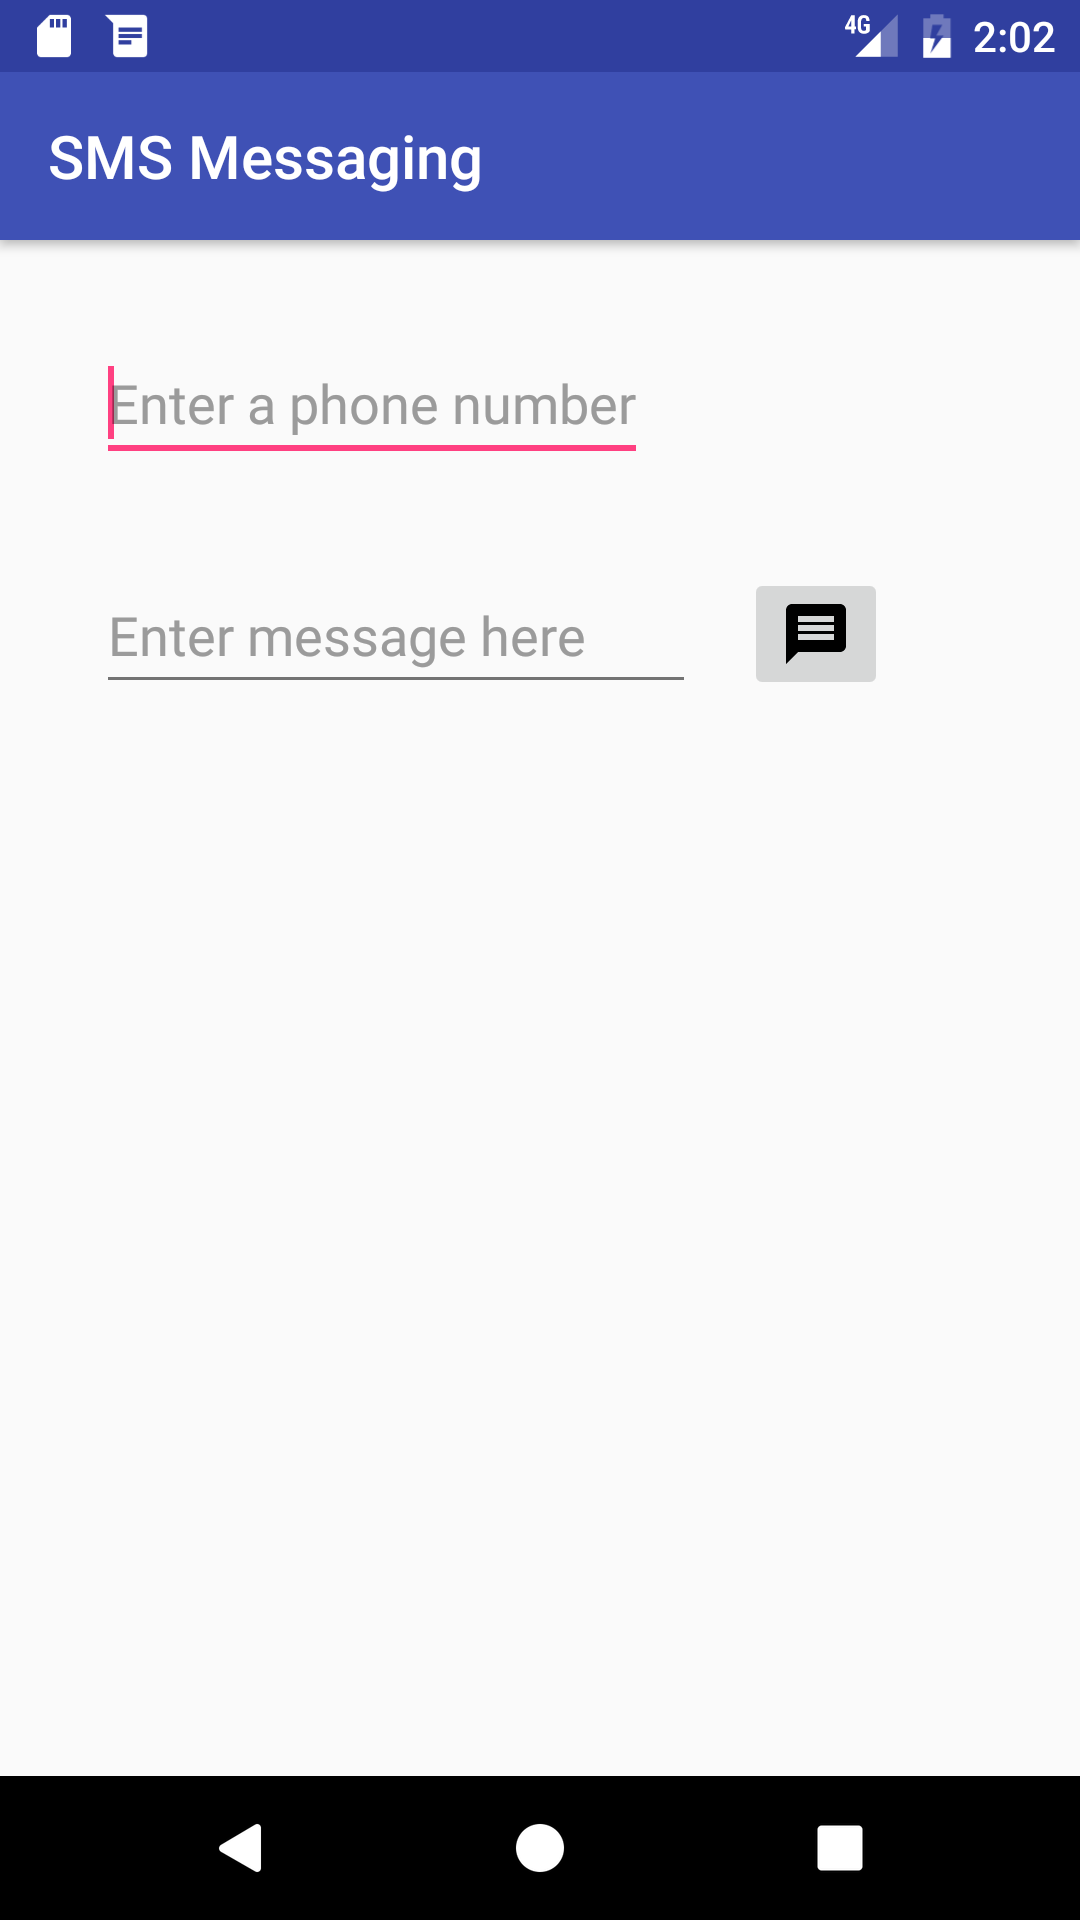
SMS Messaging: Change the PhoneCallingSample app from the previous chapter to enable a user to enter a phone number, enter an SMS message, and send the message from within the app. It checks for permission and then uses the SmsManager class to send the message.
As shown in the figure below, the PhoneCallingSample app already has an EditText view for entering the phone number and an ImageButton for making a phone call. You will copy the app, rename it to SmsMessaging, and modify the layout to include another EditText for entering the message, and change the ImageButton to an icon that the user can tap to send the message.
Task 1. Launch a messaging app to send a message
In this task you create an app called PhoneMessaging, a new version of the PhoneCallDial app from a previous lesson. The new app launches a messaging app with an implicit intent, and passes a fixed phone number and a message entered by the user.
The user can tap the messaging icon in your app to send the message. In the messaging app launched by the intent, the user can tap to send the message, or change the message or the phone number before sending the message. After sending the message, the user can navigate back to your app using the Back button.
1.1 Modify the app and layout
- Copy the PhoneCallDial project folder, rename it to PhoneMessaging, and refactor it to populate the new name throughout the app project. (See the Appendix for instructions on copying a project.)
Add an icon for the messaging button by following these steps:
Select drawable in the Project: Android view and choose File > New > Vector Asset.
Click the Android icon next to "Icon:" to choose an icon. To find a messaging icon, choose Communication in the left column.
Select the icon, click OK, click Next, and then click Finish.
Add the following EditText to the existing layout after the
phone_iconImageButton:... <ImageButton android:id="@+id/phone_icon" ... /> <EditText android:id="@+id/sms_message" android:layout_width="200dp" android:layout_height="wrap_content" android:layout_below="@id/number_to_call" android:layout_marginTop="@dimen/activity_vertical_margin" android:layout_marginRight="@dimen/activity_horizontal_margin" android:hint="Enter message here" android:inputType="textMultiLine"/>You will use the
android:idsms_messageto retrieve the message in your code. You can use@dimen/activity_horizontal_marginand@dimen/activity_vertical_marginfor the EditText margins because they are already defined in the dimens.xml file. The EditText view uses theandroid:inputTypeattribute set to"textMultiLine"for entering multiple lines of text.- After adding hard-coded strings and dimensions, extract them into resources:
android:layout_width="@dimen/edittext_width": The width of the EditText message (200dp).android:hint="@string/enter_message_here": The hint for the EditText ("Enter message here").
Add the following ImageButton to the layout after the above EditText:
<ImageButton
    android:id="@+id/message_icon"
    android:contentDescription="Send a message"
    android:layout_width="wrap_content"
    android:layout_height="wrap_content"
    android:layout_marginTop="@dimen/activity_vertical_margin"
    android:layout_toRightOf="@id/sms_message"
    android:layout_toEndOf="@id/sms_message"
    android:layout_below="@id/phone_icon"
    android:src="@drawable/ic_message_black_24dp"
    android:onClick="smsSendMessage"/>
You will use the
android:idmessage_iconto refer to the ImageButton for launching the messaging app. Use the vector asset you added previously (such asic_message_black_24dpfor a messaging icon) for the ImageButton.After adding the hard-coded string for the
android:contentDescriptionattribute, extract it into the resourcesend_a_message.The
smsSendMessage()method referred to in theandroid:onClickattribute remains highlighted until you create this method in the MainActivity, which you will do in the next step.Click
smsSendMessagein theandroid:onClickattribute, click the red light bulb that appears, and then select Create smsSendMessage(View) in 'MainActivity'. Android Studio automatically creates thesmsSendMessage()method in MainActivity aspublic, returningvoid, with aViewparameter. This method is called when the user taps themessage_iconImageButton.public void smsSendMessage(View view) { }
Your app's layout should now look like the following figure:

1.2 Edit the onClick method in MainActivity
- Inside the
smsSendMessage()method in MainActivity, get the phone number from thenumber_to_callTextView, and concatenate it with thesmsto:prefix (as insmsto:14155551212) to create the phone number URI stringsmsNumber:... TextView textView = (TextView) findViewById(R.id.number_to_call); // Use format with "smsto:" and phone number to create smsNumber. String smsNumber = String.format("smsto: %s", textView.getText().toString()); ... - Get the string of the message entered into the EditText view:
...
// Find the sms_message view.
EditText smsEditText = (EditText) findViewById(R.id.sms_message);
// Get the text of the SMS message.
String sms = smsEditText.getText().toString();
...
Create an implicit intent (
smsIntent) with the intent actionACTION_SENDTO, and set the phone number and text message as intent data and extended data, usingsetData()andputExtra:... // Create the intent. Intent smsIntent = new Intent(Intent.ACTION_SENDTO); // Set the data for the intent as the phone number. smsIntent.setData(Uri.parse(smsNumber)); // Add the message (sms) with the key ("sms_body"). smsIntent.putExtra("sms_body", sms); ...The putExtra() method needs two strings: the key identifying the type of data (
"sms_body") and the data itself, which is the text of the message (sms). For more information about common intents and theputExtra()method, see Common Intents: Text Messaging.Add a check to see if the implicit intent resolves to a package (a messaging app). If it does, send the intent with
startActivity(), and the system launches the app. If it does not, log an error.... // If package resolves (target app installed), send intent. if (smsIntent.resolveActivity(getPackageManager()) != null) { startActivity(smsIntent); } else { Log.e(TAG, "Can't resolve app for ACTION_SENDTO Intent"); } ...
The full method should now look like the following:
public void smsSendMessage(View view) {
    TextView textView = (TextView) findViewById(R.id.number_to_call);
    // Use format with "smsto:" and phone number to create smsNumber.
    String smsNumber = String.format("smsto: %s",
                                        textView.getText().toString());
    // Find the sms_message view.
    EditText smsEditText = (EditText) findViewById(R.id.sms_message);
    // Get the text of the sms message.
    String sms = smsEditText.getText().toString();
    // Create the intent.
    Intent smsIntent = new Intent(Intent.ACTION_SENDTO);
    // Set the data for the intent as the phone number.
    smsIntent.setData(Uri.parse(smsNumber));
    // Add the message (sms) with the key ("sms_body").
    smsIntent.putExtra("sms_body", sms);
    // If package resolves (target app installed), send intent.
    if (smsIntent.resolveActivity(getPackageManager()) != null) {
        startActivity(smsIntent);
    } else {
        Log.d(TAG, "Can't resolve app for ACTION_SENDTO Intent");
    }
}
1.3 Run the app
- Run the app on either an emulator or a device.
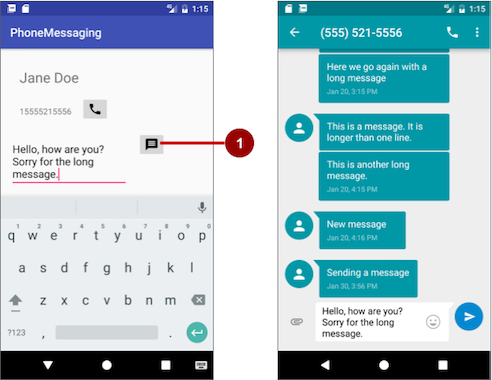
Enter a message, and tap the messaging icon (marked "1" in the left side of the figure below). The messaging app appears, as shown on the right side of the figure below.
- Use the Back button to return to the PhoneMessaging app. You may need to tap or click it more than once to leave the SMS messaging app.
Solution code
Android Studio project: PhoneMessaging
Task 2. Send an SMS message from within an app
In this task you will copy the PhoneCallingSample app from the lesson on making a phone call, rename and refactor it to SmsMessaging, and modify its layout and code to create an app that enables a user to enter a phone number, enter an SMS message, and send the message from within the app.
In the first step you will add the code to send the message, but the app will work only if you first turn on SMS permission manually for the app in Settings on your device or emulator.
In subsequent steps you will do away with setting this permission manually by requesting SMS permission from the app's user if it is not already set.
2.1 Create the app and layout and add permission
- Copy the PhoneCallingSample project folder, rename it to SmsMessaging, and refactor it to populate the new name throughout the app project. (See the Appendix for instructions on copying a project.)
- Open strings.xml and change the
app_namestring resource to"SMS Messaging". Add the
android.permission.SEND_SMSpermission to the AndroidManifest.xml file, and remove theCALL_PHONEandREAD_PHONE_STATEpermissions for phone use, so that you have only one permission:<uses-permission android:name="android.permission.SEND_SMS" />Sending an SMS message is permission-protected. Your app can't use SMS without the
SEND_SMSpermission line in AndroidManifest.xml. This permission line enables a setting for the app in the Settings app that gives the user the choice of allowing or disallowing use of SMS. (In the next task you will add a way for the user to grant that permission from within the app.)- Add a messaging icon as you did in the previous task, and remove the phone icon from the drawable folder.
- Open activity_main.xml and edit the EditText view and replace the
android:layout_marginattribute with the following:
You can use... android:layout_marginTop="@dimen/activity_vertical_margin" android:layout_marginRight="@dimen/activity_horizontal_margin" ...@dimen/activity_horizontal_marginand@dimen/activity_vertical_marginbecause they are already defined in the dimens.xml file. Add the following EditText to the layout after the first EditText (for an image of the layout, see the figure at the end of these steps):
...
<EditText
    android:id="@+id/sms_message"
    android:layout_width="@dimen/edittext_width"
    android:layout_height="wrap_content"
    android:layout_below="@id/editText_main"
    android:layout_margin="@dimen/activity_horizontal_margin"
    android:hint="Enter message here"
    android:inputType="textMultiLine"/>
You will use the
android:idattribute tosms_messageto identify it as the EditText for the message. The EditText view uses theandroid:inputTypeattribute set to"textMultiLine"for entering multiple lines of text.After adding the hard-coded string "Enter message here" for the
android:hintattribute, extract it into the text resource"enter_message_here".Change the
android:layout_belowattribute for thebutton_retryButton to refer to thesms_messageEditText view. The Button should appear below the SMS message in the layout if it becomes visible:android:layout_below="@id/sms_message"The
button_retryButton is set to invisible. It appears only if the app detected that telephony is not enabled, or if the user previously denied phone permission when the app requested it.Replace the
phone_iconImageButton from the existing layout with the following:<ImageButton android:id="@+id/message_icon" android:contentDescription="Send a message" android:layout_width="wrap_content" android:layout_height="wrap_content" android:layout_marginTop="@dimen/activity_vertical_margin" android:layout_toRightOf="@id/sms_message" android:layout_toEndOf="@id/sms_message" android:layout_below="@id/editText_main" android:src="@drawable/ic_message_black_24dp" android:visibility="visible" android:onClick="smsSendMessage"/>You will use the
android:idmessage_iconin your code to refer to the ImageButton for sending the message. Use the vector asset you added previously (such asic_message_black_24dpfor a messaging icon) for the ImageButton. Make sure you include theandroid:visibilityattribute set to"visible". You will control the visibility of this ImageButton from your code.After adding a hard-coded string for the
android:contentDescriptionattribute, extract it to thesend_a_messagestring resource.The
smsSendMessage()method referred to in theandroid:onClickattribute for the ImageButton remains highlighted until you create this method in the MainActivity, which you will do in the next step.Click
smsSendMessagein theandroid:onClickattribute, click the red light bulb that appears, and then select Create smsSendMessage(View) in 'MainActivity'. Android Studio automatically creates thesmsSendMessage()method in MainActivity aspublic, returningvoid, with aViewparameter. This method is called when the user taps themessage_iconImageButton.public void smsSendMessage(View view) { }
Your app's layout should look like the following figure (the button_retry Button is invisible):

2.2 Edit the onClick method in MainActivity
- Open MainActivity and find the new
smsSendMessage()method you created in the last step. - Add statements to the method to get the string for the phone number from the
editText_mainview, and get the string for the SMS message from thesms_messageview:public void smsSendMessage(View view) { EditText editText = (EditText) findViewById(R.id.editText_main); // Set the destination phone number to the string in editText. String destinationAddress = editText.getText().toString(); // Find the sms_message view. EditText smsEditText = (EditText) findViewById(R.id.sms_message); // Get the text of the sms message. String smsMessage = smsEditText.getText().toString(); ... } - Declare additional string and
PendingIntentparameters for the sendTextMessage() method, which will send the message (destinationAddressis already declared as the string for the phone number to receive the message):scAddress: A string for the service center address, ornullto use the current default SMSC. A Short Message Service Center (SMSC) is a network element in the mobile telephone network. The mobile network operator usually presets the correct service center number in the default profile of settings stored in the device's SIM card.smsMessage: A string for the body of the message to send.sentIntent: APendingIntent. If notnull, this is broadcast when the message is successfully sent or if the message failed.deliveryIntent: APendingIntent. If notnull, this is broadcast when the message is delivered to the recipient.... // Set the service center address if needed, otherwise null. String scAddress = null; // Set pending intents to broadcast // when message sent and when delivered, or set to null. PendingIntent sentIntent = null, deliveryIntent = null; ...
- Use the SmsManager class to create
smsManager, which automatically importsandroid.telephony.SmsManager, and usesendTextMessage()to send the message:... // Use SmsManager. SmsManager smsManager = SmsManager.getDefault(); smsManager.sendTextMessage (destinationAddress, scAddress, smsMessage, sentIntent, deliveryIntent); ...
The full method should now look like the following:
public void smsSendMessage(View view) {
    EditText editText = (EditText) findViewById(R.id.editText_main);
    // Set the destination phone number to the string in editText.
    String destinationAddress = editText.getText().toString();
    // Find the sms_message view.
    EditText smsEditText = (EditText) findViewById(R.id.sms_message);
    // Get the text of the SMS message.
    String smsMessage = smsEditText.getText().toString();
    // Set the service center address if needed, otherwise null.
    String scAddress = null;
    // Set pending intents to broadcast
    // when message sent and when delivered, or set to null.
    PendingIntent sentIntent = null, deliveryIntent = null;
    // Use SmsManager.
    SmsManager smsManager = SmsManager.getDefault();
    smsManager.sendTextMessage
                  (destinationAddress, scAddress, smsMessage,
                                 sentIntent, deliveryIntent);
}
If you run the app now, on either a device or an emulator, the app may crash depending on whether the device or emulator has been previously set to allow the app to use SMS. In some versions of Android, this permission is turned on by default. In other versions, this permission is turned off by default.
To set the app's permission on a device or emulator instance, choose Settings > Apps > SMS Messaging > Permissions, and turn on the SMS permission for the app. Since the user can turn on or off SMS permission at any time, you need to add a check in your app for this permission, and request it from the user if necessary. You will do this in the next step.
2.3 Check for and request permission for SMS
Your app must always get permission to use anything that is not part of the app itself. In Step 2.1 you added the following permission to the AndroidManifest.xml file:
<uses-permission android:name="android.permission.SEND_SMS" />
This permission enables a permission setting in the Settings app for your app. The user can allow or disallow this permission at any time from the Settings app. You can add code to request permission from the user if the user has turned off SMS permission for the app. Follow these steps:
At the top of MainActivity, below the class definition, change the global constant for the
MY_PERMISSIONS_REQUEST_CALL_PHONErequest code to the following:private static final int MY_PERMISSIONS_REQUEST_SEND_SMS = 1;When a result returns in the activity, it will contain the
MY_PERMISSIONS_REQUEST_SEND_SMSrequestCodeso that your code can identify it.Remove the constant declarations for
mTelephonyManagerandMyPhoneCallListener.Remove the
isTelephonyEnabled()method, and remove all of the code in theonCreate()method that starts with themTelephonyManagerassignment, leaving only the first two lines:@Override protected void onCreate(Bundle savedInstanceState) { super.onCreate(savedInstanceState); setContentView(R.layout.activity_main); }Refactor/rename the existing
disableCallButton()method todisableSmsButton()and edit the method to do the following:Display a toast to notify the user that SMS usage is disabled.
Find and then set the
smsButton(the message icon) to be invisible so that the user can't send a message.Set the Retry button to be visible, so that the user can restart the activity and allow permission.
private void disableSmsButton() {
   Toast.makeText(this, "SMS usage disabled", Toast.LENGTH_LONG).show();
   ImageButton smsButton = (ImageButton) findViewById(R.id.message_icon);
   smsButton.setVisibility(View.INVISIBLE);
   Button retryButton = (Button) findViewById(R.id.button_retry);
   retryButton.setVisibility(View.VISIBLE);
}
Extract a string resource (
sms_disabled) for the hard-coded string "SMS usage disabled" in the toast statement.- Refactor/rename the existing
enableCallButton()method toenableSmsButton()to set the SMS message icon button to be visible:private void enableSmsButton() { ImageButton smsButton = (ImageButton) findViewById(R.id.message_icon); smsButton.setVisibility(View.VISIBLE); } Modify the existing
retryApp()method in MainActivity to remove the call toenableCallButton().In MainActivity, rename and refactor the
checkForPhonePermission()method tocheckForSmsPermission(), and change the code to the following:private void checkForSmsPermission() { if (ActivityCompat.checkSelfPermission(this, Manifest.permission.SEND_SMS) != PackageManager.PERMISSION_GRANTED) { Log.d(TAG, getString(R.string.permission_not_granted)); // Permission not yet granted. Use requestPermissions(). // MY_PERMISSIONS_REQUEST_SEND_SMS is an // app-defined int constant. The callback method gets the // result of the request. ActivityCompat.requestPermissions(this, new String[]{Manifest.permission.SEND_SMS}, MY_PERMISSIONS_REQUEST_SEND_SMS); } else { // Permission already granted. Enable the SMS button. enableSmsButton(); } }Use checkSelfPermission() to determine whether your app has been granted a particular permission by the user. If permission has not been granted by the user, use the requestPermissions() method to display a standard dialog for the user to grant permission.
When your app calls requestPermissions(), the system shows a standard dialog for each permission to the user, as shown in the figure below.
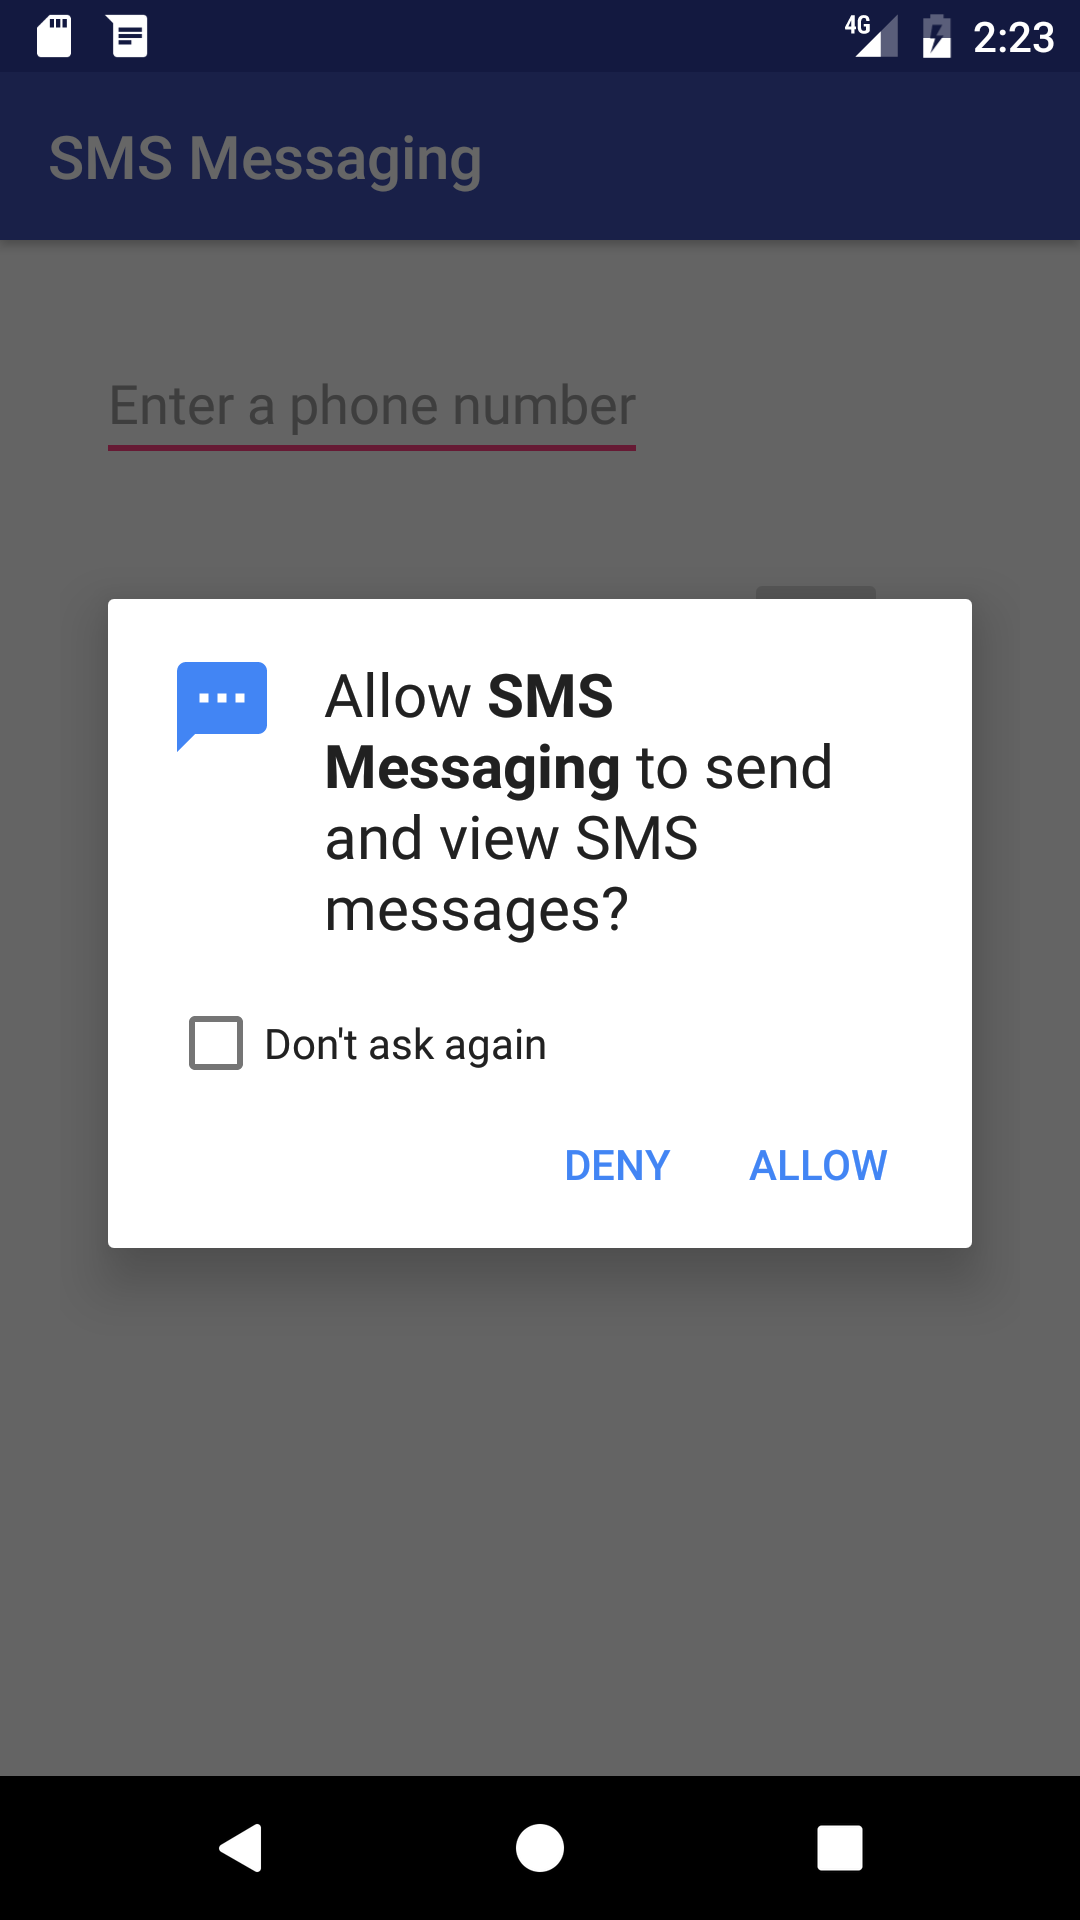
When the user responds to the request permission dialog, the system invokes your app's onRequestPermissionsResult() method, passing it the user response. Find the
onRequestPermissionsResult()method you created for the previous version of this app.Your implementation of
onRequestPermissionsResult()already uses aswitchstatement based on the value ofrequestCode. Acasefor checking phone permission is already implemented usingMY_PERMISSIONS_REQUEST_CALL_PHONE. ReplaceMY_PERMISSIONS_REQUEST_CALL_PHONEwithMY_PERMISSIONS_REQUEST_SEND_SMS, and replaceCALL_PHONEwithSEND_SMS. The switch block should now look like the following:... switch (requestCode) { case MY_PERMISSIONS_REQUEST_SEND_SMS: { if (permissions[0].equalsIgnoreCase (Manifest.permission.SEND_SMS) && grantResults[0] == PackageManager.PERMISSION_GRANTED) { // Permission was granted. Enable sms button. enableSmsButton(); } else { // Permission denied. Log.d(TAG, getString(R.string.failure_permission)); Toast.makeText(this, getString(R.string.failure_permission), Toast.LENGTH_LONG).show(); // Disable the sms button. disableSmsButton(); } } }If the user allows the permission request, the message button is re-enabled with
enableSmsButton()in case it was made invisible by lack of permission.If the user denies the permission requests, your app should take appropriate action. For example, your app might disable the functionality that depends on a specific permission and show a dialog explaining why it could not perform it. For now, log a debug message, display a toast to show that permission was not granted, and disable the message button with
disableSmsButton().- In the
onCreate()method of MainActivity, add a call to thecheckForSmsPermission()method:@Override protected void onCreate(Bundle savedInstanceState) { super.onCreate(savedInstanceState); setContentView(R.layout.activity_main); checkForSmsPermission(); } - Remove the
callNumber()method and theMyPhoneCallListenerinner class (including theonCallStateChanged()method, as you are no longer using the Telephony Manager). - Remove the
onDestroy()method since you are no longer using a listener. - Since the user might turn off SMS permission while the app is still running, add a check for SMS permission in the
smsSendMessage()method after setting thesentIntentbut before using theSmsManagerclass:... PendingIntent sentIntent = null, deliveryIntent = null; // Check for permission first. checkForSmsPermission(); // Use SmsManager. ...
2.4 Run the app and test permissions
- Run your app. Enter a phone number (or the emulator port number if using emulators), and enter the message to send. Tap the messaging icon to send the message.
- After running the app, choose Settings > Apps > SMS Messaging > Permissions and turn off SMS permission for the app.
- Run the app again. You should see the SMS permission request dialog as shown below.

- Click Deny. In the app's UI, the message icon button no longer appears, and a Retry button appears, as shown below.
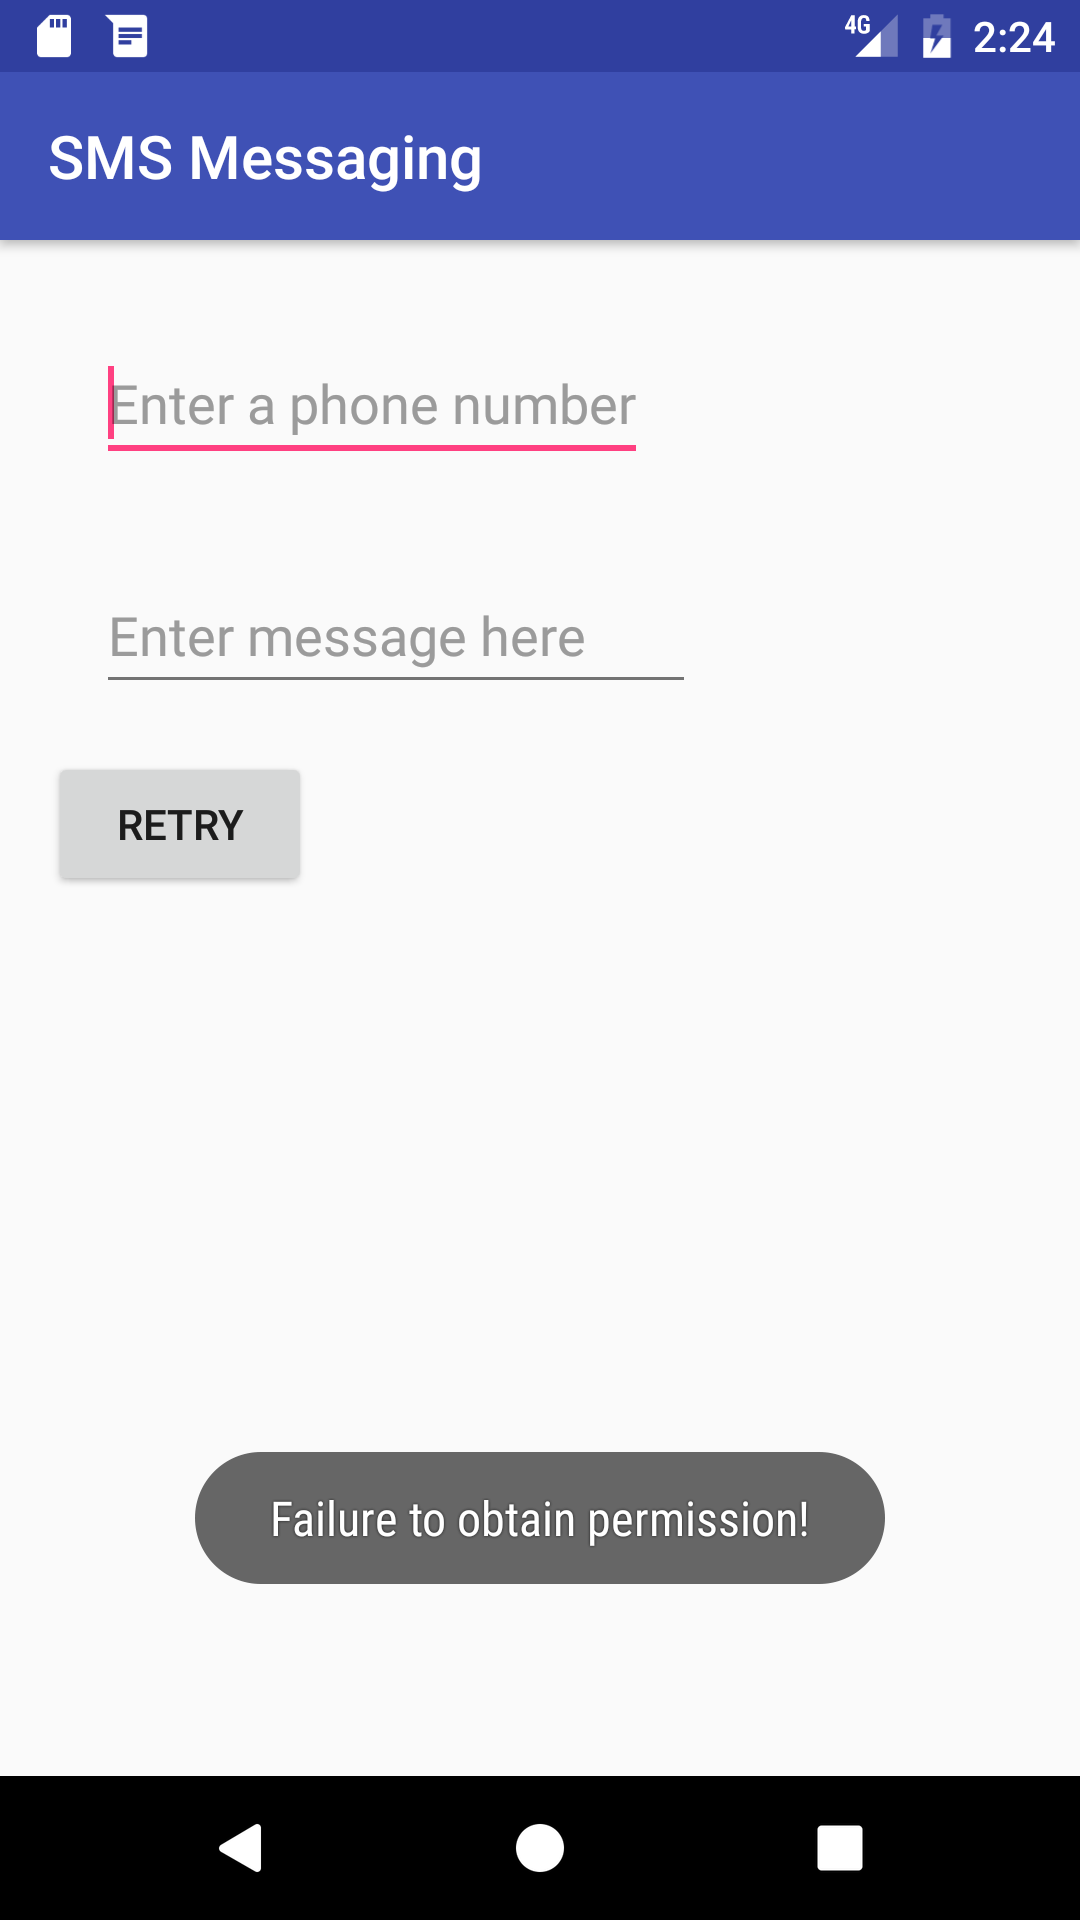
- Click Retry, and then click Allow for SMS permission.
Test the app's ability to send a message:
Enter a phone number.
Enter a message.
Tap the messaging icon.
