5.3: Providing Resources for Adaptive Layouts
Table of Contents:
- Introduction
- Externalizing resources
- Grouping resources
- Alternative resources
- Creating alternative resources
- Common alternative-resource qualifiers
- Providing default resources
- Related practical
- Learn more
An adaptive layout is a layout that works well for different screen sizes and orientations, different devices, different locales and languages, and different versions of Android.
In this chapter you learn how to create an adaptive layout by externalizing and grouping resources, providing alternative resources, and providing default resources in your app.
Externalizing resources
When you externalize resources, you keep them separate from your application code. For example, instead of hard-coding a string into your code, you name the string and add it to the res/values/strings.xml file.
Always externalize resources such as drawables, icons, layouts, and strings. Here's why it's important:
- You can maintain externalized resources separately from your other code. If a resource is used in several places in your code and you need to change the resource, you only need to change it in one place.
- You can provide alternative resources that support specific device configurations, for example devices with different languages or screen sizes. This becomes increasingly important as more Android-powered devices become available.
Grouping resources
Store all your resources in the res/ folder. Organize resources by type into folders under /res. You must use standardized names for these folders.
For example, the screenshot below shows the file hierarchy for a small project, as seen in the "Android" Project view in Android Studio. The folders that contain this project's default resources use standardized names: drawable, layout, menu, mipmap (for icons), and values.
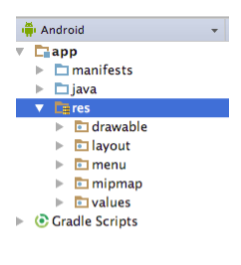
Table 1 lists the standard resource folder names. The types are described more fully in the Providing Resources guide.
Table 1: Standard Resource Folder Names
Name |
Resource Type |
animator/ |
XML files that define property animations. |
anim/ |
XML files that define tween animations. |
color/ |
XML files that define "state lists" of colors. (This is different from the colors.xml file in the values/ folder.) See Color State List Resource. |
drawable/ |
Bitmap files (WebP, PNG, 9-patch, JPG, GIF) and XML files that are compiled into drawables. See Drawable Resources. |
mipmap/ |
Drawable files for different launcher icon densities. See Projects Overview. |
layout/ |
XML files that define user interface layouts. See Layout Resource. |
menu/ |
XML files that define application menus. See Menu Resource. |
raw/ |
Arbitrary files saved in raw form. To open these resources with a raw InputStream, call Resources.openRawResource() with the resource ID, which is |
values/ |
XML files that contain simple values, such as strings, integers, and colors. For clarity, place unique resource types in different files. For example, here are some filename conventions for resources you can create in this folder:
See String Resources, Style Resource, and More Resource Types. |
xml/ |
Arbitrary XML files that can be read at runtime by calling Resources.getXml(). Various XML configuration files, such as a searchable configuration, must be saved here, along with preference settings. |
Alternative resources
Most apps provide alternative resources to support specific device configurations. For example, your app should include alternative drawable resources for different screen densities, and alternative string resources for different languages. At runtime, Android detects the current device configuration and loads the appropriate resources.
If no resources are available for the device's specific configuration, Android uses the default resources that you include in your app—the default drawables, which are in the res/drawable/ folder, the default text strings, which are in the res/values/strings.xml file, and so on.
Like default resources, alternative resources are kept in folders inside res/. Alternative-resource folders use the following naming convention:
<resource_name>-<config_qualifier>
<resource_name>is the folder name for this type of resource, as shown in Table 1. For example, "drawable" or" values".<config_qualifier>specifies a device configuration for which these resources are used. The possible qualifiers are shown in Table 2.To add multiple qualifiers to one folder name, separate the qualifiers with a dash. If you use multiple qualifiers for a resource folder, you must list them in the order they are listed in Table 2.
Examples with one qualifier:
- String resources localized to Japanese would be in a
res/values-ja/strings.xmlfile. Default string resources (resources to be used when no language-specific resources are found) would be inres/values/strings.xml. Notice that the XML files have identical names, in this case "strings.xml". - Style resources for API level 21 and higher would be in a
res/values-v21/styles.xmlfile. Default style resources would be inres/values/styles.xml.
Example with multiple qualifiers:
- Layout resources for a right-to-left layout running in "night" mode would be in a
res/layout-ldrtl-night/folder.
In the "Android" view in Android Studio, the qualifier is not appended to the end of the folder. Instead, the qualifier is shown as a label on the right side of the file in parentheses. For example, in the "Android" view shown below, the res/values/dimens.xml/ folder shows two files:
- The
dimens.xmlfile, which includes default dimension resources. - The
dimens.xml (w820dp)file, which includes dimension resources for devices that have a minimum available screen width of 820dp.
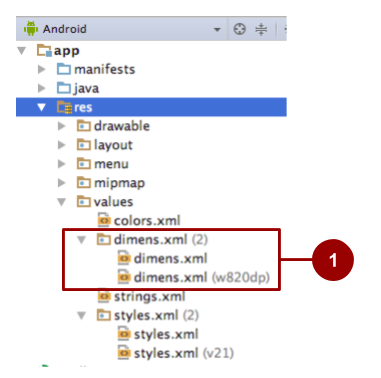
- In the "Android" view in Android Studio, default resources for dimensions are shown in the same folder as alternative resources for dimensions.
In the "Project" view in Android Studio, the same information is presented differently, as shown in the screenshot below.
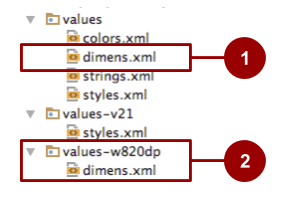
- In the "Project" view in Android Studio, default resources for dimensions are shown in the
res/valuesfolder. - Alternative resources for dimensions are shown in
res/values-<qualifier>folders.
Table 2 shows the configuration qualifiers that Android supports. They are listed in the order you must use when you combine multiple qualifiers in one folder name. For example in res/layout-ldrtl-night/, the qualifier for layout direction is listed before the qualifier for night mode, because layout direction is listed before night mode in the table.
These qualifiers are described in detail in Providing Alternative Resources.
Table 2: Qualifiers for Naming Alternative Resources
Precedence |
Qualifier |
Description |
1 |
MCC and MNC |
The mobile country code (MCC), optionally followed by mobile network code (MNC) from the SIM card in the device. For example, |
2 |
Localization |
Language, or language and region. Examples: |
3 |
Layout direction |
The layout direction of your application. Possible values include
To enable right-to-left layout features, set supportsRtl to |
4 |
Smallest width |
Fundamental screen size as indicated by the shortest dimension of the available screen area. Example: |
5 |
Available width |
Minimum available screen width at which the resource should be used. Specified in dp units. The format is |
6 |
Available height |
Minimum available screen height at which the resource should be used. Specified in dp units. The format is |
7 |
Screen size |
Possible values:
|
8 |
Screen aspect |
Possible values include |
9 |
Round screen |
Possible values include |
10 |
Screen orientation |
Possible values: |
11 |
UI mode |
Possible values:
|
12 |
Night mode |
Possible values:
|
13 |
Screen pixel density |
Possible values:
Note: Using a density qualifier doesn't imply that the resources are only for screens of that density. If you don't provide alternative resources with qualifiers that better match the current device configuration, the system may use whichever resources are the best match. |
14 |
Touchscreen type |
Possible values include |
15 |
Keyboard availability |
Possible values:
|
16 |
Primary text input method |
Possible values:
|
17 |
Navigation key availability |
Possible values include |
18 |
Primary non-touch navigation method |
Possible values:
|
19 |
Platform version (API level) |
The API level supported by the device. Described in Platform version, below. |
Creating alternative resources
To create alternative resource folders most easily in Android Studio, use the "Android" view in the Project tool window.
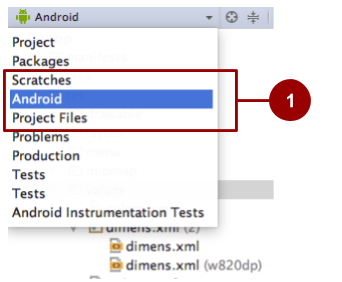
- Selecting the "Android" view in Android Studio. If you don't see these options, make sure the Project tool window is visible by selecting View > Tool Windows > Project.
To use Android Studio to create a new configuration-specific alternative resource folder in res/:
- Be sure you are using the "Android" view, as shown above.
- Right-click on the res/ folder and select New > Android resource directory. The New Resource Directory dialog box appears.
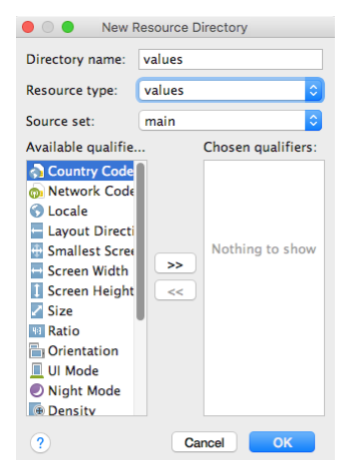
- Select the type of resource (described in Table 1) and the qualifiers (described in Table 2) that apply to this set of alternative resources.
- Click OK.
If you can't see the new folder in the Project tool window in Android Studio, switch to the "Project" view, as shown in the screenshot below. If you don't see these options, make sure the Project tool window is visible by selecting View > Tool Windows > Project.
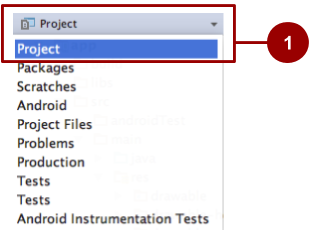
Save alternative resources in the new folder. The alternative resource files must be named exactly the same as the default resource files, for example "styles.xml" or "dimens.xml".
For the complete documentation about alternative resources, see Providing Alternative Resources.
Common alternative-resource qualifiers
This section describes a few commonly used qualifiers. Table 2 gives the complete list.
Screen orientation
The screen-orientation qualifier has two possible values:
port: The device is in portrait mode (vertical). For example,res/layout-port/would contain layout files to use when the device is in portrait mode.land: The device is in landscape mode (horizontal). For example,res/layout-land/would contain layout files to use when the device is in landscape mode.
If the user rotates the screen while your app is running, and if alternative resources are available, Android automatically reloads your app with alternative resources that match the new device configuration. For information about controlling how your app behaves during a configuration change, see Handling Runtime Changes.
To create variants of your layout XML file for landscape orientation and larger displays, use the layout editor. To use the layout editor:
- In Android Studio, open the XML file. The layout editor appears.
- From the drop-down menu in the Layout Variants menu, choose an option such as Create Landscape Variant. The Layout Variants menu, which is visible when an XML file is open in Android Studio, is highlighted in the screenshot below.
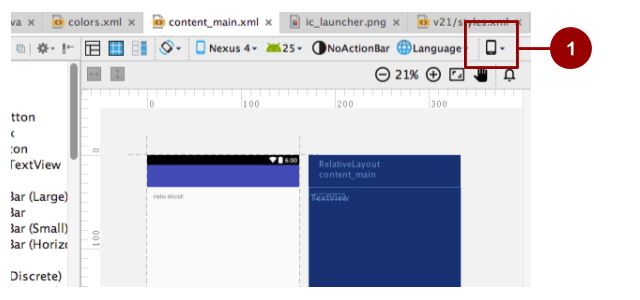
A layout for a different landscape orientation appears, and a new XML file is created for you. For example, you might now have a file named "activity_main.xml (land)" along with your original "activity_main.xml" file. You can use the editor to change the new layout without changing the original layout.
See the previous practical about layouts for an example of layout design.
Smallest width
The smallest-width qualifier specifies the minimum width of the device. It is the shortest of the screen's available height and width, the "smallest possible width" for the screen. The smallest width is a fixed screen-size characteristic of the device, and it does not change when the screen's orientation changes.
Specify smallest width in dp units, using the following format:
sw<N>dp
where <N> is the minimum width. For example, resources in a file named res/values-sw320dp/styles.xml are used if the device's screen is always at least 320dp wide.
You can use this qualifier to ensure that a certain layout won't be used unless it has at least <N> dps of width available to it, regardless of the screen's current orientation.
Some values for common screen sizes:
- 320, for devices with screen configurations such as
- 240x320 ldpi (QVGA handset)
- 320x480 mdpi (handset)
- 480x800 hdpi (high-density handset)
- 480, for screens such as 480x800 mdpi (tablet/handset)
- 600, for screens such as 600x1024 mdpi (7" tablet)
- 720, for screens such as 720x1280 mdpi (10" tablet)
When your application provides multiple resource folders with different values for the smallest-width qualifier, the system uses the one closest to (without exceeding) the device's smallest width.
Example:
res/values-sw600dp/dimens.xml contains dimensions for images. When the app runs on a device with a smallest width of 600dp or higher (such as a tablet), Android uses the images in this folder.
Platform version
The platform-version qualifier specifies the minimum API level supported by the device. For example, use v11 for API level 11 (devices with Android 3.0 or higher). See the Android API levels document for more information about these values.
Use the platform-version qualifier when you use resources for functionality that's unavailable in prior versions of Android.
For example, WebP images require API level 14 (Android 4.0) or higher, and for full support they require API level 17 (Android 4.2) or higher. If you use WebP images:
- Put default versions of the images in a
res/drawablefolder. These images must use an image format that's supported for all API levels, for example PNG. - Put WebP versions of the images in a
res/drawable-v17folder. If the device uses API level 17 or greater, Android will select these resources at runtime.
Localization
The localization qualifier specifies a language and, optionally, a region. This qualifier is a two-letter ISO 639-1 language code, optionally followed by a two letter ISO 3166-1-alpha-2 region code (preceded by lowercase r).
You can specify a language alone, but not a region alone. Examples:
res/values-fr-rFR/strings.xmlStrings in this file are used on devices that are configured for the French language and have their region set to France.
res/mipmap-fr-rCA/Icons in this folder are used on devices that are configured for the French language and have their region set to Canada.
res/layout-ja/content_main.xmlThis layout is used on devices that are configured for the Japanese language.
If the user changes the language or region in the device's system settings while your app is running, and if alternative resources are available, Android automatically reloads your app with alternative resources that match the new device configuration. For information about controlling how your app behaves during a configuration change, see Handling Runtime Changes.
For a full guide on localization, see Localizing with Resources.
Providing default resources
Default resources specify the default design and content for your application. For example, when the app runs in a locale for which you have not provided locale-specific text, Android loads the default strings from res/values/strings.xml. If this default file is absent, or if it is missing even one string that your application needs, then your app doesn't run and shows an error.
Default resources have standard resource folder names (values, for example) without any qualifiers in the folder name or in parentheses after the file names.
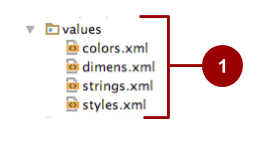
- Default resourcesTip: Always provide default resources, because your app might run on a device configuration that you don't anticipate.
Sometimes new versions of Android add configuration qualifiers that older versions don't support. If you use a new resource qualifier and maintain code compatibility with older versions of Android, then when an older version of Android runs your app, the app crashes unless default resources are available. This is because the older version of Android can't use the alternative resources that are named with the new qualifier.
For example, assume your minSdkVersion is set to 4 and you qualify all your drawable resources using night mode, meaning that you put all your drawable resources in res/drawable-night/ and res/drawable-notnight/. In this example:
- When an API level 4 device runs the app, the device can't access your drawable resources. The Android version doesn't know about
nightandnotnight, because these qualifiers weren't added until API level 8. The app crashes, because it doesn't include any default resources to fall back on.
In this example, you probably want notnight to be your default case. To solve the problem, exclude the notnight qualifier and put your drawable resources in res/drawable/ and res/drawable-night/. With this solution:
- When an API level 4 device runs the app, it always uses the resources in the default
res/drawable/folder. - When a device at API level 8 or above uses the app, it uses the resources in the
res/drawable-night/folder whenever the device is in night mode. At all other times, it uses the default (notnight) resources.
To provide the best device compatibility, provide default resources for every resource that your application needs. After your default resources are in place, create alternative resources for specific device configurations using the alternative-resource configuration qualifiers shown in Table 2.
Related practical
The related exercises and practical documentation is in Android Developer Fundamentals: Practicals.
