1.2A: Make Your First Interactive UI
Contents:
- What you should already KNOW
- What you will LEARN
- What you will DO
- App overview
- Task 1. Create the "Hello Toast" project
- Task 2: Add views to "Hello Toast" in the Layout Editor
- Task 3: Edit the "Hello Toast" Layout in XML
- Task 4: Add on-click handlers for the buttons
- Coding challenge
- Summary
- Related concept
- Learn more
The user interface displayed on the screen of a mobile Android device consists of a hierarchy of "views". Views are Android's basic user interface building blocks. You specify the views in XML layout files. For example, views can be components that:
- display text (TextView class)
- allow you to edit text (EditText class)
- represent clickable buttons (Button class) and other interactive components
- contain scrollable text (ScrollView) and scrollable items (RecyclerView)
- show images (ImageView)
- contain other views and position them (LinearLayout).
- pop up menus and other interactive components.
You can explore the view hierarchy of your app in the Layout Editor's Component Tree pane.
The Java code that displays and drives the user interface is contained in a class that extends Activity and contains methods to inflate views, that is, take the XML layout of views and display it on the screen. For example, the MainActivity in the Hello World app inflates a text view and prints Hello World. In more complex apps, an activity might implement click and other event handlers, request data from a database or the internet, or draw graphical content.
Android makes it straightforward to clearly separate UI elements and data from each other, and use the activity to bring them back together. This separation is an implementation of an MVP (Model-View-Presenter) pattern.
You will work with Activities and Views throughout this book.
What you should already KNOW
For this practical you should be familiar with:
- How to create a Hello World app with Android Studio.
What you will LEARN
You will learn:
- How to create interactive user interfaces in the Layout Editor, in XML, and programmatically.
- A lot of new terminology. Check out the Vocabulary words and concepts glossary for friendly definitions.
What you will DO
In this practical, you will:
- Create an app and add user interface elements such as buttons in the Layout Editor.
- Edit the app's layout in XML.
- Add a button to the app. Use a string resource for the label.
- Implement a click handler method for the button to display a message on the screen when the user clicks.
- Change the click handler method to change the message shown on the screen.
App Overview
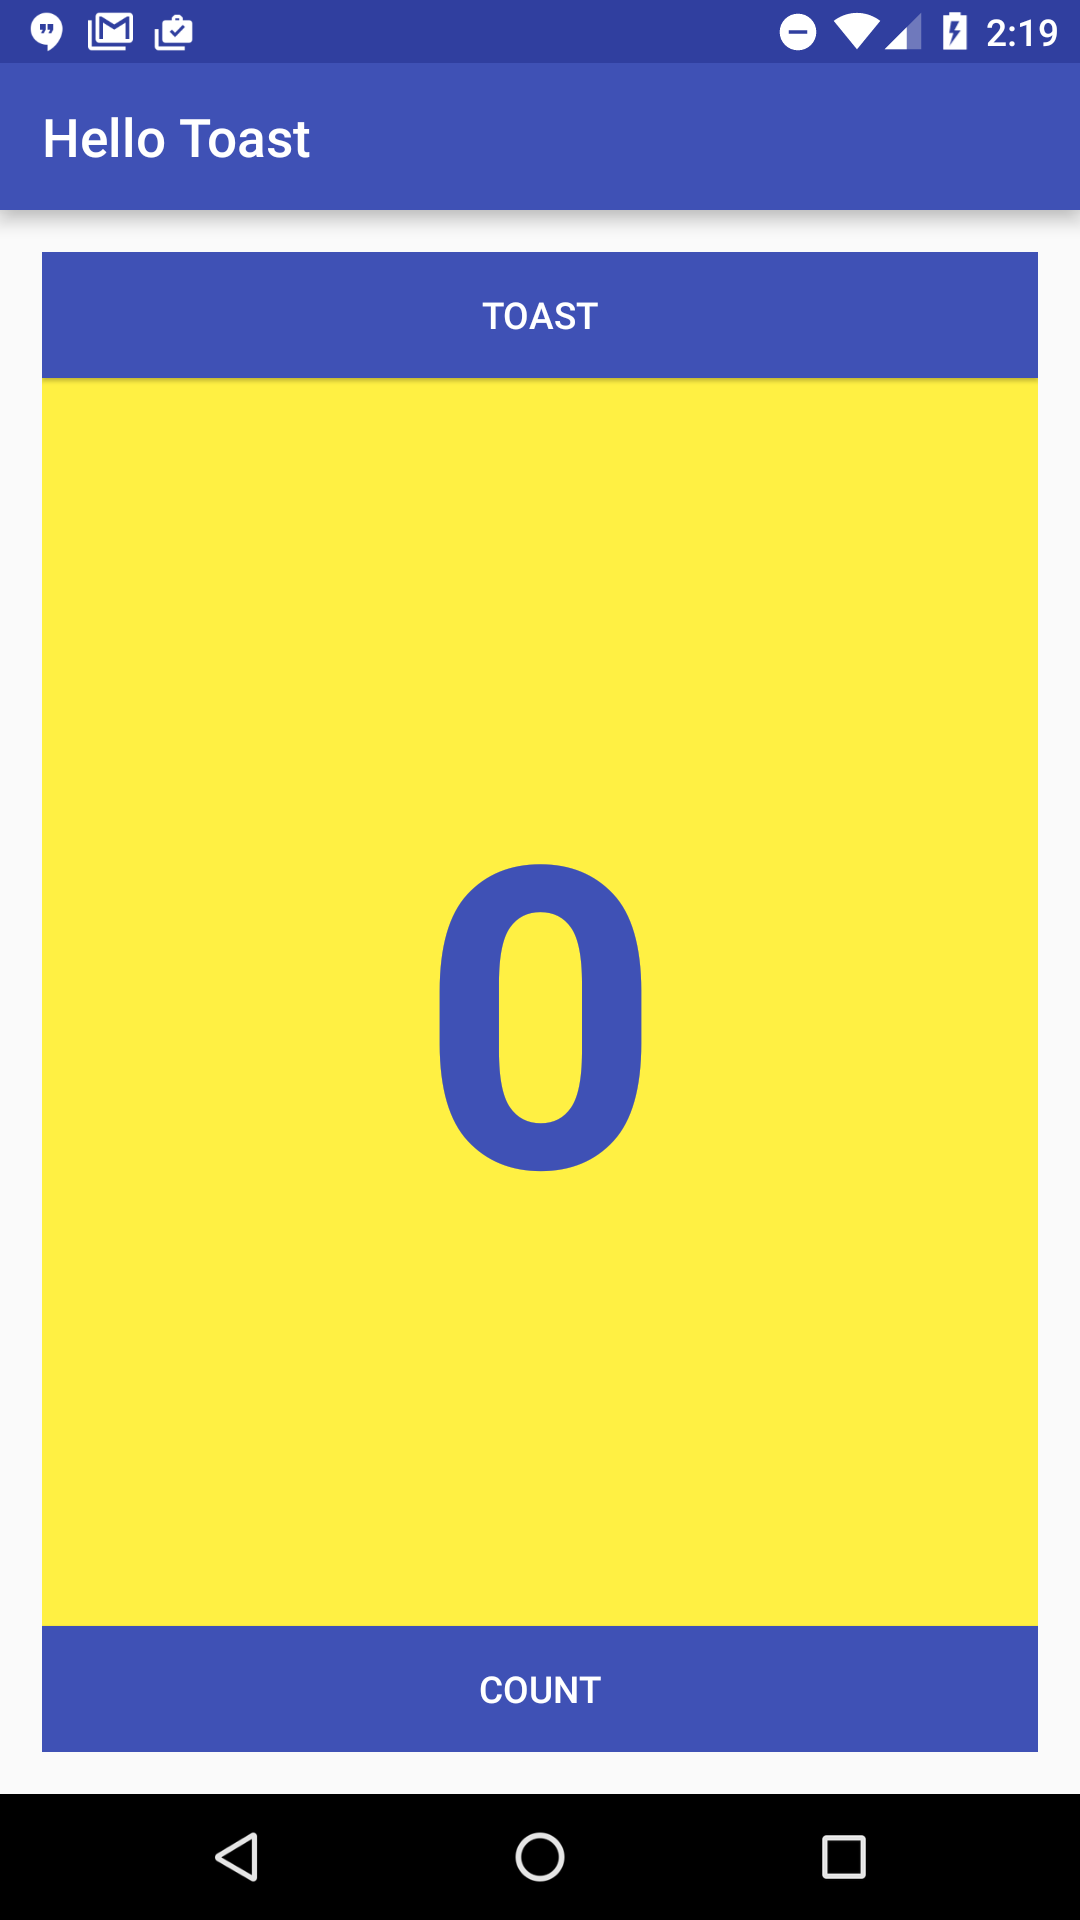
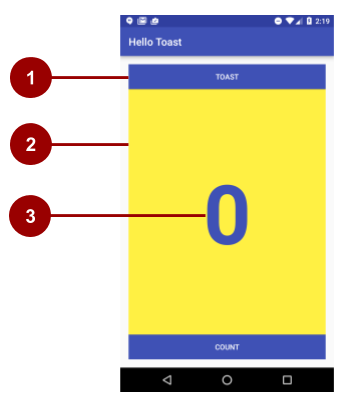
The "Hello Toast" app will consist of two buttons and one text view. When you click on the first button, it will display a short message, or toast, on the screen. Clicking on the second button will increase a click counter; the total count of mouse clicks will be displayed in the text view.
Here's what the finished app will look like:
Task 1. Create a new "Hello Toast" project
In this practical, you will design and implement a project for the "Hello Toast" app.
1.1. Create the "Hello Toast" project
Start Android Studio and create a new project with the following parameters:
Attribute Value Application Name Hello Toast Company Name com.example.android or your own domain Phone and Tablet Minimum SDK API15: Android 4.0.3 IceCreamSandwich Template Empty Activity Generate Layout file box Checked Backwards Compatibility box Checked
- Select Run > Run app or click the Run icon
 in the toolbar to build and execute the app on the emulator or your device.
Task 2: Add views to "Hello Toast" in the Layout Editor
In this task, you will create and configure a user interface for the "Hello Toast" app by arranging view UI components on the screen.
Why: Every app should start with the user experience, even if the initial implementation is very basic.
Views used for Hello Toast are:
- TextView - A view that displays text.
- Button - A button with a label that is usually associated with a click handler.
- LinearLayout - A view that acts as a container to arrange other view. This type of view extends the ViewGroup class and is also called a view group. LinearLayout is a basic view group that arranges its collection of views in a horizontal or vertical row.
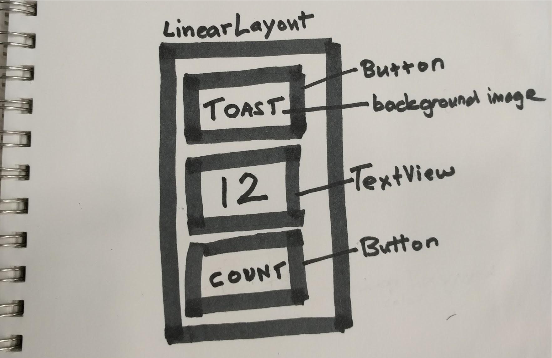
Here is a rough sketch of the UI you will build in this exercise. Simple UI sketches can be very useful for deciding which views to use and how to arrange them, especially when your layouts become more sophisticated.
2.1 Explore the Layout Editor
Use the Layout Editor to create the layout of the user interface elements, and to preview your app using different devices and app themes, resolutions, and orientations.
Refer to the screenshot below to match
In the app > res > layout folder, open the activiy_main.xml file (1).
The Android Studio Screen should look similar to the screenshot below. If you see the XML code for the UI layout, click the Design tab below the Component Tree (8).
- Using the annotated screenshot below as a guideline, explore the Layout Editor.
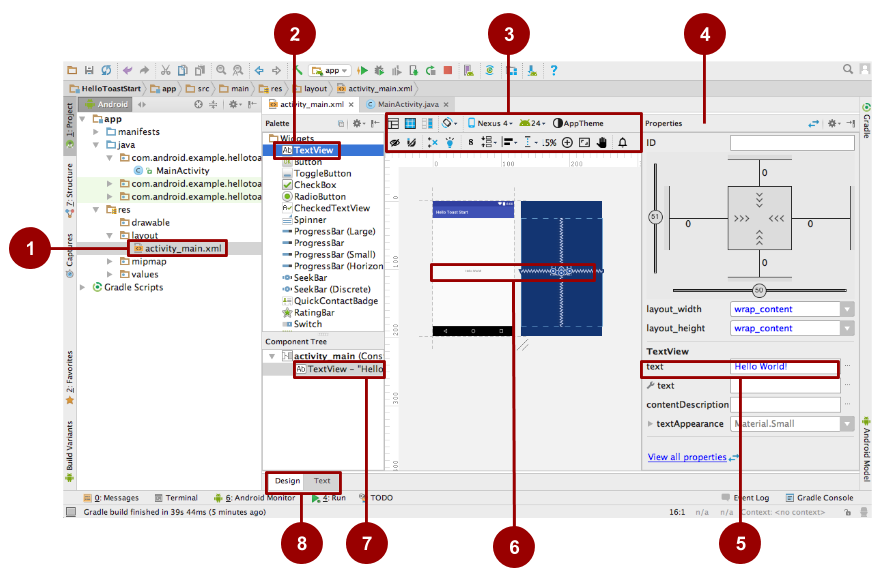
- Find the different ways in which the "Hello World" string's UI element, a TextView, is represented.
- In the Palette of UI elements (2) developers can create a text view by dragging it into the design pane.
- Visually, in the Design pane (6).
- In the Component Tree (7), as a component in a hierarchy of UI elements called the View Hierarchy. That is, views are organized into a tree hierarchy of parents and children, where children inherit properties of their parents.
- In the Properties pane (4), as a list of its properties, where "Hello Toast" is the value of the text property of the TextView (5).
Use the selectors above the virtual device (3) to do the following:
- Change the theme for your app.
- Change the rotation to landscape.
- Use a different version of the SDK.
- Preview layout variants such as a right-to-left layout direction.
Use the tooltips on the icons to help you discover their function.
- Switch between the Design and Text tabs (8). Some UI changes can only be made in code, and some are quicker to accomplish in the virtual device.
- When you're done, undo the changes (for UI changes, use Edit > Undo or the keyboard shortcut for the operating system).
See the Android Studio User Guide for the full Android Studio documentation.
2.2 Change the view group to a LinearLayout
The root of the view hierarchy is a view group, which as implied by the name, is a view that contains other views.
A vertical linear layout is one of the most common layouts. It is simple, fast, and always a good starting point. Change the view group to a vertical, LinearLayout as follows:
- In the Component Tree pane (7 in the previous screenshot), find the top or root view directly below the Device Screen.
- Click the Text tab (8) to switch to the code view of the layout.
In the second line of the code, change the root view group to LinearLayout. The second line of code now looks something like this:
<LinearLayout xmlns:android="http://schemas.android.com/apk/res/android"
Make sure the closing tag at the end of the code has changed to
</LinearLayout>. If it hasn't changed automatically, change it manually.The
android:layout_heightis defined as part of the template. The default layout orientation a horizontal row. To change the layout to be vertical, add the following code inside LinearLayout, belowandroid:layout_height.android:orientation="vertical"From the menu bar, select: Code > Reformat Code…
It may say "No lines changed: code is already properly formatted".
- Run the code to make sure it still works.
- Switch back to Design.
- Verify in the Component Tree pane that the top element is now a LinearLayout with its orientation attribute set to "vertical".
Solution Code: Depending on your version of Android Studio, your code will look something like the following.
<?xml version="1.0" encoding="utf-8"?>
<LinearLayout xmlns:android="http://schemas.android.com/apk/res/android"
    xmlns:tools="http://schemas.android.com/tools"
    android:layout_width="match_parent"
    android:layout_height="match_parent"
    android:orientation="vertical"
    tools:context="hellotoast.android.example.com.hellotoast.MainActivity">


    <TextView
        android:layout_width="wrap_content"
        android:layout_height="wrap_content"
        android:text="Hello World!" />
</LinearLayout>
2.3 Add views to the Linear Layout in the Layout Editor
In this task you will delete the current TextView (for practice), and add a new TextView and two buttons to the LinearLayout as shown in the UI sketch for this task. Refer to the UI diagram above, if necessary.
Add UI Elements
- Click the Design tab (8) to show the virtual device layout.
- Click the TextView whose text value is "Hello World" in the virtual device layout or the Component Tree pane (7).
- Press the Delete key to remove that TextView.
- From the Palette pane (2), drag and drop a Button element, a TextView, and another Button element, in that order, one below the other into the virtual device layout.
Adjust the UI Elements
To identify each view uniquely within an activity, each view needs a unique ID. And to be of any use, the buttons need labels and the text view needs to show some text. Double-click each element in the Component Tree to see its properties and change the text and ID strings as follows:
Element Text ID Top button Toast button_toast Text view 0 show_count Bottom button Count button_count
- Run your app.
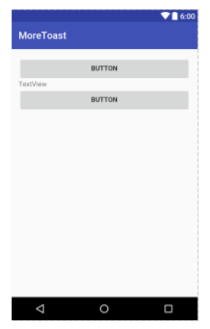
Solution Layout:
There should be three Views on your screen. They won't match the image below, but as long as you have three Views in a vertical layout, you are doing fine!
Challenge: Think of an app you might want and create a project and layout for it using Layout Editor. Explore more of the features of Layout Editor. As mentioned before, the Layout Editor has a rich set of features and coding shortcuts. Check the Android Studio documentation to dive deeper.
Task 3: Edit the "Hello Toast" layout in XML
In this practical, you will edit the XML code for the Hello Toast app UI layout. You will also edit the properties of the views you have created. You can find the properties common to all views in the View class documentation.
Why: While the Layout Editor is a powerful tool, some changes are easier to make directly in the XML source code. It is a personal preference to use either the graphical LayoutEditor or edit the XML file directly.
- Open res/layout/activity_main.xml in Text mode.
- In the menu bar select Code > Reformat Code
- Examine the code created by the Layout Editor.
Note that your code may not be an exact match, depending on what changes you made in the Layout Editor. Use the sample solutions as guidelines.
3.1 Examine LinearLayout properties
A LinearLayout is required to have these properties:
- layout_width
- layout_height
- orientation
The layout_width and layout_height can take one of three values:
- The match_parent attribute expands the view to fill its parent by width or height. When the LinearLayout is the root view, it expands to the size of the parent view.
- The wrap_content attribute shrinks the view dimensions just big enough to enclose its content. (If there is no content, the view becomes invisible.)
- Use a fixed number of dp (device independent pixels) to specify a fixed size, adjusted for the screen size of the device. For example, "16dp" means 16 device independent pixels.
The orientation can be:
- horizontal: views are arranged from left to right.
- vertical: views are arranged from top to bottom.
Change the LinearLayout of "Hello Toast" as follows:
| Property | Value |
| layout_width | match_parent (to fill the screen) |
| layout_height | match_parent (to fill the screen) |
| orientation | vertical |
3.2 Create string resources
Instead of hard-coding strings into the XML code, it is a best practice to use string resources, which represent the strings
Why: Having the strings in a separate file makes it easier to manage them, especially if you use these strings more than once. Also, string resources are mandatory for translating and localizing your app as you will create one string resource file for each language.
- Place the cursor on the word
"Toast". - Press Alt-Enter (Option-Enter on the Mac).
- Select Extract string resources.
Set the Resource name to
button_label_toastand click OK. (If you make a mistake, undo the change with Ctrl-Z.)This creates a string resource in the values/res/string.xml file, and the string in your code is replaced with a reference to the resource,
@string/button_label_toastExtract and name the remaining strings from the views as follows:
View Resource Value / String Resource name Button Hello Toast! button_label_toast TextView 0 count_initial_value Button Count button_label_count - In the Project view, navigate to values/strings.xml to find your strings. Now, you can edit all your strings in one place.
3.3 Resize
Similar to strings, it is a best practice to extract view dimensions from the main layout XML file into a dimensions resource located in a file.
Why: This makes it easier to manage dimensions, especially if you need to adjust your layout for different device resolutions. It also makes it easy to have consistent sizing, and change the size of multiple objects by changing one property.
Do the following:
- Look at the dimens.xml resource file. There should be values for the default screen margins defined. For the dimensions of views, it is better not to use hard-coded values, because that prevents views from adjusting to the screen size.
If necessary, change the layout_width of all elements inside the LinearLayout to "match_parent".
If you want to use the graphical Layout Editor, click on the Design tab, select each element in the Component Tree pane and change the layout:width property in the Properties pane. If you want to directly edit the XML file, click on the Text tab, change the android:layout_width for the first Button, the TextView, and the last Button.
- If necessary, change the layout_height of all elements inside the LinearLayout to "wrap_content".
3.4 Set colors and backgrounds
Styles and colors are additional properties that can be extracted into resources. All views can have backgrounds that can be colors or images.
Why: Extracting styles and colors makes it easy to use them consistently throughout the app, and straightforward to change across all UI elements.
Experiment with the following changes:
- Change the text size of the show_count TextView. "sp" stands for scale-independent pixel, and like dp, is a unit that scales with the screen density and user's font size preference. It is recommend you use this unit when specifying font sizes, so they will be adjusted for both the screen density and the user's preference.
android:textSize="160sp" Extract the text size of the TextView as a dimension resource named
count_text_size, as follows:Click the Text tab to show the XML code, if you haven't already done so.
Place the cursor on "
160sp".Press Alt-Enter (Option-Enter on the Mac).
Click Extract dimension resource.
Set the Resource name to
count_text_size, and click OK. (If you make a mistake, you can undo the change with Ctrl-Z).In the Project view, navigate to values/dimens.xml to find your dimensions. The dimens.xml file applies to all devices. The dimens.xml file for w820dp applies only to devices that are wider than 820dp.
- Change the
textStyleof theshow_countTextView to bold.android:textStyle="bold" Change the text color in the
show_counttext view to the primary color of the theme. Look at the colors.xml resource file to see how they are defined.The
colorPrimaryis one of the predefined theme base colors and is used for the app bar. For example, In a production app, you could customize this to fit your brand. Using the base colors for other UI elements creates a uniform UI. See Using the Material Theme. You will learn more about app themes and material design in a later practical.android:textColor="@color/colorPrimary"- Change the color of both the buttons to the primary color of the theme.
android:background="@color/colorPrimary" - Change the color of the text in both buttons to white. White is one of the colors provided as an Android Platform Resource. See Accessing Resources.
android:textColor="@android:color/white" - Add a background color to the TextView.
android:background="#FFFF00" - In the Layout Editor (Text tab), place your mouse cursor over this color and press Alt-Enter (Option-Enter on the Mac).
- Select Choose color, which brings up the color picker, pick a color you like, or go with the current yellow, then click Choose.
- Open values/colors.xml. Notice that colorPrimary that you used earlier is defined here.
Using the colors in values/colors.xml as an example, add a resource named
myBackgroundColorfor your background color, and then use it to set the background of the text view.<color name="myBackgroundColor">#FFF043</color>
3.5 Gravity and weight
Specifying gravity and weight properties gives you additional control over arranging views and content in linear layouts.
- The
android:layout_gravityattribute specifies how a view is aligned within its parent View. Because the views match their parent in width, it is not necessary to set this explicitly. You can center a view that is narrow horizontally in its parent:android:layout_gravity="center_horizontal" - The
android:layout_weightattribute indicates how much of the extra space in the LinearLayout will be allocated to the views that have this parameter set. If only one view has this attribute, it gets all the extra screen estate. For multiple views, the space is pro-rated. For example, if the buttons have a weight of 1 and the text view 2, totalling 4, the buttons get ¼ of the space each, and the textview half. - The
android:gravityattribute specifies the alignment of the content of a View within the View itself. The counter is centered in its view with:android:gravity="center"
Do the following:
- Center the text in a the
show_countTextView horizontally and vertically:android:gravity="center" - Make the
show_countTextView adjust to the size of the screen:android:layout_weight="2"
Sample Solution: strings.xml
<resources>
    <string name="app_name">Hello Toast</string>
    <string name="button_label_count">Count</string>
    <string name="button_label_toast">Toast</string>
    <string name="count_initial_value">0</string>
</resources>
Sample Solution: dimens.xml
<resources>
    <!-- Default screen margins, per the Android Design guidelines. -->
    <dimen name="activity_horizontal_margin">16dp</dimen>
    <dimen name="activity_vertical_margin">16dp</dimen>
    <dimen name="count_text_size">160sp</dimen>
</resources>
Sample Solution: colors.xml
<resources>
    <color name="colorPrimary">#3F51B5</color>
    <color name="colorPrimaryDark">#303F9F</color>
    <color name="colorAccent">#FF4081</color>
    <color name="myBackgroundColor">#FFF043</color>
</resources>
Sample Solution: activity_main.xml
<?xml version="1.0" encoding="utf-8"?>
<LinearLayout xmlns:android="http://schemas.android.com/apk/res/android"
    xmlns:tools="http://schemas.android.com/tools"
    android:layout_width="match_parent"
    android:layout_height="match_parent"
    android:orientation="vertical"
    android:paddingBottom="@dimen/activity_vertical_margin"
    android:paddingLeft="@dimen/activity_horizontal_margin"
    android:paddingRight="@dimen/activity_horizontal_margin"
    android:paddingTop="@dimen/activity_vertical_margin"
    tools:context="hellotoast.android.example.com.hellotoast.MainActivity">


    <Button
        android:id="@+id/button_toast"
        android:layout_width="match_parent"
        android:layout_height="wrap_content"
        android:text="@string/button_label_toast"
        android:background="@color/colorPrimary"
        android:textColor="@android:color/white" />


    <TextView
        android:id="@+id/show_count"
        android:layout_width="match_parent"
        android:layout_height="wrap_content"
        android:gravity="center"
        android:text="@string/count_initial_value"
        android:textSize="@dimen/count_text_size"
        android:textStyle="bold"
        android:textColor="@color/colorPrimary"
        android:background="@color/myBackgroundColor"
        android:layout_weight="2" />


    <Button
        android:id="@+id/button_count"
        android:layout_width="match_parent"
        android:layout_height="wrap_content"
        android:text="@string/button_label_count"
        android:background="@color/colorPrimary"
        android:textColor="@android:color/white" />
</LinearLayout>
Coding challenge
- Create a new project with 5 views. Have one view use the top-half of the screen, and the other 4 views share the bottom half of the screen. Use only a LinearLayout, gravity, and weights to accomplish this.
Use an image as the background of the Hello Toast app. Add an image to the drawable folder, then set it as the background of the root view. For a deep dive into drawables, see the Drawable Resources documentation.
Task 4: Add onClick handlers for the buttons
In this task, you will add methods to your MainActivity that execute when the user clicks on each button.
Why: Interactive apps must respond to user input.
To connect a user action in a view to application code, you need to do two things:
- Write a method that performs a specific action when a user user clicks an on-screen button.
- Associate this method to the view, so this method is called when the user interacts with the view.
4.1 Add an onClick property to a button
A click handler is a method that is invoked when the user clicks on a user interface element. In Android, you can specify the name of the click handler method for each view in the XML layout file with the android:onClick property.
- Open res/layout/activity_main.xml.
- Add the following property to the
button_toastbutton.android:onClick="showToast" - Add the following attribute to the
button_countbutton.android:onClick="countUp" - Inside of activity_main.xml, place your mouse cursor over each of these method names.
- Press Alt-Enter (Option-Enter on the Mac), and select Create onClick event handler.
- Choose the MainActivity and click OK.
This creates placeholder method stubs for the onClick methods in MainActivity.java.
Solution MainActivity.java:
package hellotoast.android.example.com.hellotoast;


import android.support.v7.app.AppCompatActivity;
import android.os.Bundle;
import android.view.View;


public class MainActivity extends AppCompatActivity {


   @Override
   protected void onCreate(Bundle savedInstanceState) {
       super.onCreate(savedInstanceState);
       setContentView(R.layout.activity_main);
   }


   public void countUp(View view) {
        // What happens when user clicks on the button_count Button goes here.
   }


   public void showToast(View view) {
        // What happens when user clicks on the button_toast Button goes here.
   }
}
4.2 Show a toast when the Toast button is clicked
A toast provides simple feedback about an operation in a small popup. It only fills the amount of space required for the message and the current activity remains visible and interactive. Toasts provide another way for you to test the interactivity of your app.
In MainActivity.java, add code to the showToast() method to show a toast message.
To create an instance of a Toast, you call the makeText() factory method on the Toast class, supplying a context (see below), the message to display, and the duration of display. You display the toast calling show(). This is a common pattern that you can reuse the code you are going to write.
Get the context of the application.
Displaying a Toast message requires a context. The context of an application contains global information about the application environment. Since a toast displays on top of the visible UI, the system needs information about the current activity.
Context context = getApplicationContext();When you are already in the context of the activity whose context you need, you can also use
thisas the shortcut to the context.The length of a toast string can be either short or long, and you specify which one by using a Toast constant.
Toast.LENGTH_LONGToast.LENGTH_SHORT
The actual lengths are about 3.5s for the long toast and 2s for the short toast. The values are specified in the Android source code. See this Stackoverflow post details.
- Create an instance of the Toast class with the context, message, and duration.
- The context is the application context we got earlier.
- The message is the string you want to display
- The duration is one of the predefined constants
Toast.LENGTH_LONGorToast.LENGTH_SHORT.Toast toast = Toast.makeText(context, "Hello Toast", Toast.LENGTH_LONG);
Extract the "Hello Toast" string into a string resource and call it
toast_message.Place the cursor on the string
"Hello Toast!".Press Alt-Enter (Option-Enter on the Mac).
Select Extract string resources.
Set the Resource name to
toast_messageand click OK.
This will store "Hello World" as a string resource name toast_message in the string resources file res/values/string.xml. The string parameter in your method call is replaced with a reference to the resource.
R.identifies the parameter as a resource.stringreferences the name of the XML file where the resources is defined.toast_messageis the name of the resource.Toast toast = Toast.makeText(context, R.string.toast_message, duration);
- Display the toast.
toast.show(); - Run your app and verify the toast shows when the Toast button is tapped.
Solution:
/*
* When the TOAST button is clicked, show a toast.
*
* @param view The view that triggers this onClick handler.
*             Since a toast always shows on the top, view is not used.
* */
public void showToast(View view) {
    // Create a toast show it.
    Toast toast = Toast.makeText(this, R.string.toast_message, Toast.LENGTH_LONG;);
    toast.show();
}
4.3 Increase the count in the text view when the Count button is clicked
To display the current count in the text view:
- Keep track of the count as it changes.
- Send the updated count to the text view to display it on the user interface.
Implement this as follows:
- In MainActivity.java, add a private member variable
mCountto track the count and start it at 0. - In MainActivity.java, add a private member variable
mShowCountto get the reference of theshow_countTextView. - In the
countUp()method, increase the value of the count variable each time the button is clicked. Get a reference to the text view using the ID you set in the layout file.
Views, like strings and dimensions, are resources that can have an id. The findViewById() call takes the ID of a view as its parameter and returns the view. Because the method returns a View, you have to cast the result to the view type you expect, in this case
(TextView).In order to get this resource only once, use a member variable and set it in
onCreate().mShowCount = (TextView) findViewById(R.id.show_count);- Set the text in the text view to the value of the count variable.
if (mShowCount != null) mShowCount.setText(Integer.toString(mCount)); - Run your app to verify that the count increases when the Count button is pressed.
Solution:
Class definition and initializing count variable:
public class MainActivity extends AppCompatActivity {
private int mCount = 0;
private TextView mShowCount;
in onCreate():
mShowCount = (TextView) findViewById(R.id.show_count);


countUp Method:
    public void countUp(View view) {
        mCount++;
        if (mShowCount != null)
            mShowCount.setText(Integer.toString(mCount));
    }
Resources:
- Learn more about handling Android Input Events.
- Context class documentation
Solution code
Android Studio project: HelloToast
Coding challenge
Challenge: Even a simple app like Hello Toast can be the foundation of many scoring or product ordering apps. Write one app that would be of use to you, or try one of these examples:
- Create a coffee ordering app. Add buttons to change the number of coffees ordered. Calculate and display the total price.
- Create a scoring app for your favorite team sport. Make the background an image that represents that sport. Create buttons to count the scores for each team.
Summary
In this chapter, you:
- Added UI elements to an app in the Layout Editor and using XML.
- Made the UI interactive with buttons. and click listeners
- Add click listeners that update a text view in response to user input.
- Displayed information to users using a toast.
Related concept
The related concept documentation is in Android Developer Fundamentals: Concepts.
Learn more
- All Views are subclasses of the View class and therefore inherit many properties of the View superclass.
- You can find information on all Button properties in the Button class documentation, and all the TextView properties in the TextView class documentation.
- You can find information on all the LinearLayout properties in the LinearLayout class documentation.
- The Android resources documentation will describe other types of resources.
- Android color constants: Android standard R.color resources
- More information about dp and sp units can be found at Supporting Different Densities
Developer Documentation:
- Android Studio documentation
- Vocabulary words and concepts glossary
- developer.android.com Layouts
- View class documentation
- device independent pixels
- Button class documentation
- TextView class documentation
- Android resources documentation
- Complete code for the Hello Toast app
- Architectural Patterns (overview)
