1.2B: Using Layouts
Contents:
- What you should already KNOW
- What you will LEARN
- What you will DO
- App Overview
- Task 1: Change the layout to RelativeLayout
- Task 2: Change the layout to ConstraintLayout
- Task 3: Create layout variants
- Coding Challenge
- Summary
- Related concepts
- Learn more
When you start an Android Studio project, the template you choose provides a basic layout with views. As you learned in a previous practical, you can line views up quickly and easily in a layout using LinearLayout, which is a view group that aligns child views within it horizontally or vertically.
This practical explores two other layout view groups:
- RelativeLayout: A group of child views in which each view is positioned and aligned relative to other views within the view group. Positions of the child views are described in relation to each other or to the parent view group.
- ConstraintLayout: A layout similar to RelativeLayout but more flexible. It groups child views using anchor points (a connection to another view), edges, and guidelines to control how views are positioned relative to other elements in the layout. ConstraintLayout was designed to make it easy to drag and drop views in the layout editor of Android Studio
What you should already KNOW
From the previous practicals, you should be able to:
- Create a Hello World app with Android Studio.
- Run an app on the emulator or a device.
- Implement a TextView in a layout for an app.
- Create and using string resources.
- Convert layout dimensions to resources.
What you will LEARN
You will learn to:
- Use the layout editor in Android Studio
- Position views within a RelativeLayout
- Position views within a ConstraintLayout
- Create variants of the layout for landscape orientation and larger displays
What you will DO
In this practical you will:
- Experiment with using RelativeLayout and ConstraintLayout.
- Copy and refactor the Hello Toast app to create the Hello Relative app.
- Change the root view group in the main layout to be aRelativeLayout.
- Rearrange the views in the main layout to be relative to each other.
- Copy and refactor the Hello Relative app to create Hello Constraint.
- Change the root view group in the main layout to be ConstraintLayout.
- Modify the layout to add constraints to the views.
- Modify the views for layout variants for landscape orientation and larger displays.
App Overview
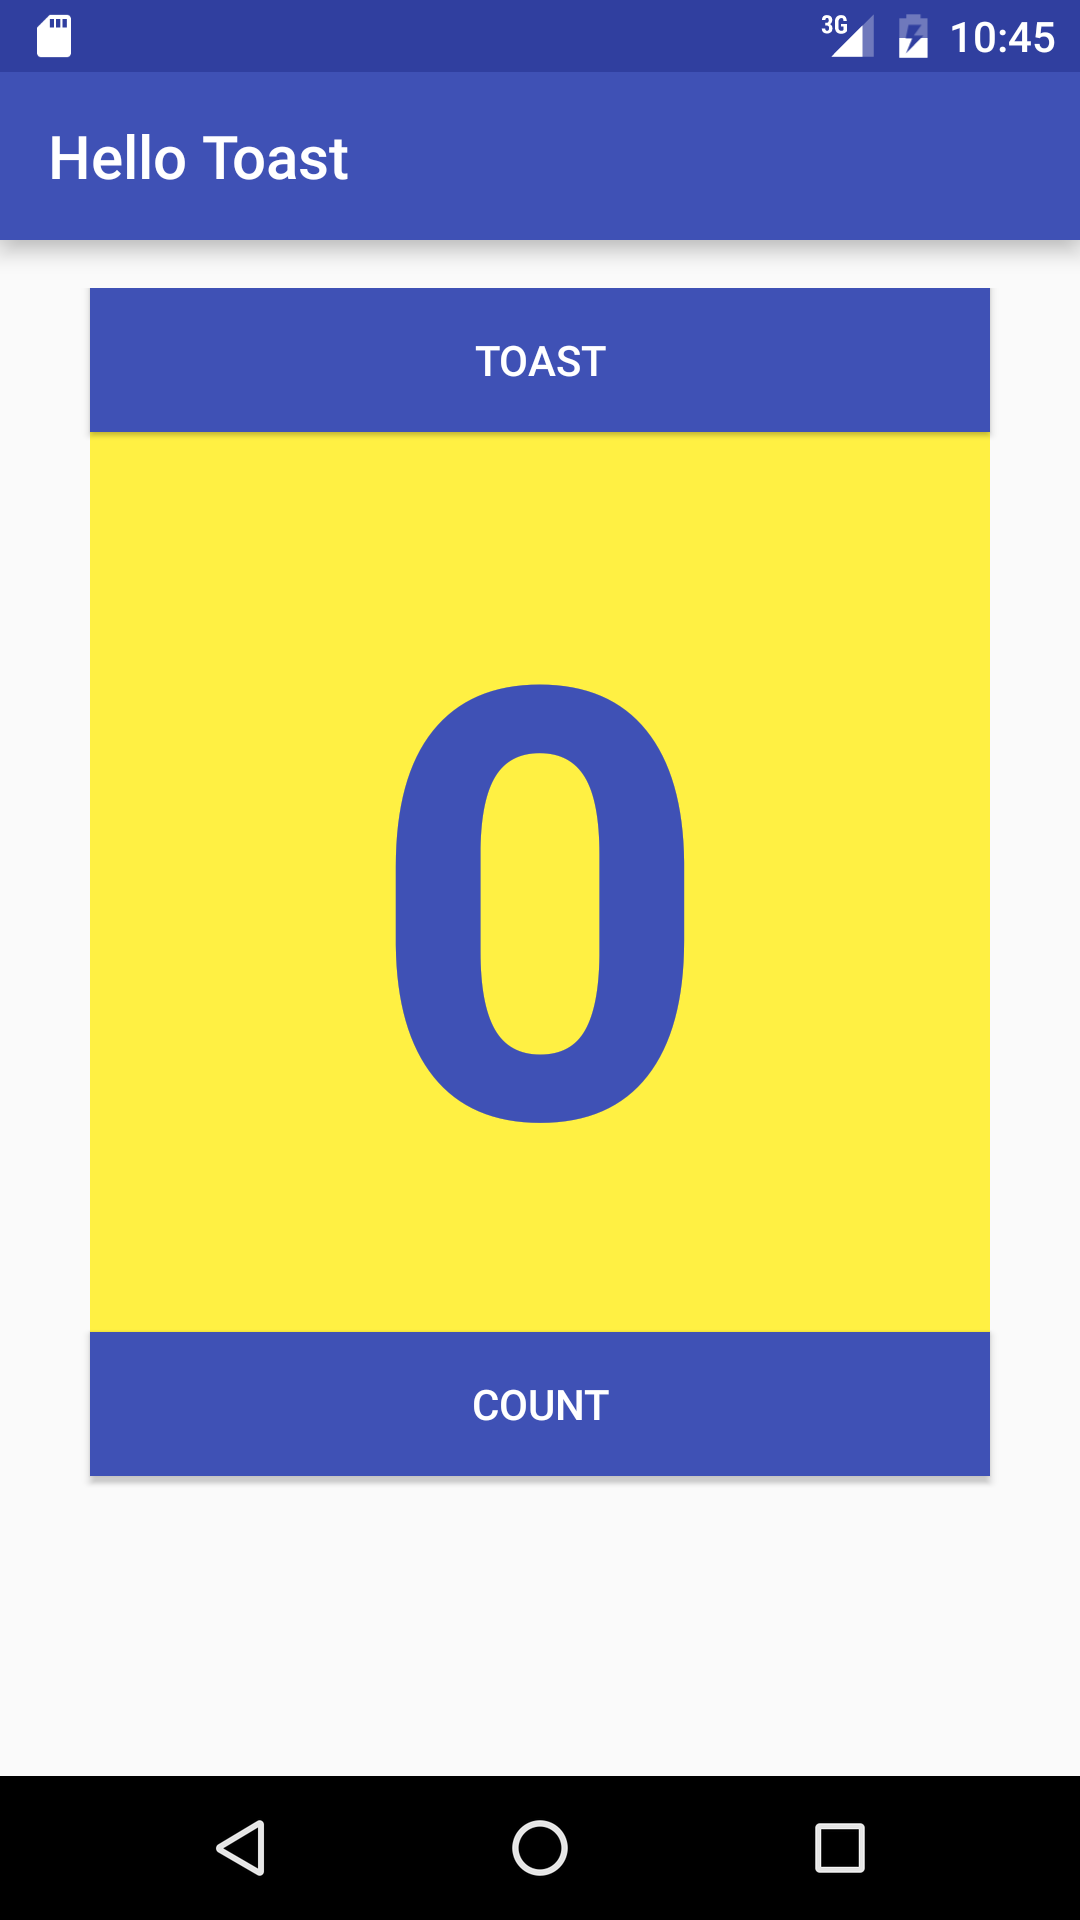
The Hello Toast app in a previous practical uses a LinearLayout to arrange the views in the activity layout, as shown in the figure below.
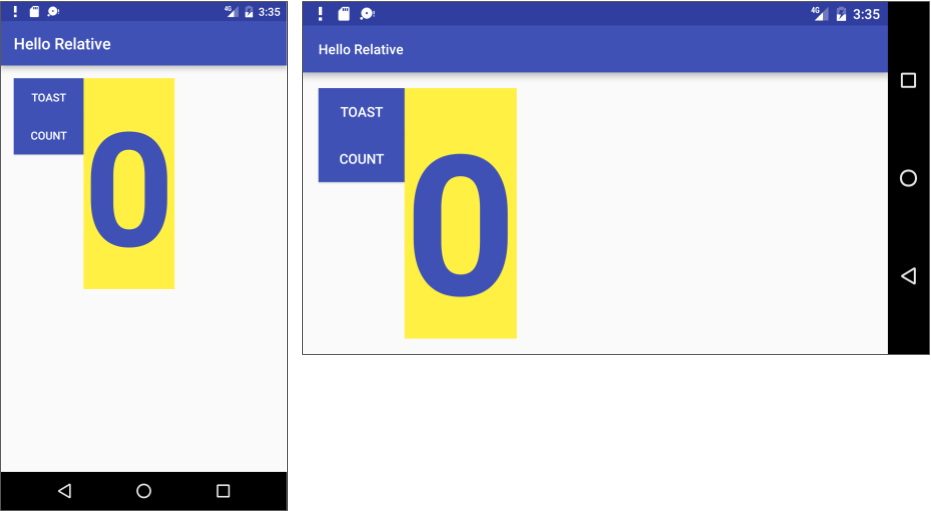
In order to practice using the layout editor, you will copy the Hello Toast app and call the new copy Hello Relative, in order to experiment with a RelativeLayout. You will use the layout editor to arrange the views in a different UI layout as shown below.
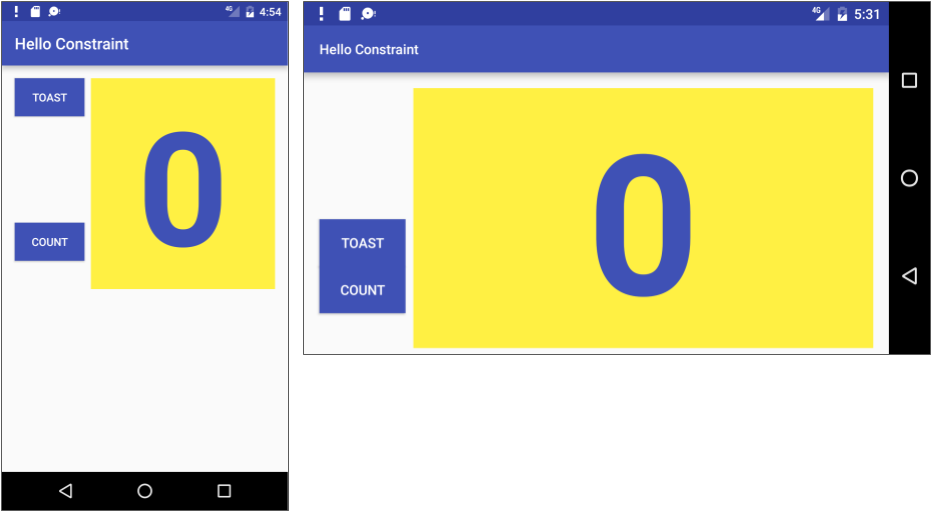
Finally, you will make another copy of the app and call it Hello Constraint, and replace LinearLayout with ConstraintLayout. ConstraintLayout offers more visual aids and positioning features in the layout editor. You will create an entirely different UI layout, and also layout variants for landscape orientation and larger displays, as shown below.
Android Studio project: HelloToast
Task 1: Change the layout to RelativeLayout
A RelativeLayout is a view grouping in which each view is positioned and aligned relative to other views within the group. In this task, you will investigate using RelativeLayout.
1.1 Copy and refactor the Hello Toast app
- Copy the HelloToast project folder, rename it to HelloRelative, and refactor it. (See the Appendix for instructions on copying a project.)
- After refactoring, change the
<string name="app_name">value in the strings.xml file (within app > res > values) to Hello Relative (with a space) as the app's name.
1.2 Change LinearLayout to RelativeLayout
- Open the activity_main.xml layout file, and click the Text tab at the bottom of the editing pane to see the XML code.
- Change the
<LinearLayoutat the top to <RelativeLayout so that the statement looks like this:<RelativeLayout xmlns:android="http://schemas.android.com/apk/res/android" - Scroll down to make sure that the ending tag
</LinearLayout>has also changed to</RelativeLayout>; if it hasn't, change it manually.
1.3 Rearrange views with the Design tab
- Click the Design tab at the bottom of the editing pane.
The editing pane should now look like the figure below, with the layout design and its blueprint. If you see only a layout design, or only a blueprint, click the Show Design + Blueprint button (#1 in the figure below).
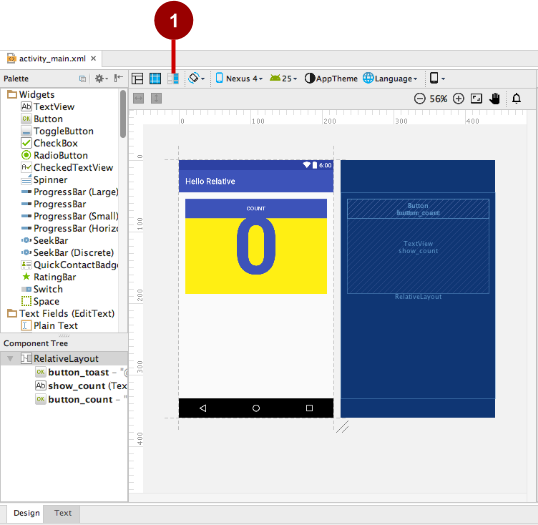
With the change to
RelativeLayout, the layout editor also changed some of the view attributes. For example:- The
button_countview for theCOUNTbutton is overlaying thebutton_toastview for theTOASTbutton, which is why you can't see theTOASTbutton. However, in the blueprint, you can see that the two buttons are occupying the same space. - The top part of the
show_countview (showing0)is also overlaying theCOUNTandTOASTbuttons.
- The
Drag the
button_countview (for theCOUNTbutton) to an area below theshow_countview (showing0), and then drag it up to the bottom of theshow_countview until it snaps into place as shown below. Also drag theshow_countview so that the top of the view snaps to the bottom of thebutton_toastview for theTOASTbutton.
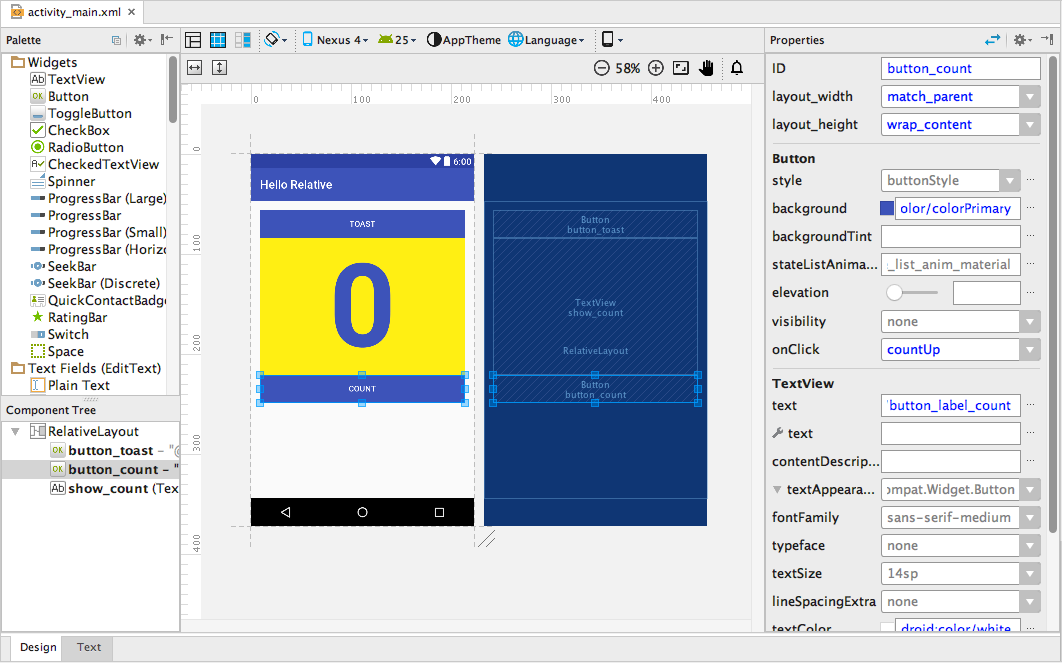
Tip: When selecting a view in the layout, its properties appear in the Properties pane on the right side of the editing pane. These properties correspond to XML attributes in the XML code for the layout, which you will examine in the next step.
1.4 Examine the XML code in the Text tab
Follow these steps to see how the app looks:
- Run the app. The app works the same way as before. The only difference is that the layout uses a RelativeLayout to position the elements, rather than a LinearLayout. In the next task, you will change the layout of the UI.
- Change the device or emulator orientation to landscape. Note that the
button_countview disappears because the screen layout does not accommodate the landscape orientation. You will fix this problem in a subsequent task in this practical. - Click the Text tab at the bottom of the editing pane.
- Examine the changes to the XML code in the editing pane as a result of changing
LinearLayouttoRelativeLayout. Start by examining the second Button (button_count):
<Button
    android:id="@+id/button_count"
    android:layout_width="match_parent"
    android:layout_height="wrap_content"
    android:layout_gravity="center_horizontal"
    android:background="@color/colorPrimary"
    android:onClick="countUp"
    android:text="@string/button_label_count"
    android:textColor="@android:color/white"
    android:layout_below="@+id/show_count"
    android:layout_centerHorizontal="true" />
Two new XML attributes were automatically added by the layout editor after you moved the Button (button_count) in the layout:
android:layout_below="@+id/show_count"
android:layout_centerHorizontal="true"
The android:layout_below attribute places the button_count view directly below the show_count view. This attribute is one of several attributes for positioning views within a RelativeLayout — you place views in relation to
The XML code for show_count view, which you also moved in the layout editor, is now in a position below the two buttons in the Text view. This is due to the change from LinearLayout to RelativeLayout. The show_count view also now includes the following attributes, as a result of moving the view in the layout editor:
android:layout_below="@+id/button_toast"
android:layout_alignParentLeft="true"
android:layout_alignParentStart="true"
The android:layout_alignParentLeft aligns the view to the left side of the RelativeLayout parent view group. While this attribute by itself is enough to align the view to the left side, you may want the view to align to the right side if the app is running on a device that is using a right-to-left language. Thus, the android:layout_alignParentStart attribute makes the "start" edge of this view match the start edge of the parent. The start is the left edge of the screen if the preference is left-to-right, or it is the right edge of the screen if the preference is right-to-left.
1.5 Rearrange elements in the RelativeLayout
- To experiment more with
RelativeLayout, select the activity_main.xml layout again for editing (if it's not already selected), and click the Design tab at the bottom of the editing pane. Select the
show_countview in the layout or the Component Tree, and change itslayout_widthin the Properties pane on the right side of the window to wrap_content as shown in the figure below.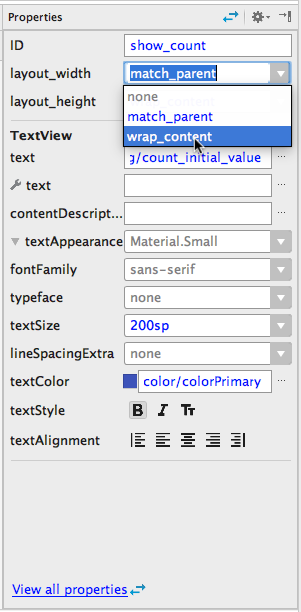
The layout editor displays a thinner
show_countview aligned to the left side of the parent view, as shown in the figure below.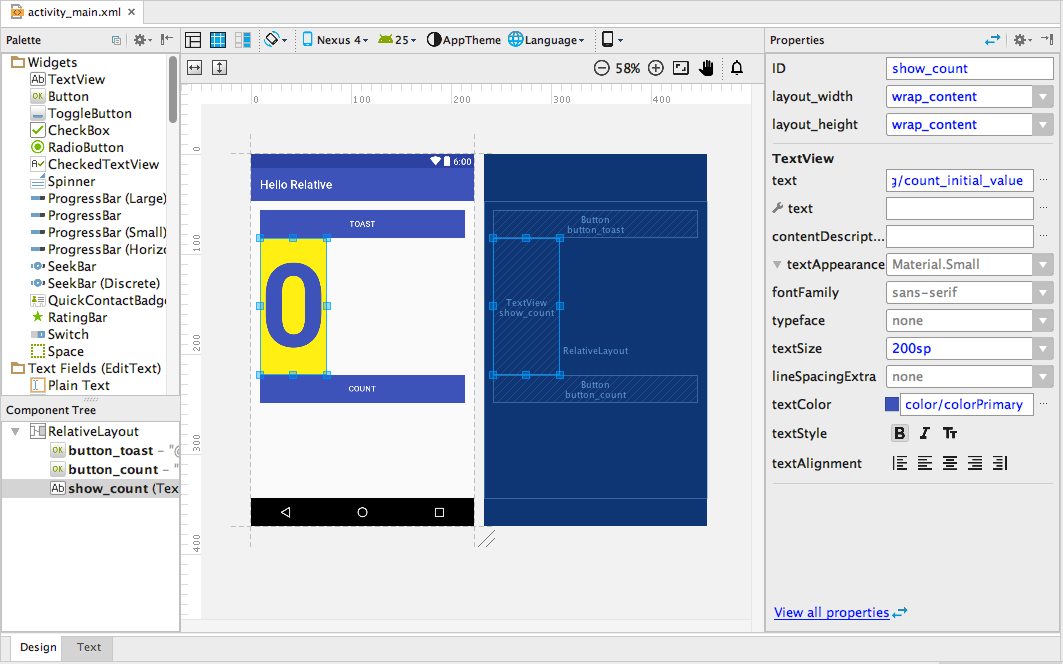
- Drag the
show_countview horizontally to the center of the layout. As you drag the view, a center guide appears — the view's center should snap into place with the guide as shown below.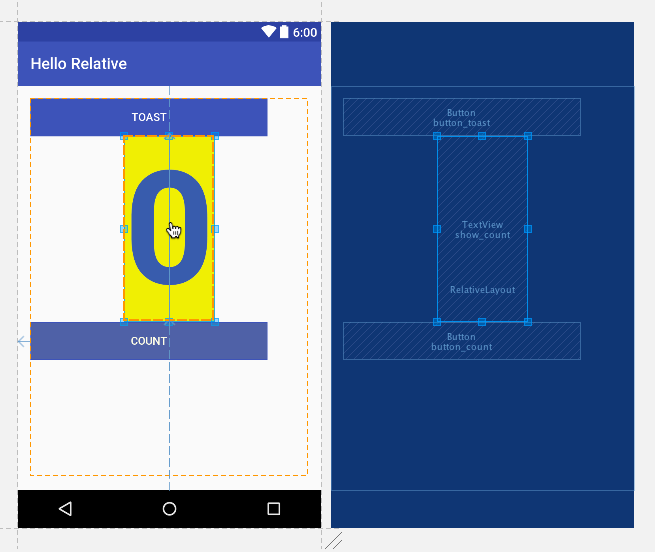
- Select the
button_toastview and change itslayout_widthto wrap_content in the Properties pane, and then change thelayout_widthof thebutton_countview to wrap_content. The layout should now look like the figure below.
- Drag the
button_countview up to just below thebutton_toastview so that it snaps to the bottom of thebutton_toastview, and drag theshow_countview up next to the right edge of thebutton_toastview so that it snaps to the right edge of the button. The layout should now look like the figure below: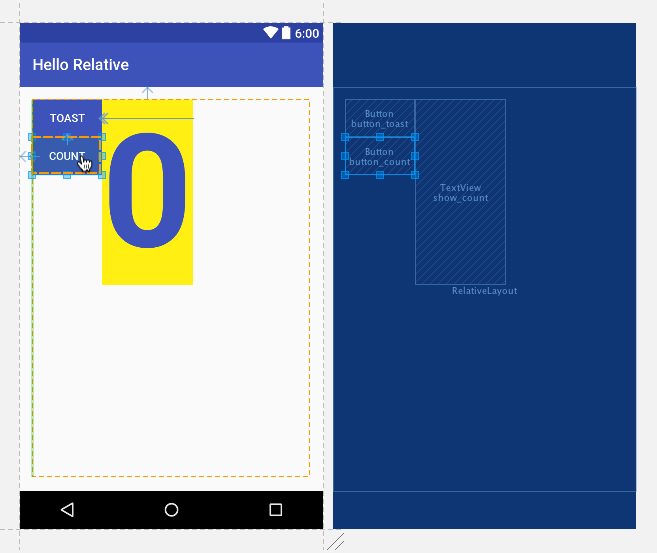
- Click the Text tab at the bottom of the editing pane, and examine the changes to the XML code as a result of moving the views in the layout:
- The
show_countview now uses the following attributes to position it to the right of and the end of thebutton_toastview:android:layout_toRightOf="@+id/button_toast" android:layout_toEndOf="@+id/button_toast" - The
button_countview now uses the following attributes to position it below thebutton_toastview:android:layout_below="@+id/button_toast"
- The
- Run the app. The app works the same way as before (since we didn't change any Java code). However, the layout is different, as shown in the figure below. Change the device or emulator orientation to landscape to see that the new layout works for both orientations.

Tip: To learn more about how to position views in a RelativeLayout, see "Positioning Views" in the "Relative Layout" topic of the API Guide.
Solution code: Android Studio project: HelloRelative
Task 2: Change the layout to ConstraintLayout
ConstraintLayout is a view group available in the Constraint Layout library, which is included with Android Studio 2.2 and higher. The constraint-based layout lets a developer build complex layouts without having to nest view groups, which can improve the performance of the app. It is built into the layout editor, so that the constraining tools are accessible from the Design tab without having to edit the XML by hand.
In this task you will copy and refactor the Hello Toast app to create the Hello Constraint app. You will then change the root LinearLayout view group in the main layout to be ConstraintLayout. After changing the root view group, you will rearrange the views in the main layout to have constraints that govern their appearance.
2.1 Copy and refactor the Hello Toast app
- Copy the HelloToast project folder, rename it to HelloConstraint, and refactor it. (See the Appendix for instructions on copying a project.)
- After refactoring, change the
string name="app_name"value in the strings.xml file (within app > res > values) to Hello Constraint (with a space) as the app's name.
2.2 Add ConstraintLayout to your project
Check to be sure that ConstraintLayout is available in your project:
- In Android Studio, choose Tools > Android > SDK Manager.
- In the left pane, click Android SDK.
- In the right pane, click the SDK Tools tab at the top of the pane.
Expand Support Repository and see if ConstraintLayout for Android and Solver for ConstraintLayout are already checked.
- If "Installed" appears in the Status column, you're all set. Click Cancel.
If "Not installed" appears, or "Update" appears:
Click the checkbox next to ConstraintLayout for Android and Solver for ConstraintLayout. A download icon should appear next to each checkbox.
Click one of the following:
- Apply to start installing the components and remain in SDK Manager to make other changes.
- OK to install the components.
After installing the components (and making other changes if needed), click Finish to finish using the SDK Manager.
2.3 Convert a layout to ConstraintLayout
Android Studio has a built-in converter to help you convert a layout to ConstraintLayout. Follow these steps:
- Open the layout file (activity_main.xml) in Android Studio and click the Design tab at the bottom of the editor window.
- In the Component Tree window, right-click LinearLayout and then choose Convert layout to ConstraintLayout from the context menu.
The converter displays an alert with two checkboxes already checked. Don't uncheck them—make sure both options remain checked:
Flatten Layout Hierarchy: This option removes all other nested layouts in the hierarchy. The result is a single, flat layout, which may be more efficient for these purposes.
Don't flatten layouts referenced from other files: If a particular layout defines an
android:id attributethat is referenced in your Java code, you may not want to flatten that layout because your code may no longer work. However, in HelloConstraint, you don't have anandroid:id attributefor a layout, only for views.
In the Add Project Dependency alert, click OK to add the constraint-layout library. Android Studio automatically copies the appropriate dependency to your project's build.gradle (Module: app) file and syncs the change for you. The layout editor reappears with
ConstraintLayoutas the root view group.Note: If the layout editor has a problem with the change, you see a Rendering Problems warning. Click build in the messageTip: Try to build the project.This will re-sync your project's build.gradle (Module: app) file with the new dependency.The layout editor's Component Tree pane now shows
ConstraintLayoutas the root view group for the layout with the other views beneath it, as shown in the figure below. Click the show_count view in the Component Tree pane. Theshow_countview is also selected in the blueprint, and its properties appear in the Properties pane on the right side.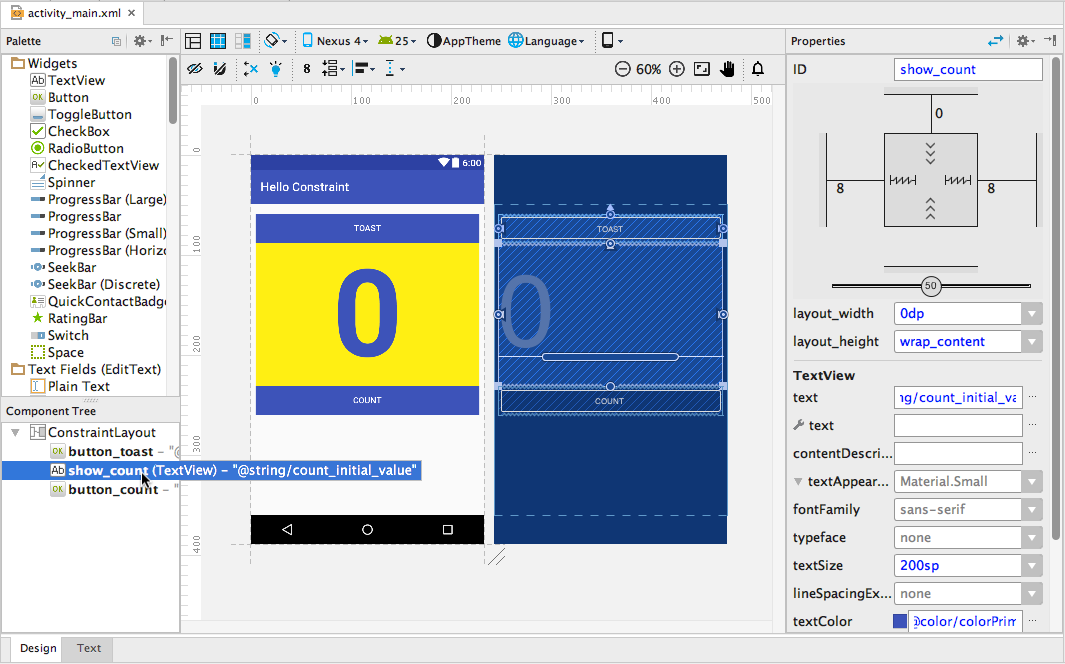
2.4 Explore the layout editor
The layout editor offers more features in the Design tab when you use a ConstraintLayout, including more visual layout tools and a second row of icons for more tools.
The visual layout and blueprint offer handles for defining constraints. A constraint is a connection or alignment to another view, to the parent layout, or to an invisible guideline. Follow these steps to explore the constraints that Android Studio created when you converted the LinearLayout to ConstraintLayout:
- Click the
show_countview in the Component Tree pane. - Hover the cursor over the
show_countview in the layout, as shown in the figure below.
Each constraint appears as a line extending from a circular handle. Each view has a circular constraint handle in the middle of each side. After selecting a view in the Component Tree pane or clicking on it in the layout, the view also shows resizing handles on each corner.
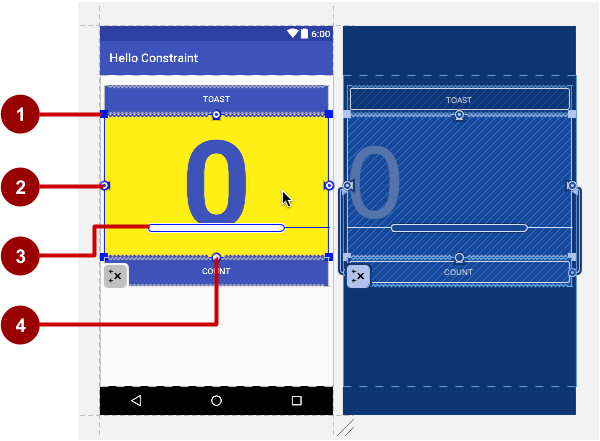
In the above figure:
- Resizing handle.
- Constraint line and handle. In the figure, the constraint aligns the left side of the
show_countview to the left side of thebutton_toastbutton. - Baseline handle. The baseline handle aligns the text baseline of a view to the text baseline of another view.
- Constraint handle without a constraint line.
The layout editor also offers a row of buttons that let you configure the appearance of the layout:

In the figure above:
- Design, Blueprint, and Both: Click the Design icon (first icon) to display a color preview of your layout. Click the Blueprint icon (middle icon) to show only outlines for each view. You can see both views side by side by clicking the third icon.
- Screen orientation: Click to rotate the device between landscape and portrait.
- Device type and size: Select the device type (phone/tablet, Android TV, or Android Wear) and screen configuration (size and density).
- API version: Select the version of Android on which to preview the layout.
- App theme: Select which UI theme to apply to the preview.
- Language: Select the language to show for your UI strings. This list displays only the languages available in the string resources.
- Layout Variants: Switch to one of the alternative layouts for this file, or create a new one.
Tip: To learn more about using the layout editor, see Build a UI with Layout Editor. To learn more about how to build a layout with ConstraintLayout, see Build a Responsive UI with ConstraintLayout.
2.5 Clear constraints
Android Studio automatically infers the constraints for layout elements when you convert a layout to use ConstraintLayout. However, the guesses may not be what you want. Follow these steps to clear the constraints in order to freely position the elements in the layout:
Right-click (or Control-click) ConstraintLayout in the Component Tree pane, and choose Clear All Constraints.
Tip: You can also delete a single constraint line by hovering the cursor over the constraint handle until a red circle appears, and then clicking the handle. The Clear All Constraints command is faster for removing all constraints.
- With constraints removed, you can now move the views on the layout freely. Drag the
button_toastview down to any position below thebutton_countview, so that the yellowshow_countview is at the top, as shown in the figure below.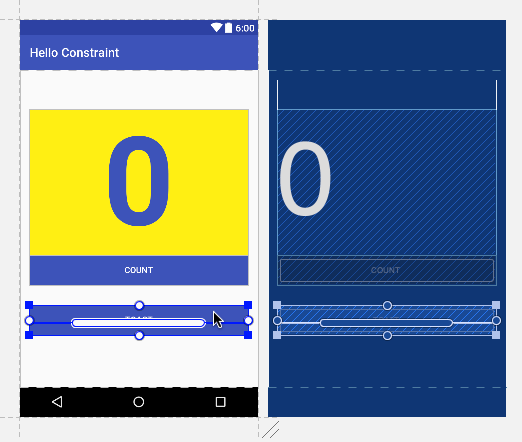
2.6 Resize a view
The layout editor offers resizing handles on all four corners of a view to resize the view quickly. You can drag the handles on each corner of the view to resize it, but doing so hard-codes the width and height dimensions, which you should avoid for most views because hard-coded view dimensions cannot adapt to different content and screen sizes.
Instead, use the Properties pane on the right side of the layout editor to select a sizing mode that doesn't use hard-coded dimensions. The Properties pane includes a square sizing panel at the top. The symbols inside the square represent the height and width settings as follows:
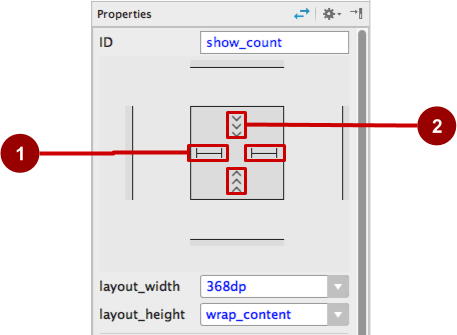
In the above figure:
- Horizontal view size control. The horizontal size control, which appears in two segments on the left and right sides of the square, specifies the
layout_width. The straight lines indicate that the dimension is fixed and set in thelayout_widthproperty below the square. - Vertical view size control. The vertical size control, which appears in two segments on the top and bottom sides of the square, specifies the
layout_heightproperty. The angles indicate that this size control is set towrap_content, which means the view will expand exactly as needed to fit its contents.
Follow these steps to resize the show_count view:
- Click the
show_countview in the Component Tree pane. Click the horizontal view size control in the Properties pane. The straight lines change to spring coils, as shown in the figure below, which represents "any size". The
layout_widthproperty is set to zero because there is no set dimension, but the view can expand as much as possible to meet constraints and margin settings.
You will use this setting to anchor the size of the view to constraints, but first, continue to experiment with settings.
Click the horizontal view size control again (either left or right side), just to see what other choices you have. The spring coils change to angles, as shown in the figure below, indicating that the
layout_widthis set towrap_content.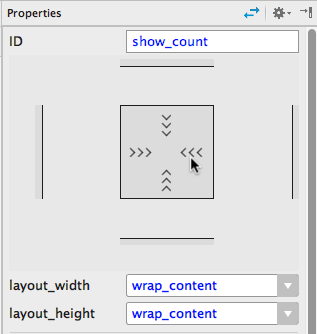
- Click the horizontal view size control again, and it toggles back to the straight lines, indicating a fixed dimension. Click it again so that the lines change to spring coils, as shown in the figure below, which represents "any size".
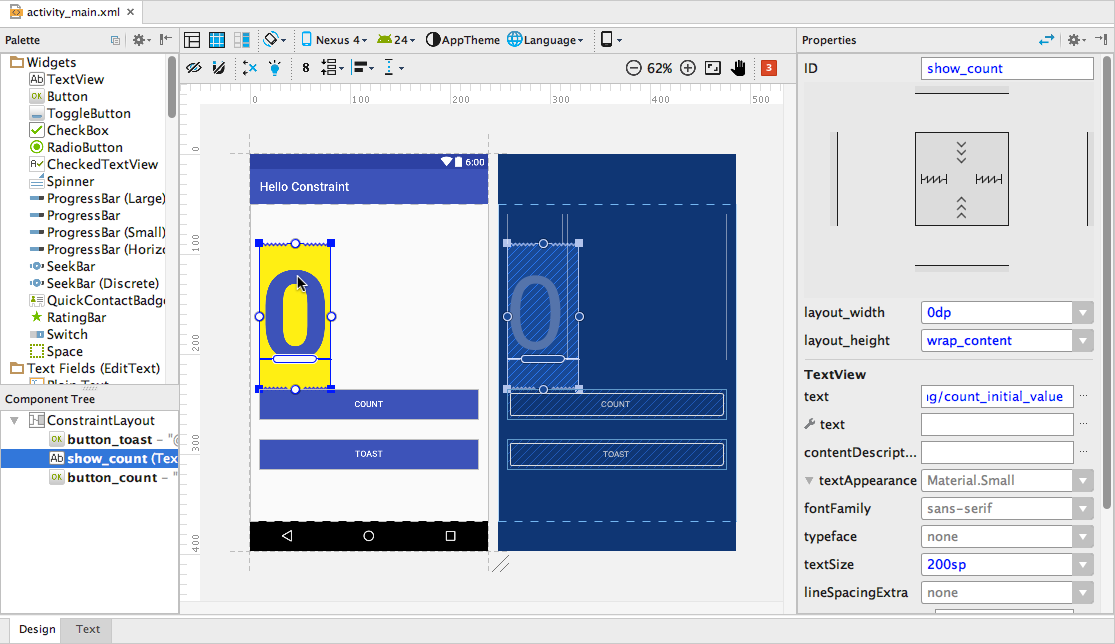
2.7 Add constraints to views
You will add a constraint to the show_count view so that it stretches to the right edge of the layout, and another constraint so that the view is positioned just below the top edge of the layout. Since the view was set to "any size" in the previous step, the view will expand as needed to match the constraints.
You will also move the two buttons into position on the left side of the show_count view, constrain the button_toast button to the top and left edges of the layout, and constrain the button_count button so that its text baseline matches the text baseline of the show_count view.
To create a right-side constraint for the
show_countview, click the view in the layout, and then hover over the view to see its constraint handles. Click-and-hold the constraint handle on the right side of the view, and drag the constraint line that appears to the right edge of the layout, as shown in the figure below.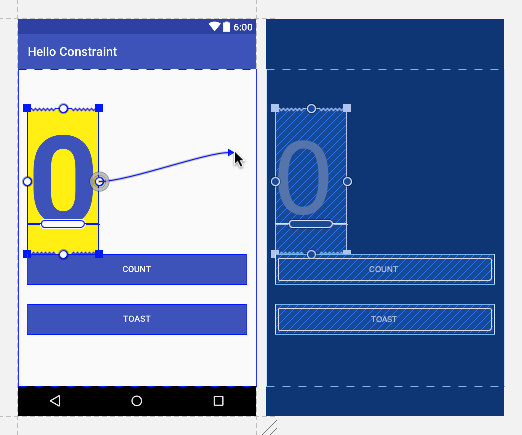
As you release from the click-and-hold, the constraint is made, and the show_count view jumps to the right edge of the layout.
Click-and-hold the constraint handle on the top side of the view, and drag the constraint line that appears to the top edge of the layout under the app bar, as shown in the figure below.
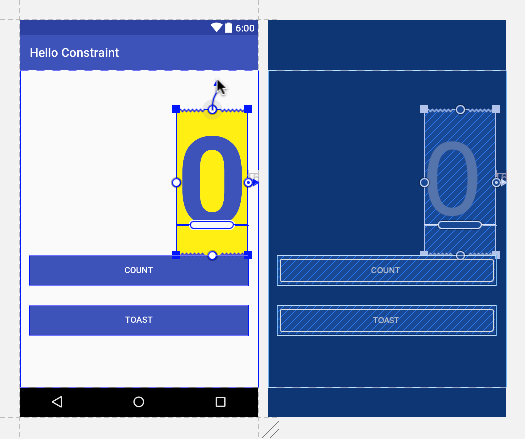
This constrains the view to the top edge. After dragging the constraint, the
show_countview jumps to the top right edge of the layout, because it is anchored to both the top and right edges.Click the
button_toastview, and use the Properties panel as shown previously to resize the view towrap_contentfor both thelayout_widthandlayout_height. Also resize thebutton_countview towrap_contentfor both thelayout_widthandlayout_height.You use
wrap_contentfor the buttons so that if the button text is localized into a different language, the button will appear wider or thinner to accommodate the word in the different language.- Drag the
button_toastview into position on the left side of theshow_countview as shown in the figure below. Guides appear so that you can snap the view into position against the top and left margins.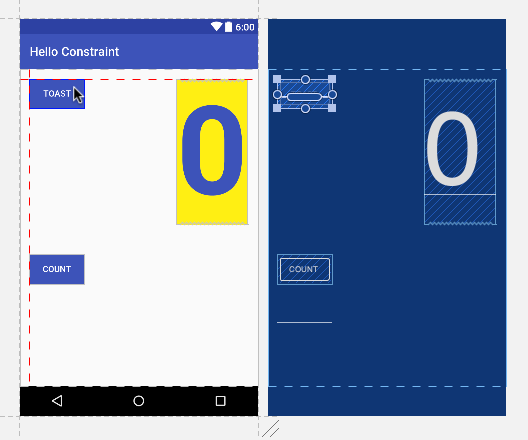
- Select the
button_toastview in the layout, click the constraint handle that appears on the top of the view, and drag it to the top edge of the layout under the app bar as shown in the figure below. Then click the constraint handle that appears on the left side of the view, and drag it to the left edge of the layout.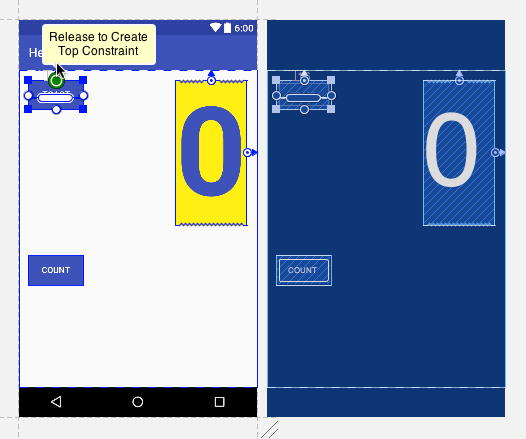
- Select the
button_countview, click the constraint handle that appears on the left side of the view, and drag it to the left edge of the layout.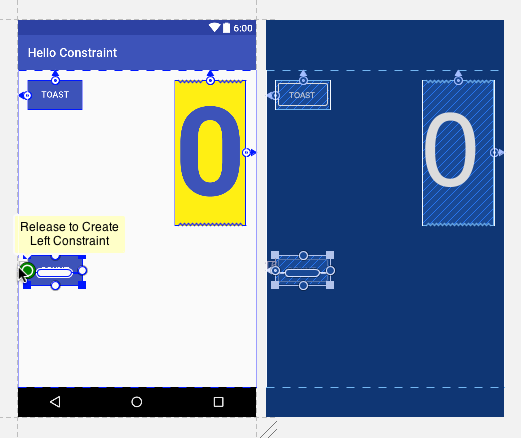
To create a baseline constraint between the
button_countview's text baseline and theshow_countview's text baseline, select thebutton_countview, and then hover over the view's baseline handle for two seconds until the handle blinks white. Then click and drag the constraint line that appears to the baseline of theshow_countview, as shown in the figure below.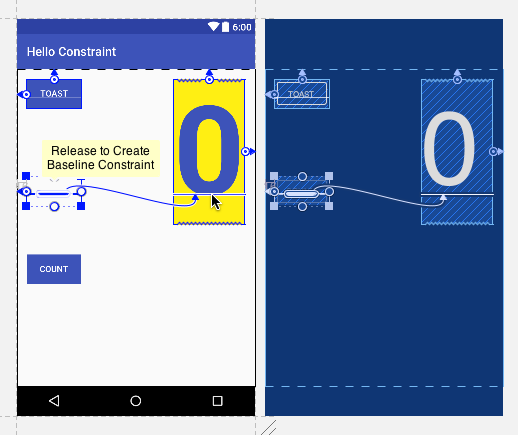
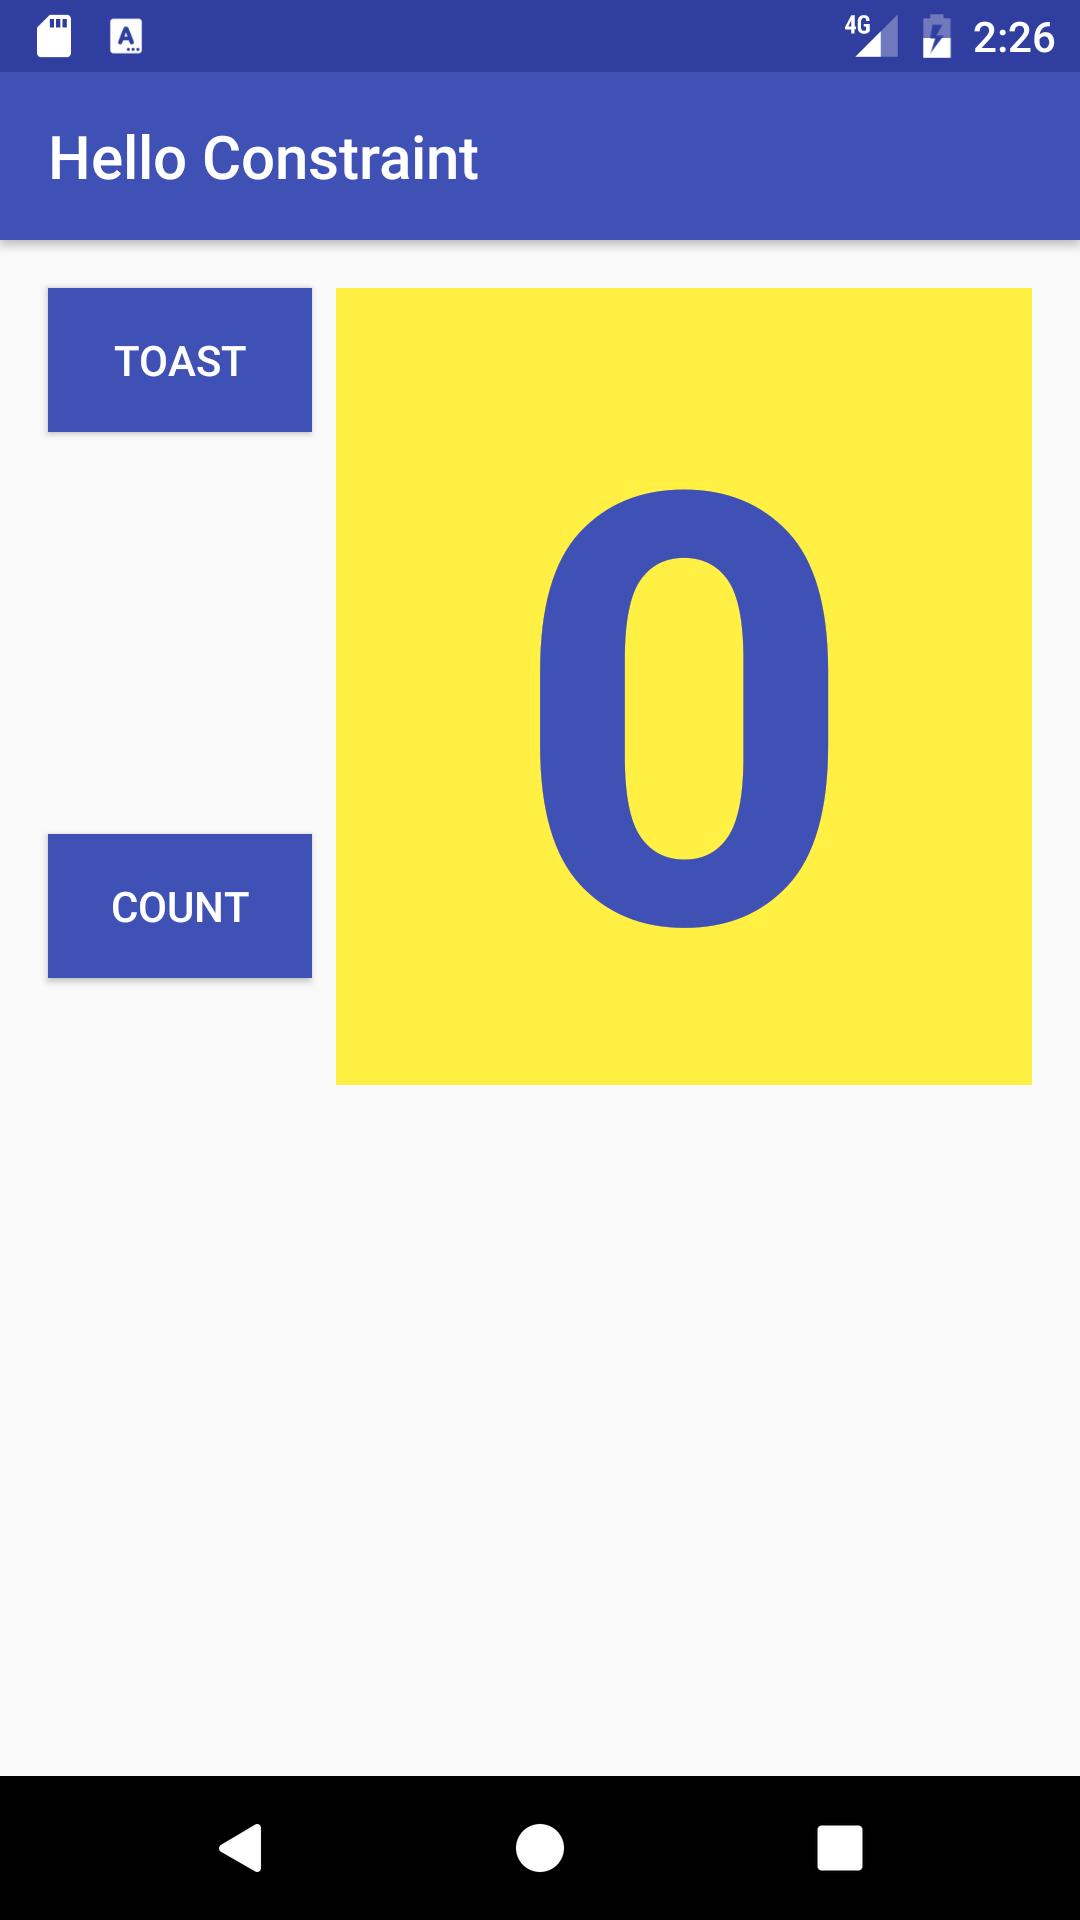
You now have a layout in which each view is set to non-specific dimensions and constrained to the layout. One button's text is aligned to a TextView's baseline, so that if you move the TextView, the button moves with it.
Tip: If a view doesn't have at least two constraints, it appears at the top of the layout.
- Although the
show_countview already has two constraints, you can add another constraint to it. Drag a constraint line from the constraint handle on the left side of the view to the right side of thebutton_countview, as shown in the figures below.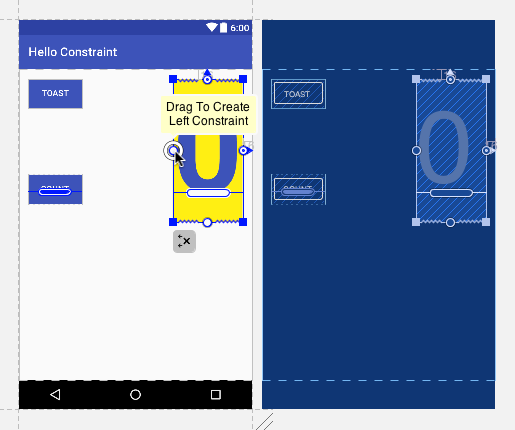
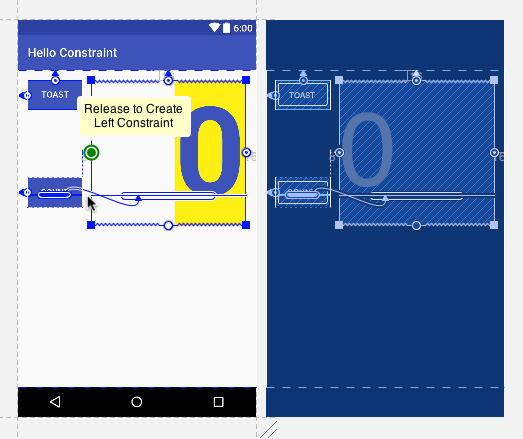
- Run the app. The layout conforms to its constraints.
Solution code: Android Studio project: HelloConstraint
Task 3: Create layout variants
You can create variants of your layout for landscape orientation and larger displays. You will create an alternative version of the previous task's layout to optimize it for landscape orientation:
- Open your layout file for the HelloConstraint app, and be sure you're viewing the Design editor (click the Design tab at the bottom of the window).
Click the Layout Variants icon in the second row of icons (refer to the figure in Task 2 Step 4) and choose Create Landscape Variation. The "land/activity_main.xml" tab appears showing the layout for the landscape (horizontal) orientation, as shown in the figure below.
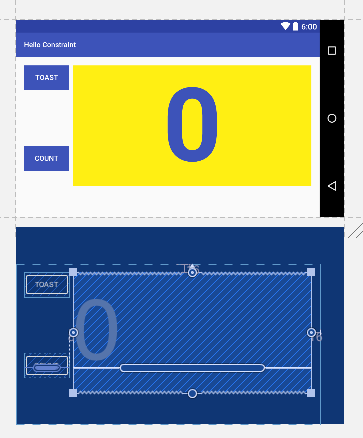
You can change the layout for the landscape (horizontal) version without changing the original portrait (vertical) orientation, thereby taking advantage of the wider screen.
- In Project: Android view in the leftmost pane of Android Studio, look inside the res > layout directory, and you will see that Android Studio automatically created the variant for you, called activity_main.xml (land).
- The "land/activity_main.xml" tab should still be open in the layout editor; if not, double-click the activity_main.xml (land) file in the layout directory.
- Click the Text tab to view the layout in XML. Find the constraint for the
button_toastview that aligns its top edge to the parent view:<Button android:id="@+id/button_toast" ... app:layout_constraintTop_toTopOf="parent" ... Change this constraint so that the
button_toastview's bottom edge is aligned to the top edge of thebutton_countview.Hint: If the constraint to align the top of a view to another view is
app:layout_constraintTop_toTopOf, what do you think the constraint is to align the bottom of a view to the top of another view? Answer:app:layout_constraintBottom_toTopOf="@id/button_count"- Run the app, and switch to landscape mode to see the different layout. The layouts should appear as shown below.
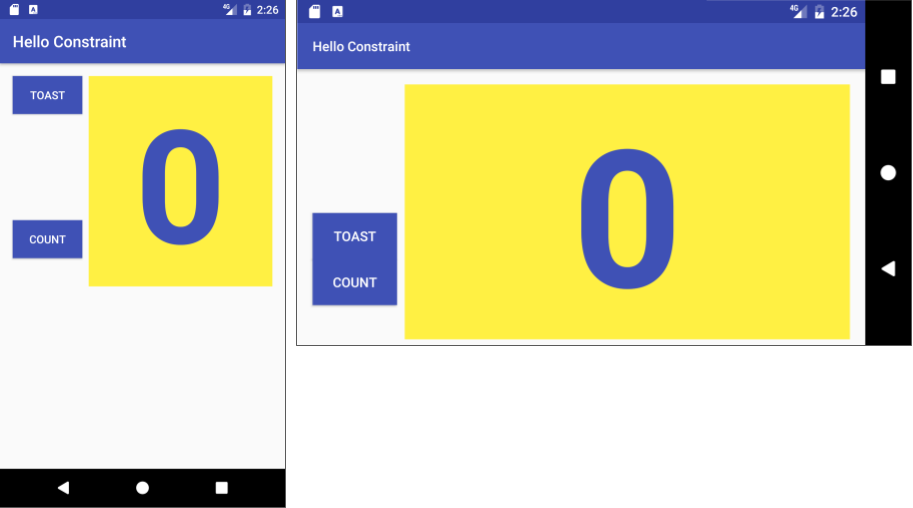
Solution code
Android Studio project: HelloToast
Android Studio project: HelloRelative
Android Studio project: HelloConstraint
Coding challenge
Challenge: Add another layout variant for a large display. The layout variant should take advantage of the larger screen size to show larger elements.
Hint: Click the Layout Variants icon in the toolbar and choose Create layout-xlarge Variation. Resize and position the elements in the layout.
Summary
In this exercise you learned how to:
- Rearrange views in a RelativeLayout using the Design tab of the layout editor.
- View the layout design and its blueprint.
- Change a view's properties (XML attributes) in the layout editor.
- Align a view with the parent RelativeLayout using:
android:layout_alignParentTopto align the view to the top of the parent.android:layout_alignParentLeftto align the view to the left side of the parent.android:layout_alignParentStartto make the start edge of the view match the start edge of the parent. This attribute is useful if your app should work on devices in which the language or locale preference may be different. The start is the left edge of the screen if the preference is left-to-right, or it is the right edge of the screen if the preference is right-to-left.
- Use
android:layout_belowto position a view underneath another view in a RelativeLayout. - Add ConstraintLayout to your project.
- Convert a layout to ConstraintLayout by right-clicking the root view group in the Component Tree pane, and then clicking Convert layout to ConstraintLayout.
- Clear all constraints in a ConstraintLayout by right-clicking (or Control-clicking) ConstraintLayout in the Component Tree pane, and choosing Clear All Constraints.
- Add constraints to views in the ConstraintLayout layout, and resizing views.
- Change the properties of views, such as
textAppearanceandtextSize. - Create variants of the layout for landscape orientation and for larger screen sizes.
Related concepts
The related concept documentation is in Android Developer Fundamentals: Concepts.
Learn more
Developer Documentation:
Other:
