1.3: Text and scrolling views
Contents:
This chapter describes one of the most often used View subclasses in apps: the TextView, which shows textual content on the screen. A TextView can be used to show a message, a response from a database, or even entire magazine-style articles that users can scroll. This chapter also shows how you can create a scrolling view of text and other elements.
TextView
One View subclass you may use often is the TextView class, which displays text on the screen. You can use TextView for a View of any size, from a single character or word to a full screen of text. You can add a resource id to the TextView in the layout, and control how the text appears using attributes in the layout file.
You can refer to a TextView in your Java code by using its resource id in order to update the text or its attributes from your code. If you want to allow users to edit the text, use EditText, a subclass of TextView that allows text input and editing. You learn all about EditText in another lesson.
TextView attributes
You can use XML attributes for a TextView to control:
- Where the
TextViewis positioned in a layout (like any other view) - How the
TextViewitself appears, such as with a background color - What the text looks like within the
TextView, such as the initial text and its style, size, and color
For example, to set the width, height, and initial text value of the view:
<TextView
   android:layout_width="wrap_content"
   android:layout_height="wrap_content"
   android:text="Hello World!"
   <!-- more attributes -->
/>
You can extract the text string into a string resource (perhaps called hello_world) that's easier to maintain for multiple-language versions of the app, or if you need to change the string in the future. After extracting the string, use the string resource name with @string/ to specify the text:
<TextView
   android:layout_width="wrap_content"
   android:layout_height="wrap_content"
   android:text="@string/hello_world"
   <!-- more attributes -->
/>
In addition to android:layout_width and android:layout_height (which are required for a TextView), the most often used attributes with TextView are the following:
android:text: Set the text to display.android:textColor: Set the color of the text. You can set the attribute to a color value, a predefined resource, or a theme. Color resources and themes are described in other chapters.android:textAppearance: The appearance of the text, including its color, typeface, style, and size. You set this attribute to a predefined style resource or theme that already defines these values.android:textSize: Set the text size (if not already set byandroid:textAppearance). Usesp(scaled-pixel) sizes such as20spor14.5sp, or set the attribute to a predefined resource or theme.android:textStyle: Set the text style (if not already set byandroid:textAppearance). Usenormal,bold,italic, orbold|italic.android:typeface: Set the text typeface (if not already set byandroid:textAppearance). Usenormal,sans,serif, ormonospace.android:lineSpacingExtra: Set extra spacing between lines of text. Usesp(scaled-pixel) or dp (device-independent pixel) sizes, or set the attribute to a predefined resource or theme.android:autoLink: Controls whether links such as URLs and email addresses are automatically found and converted to clickable (touchable) links.
Use one of the following with android:autoLink:
none: Match no patterns (default).web: Match web URLs.email: Match email addresses.phone: Match phone numbers.map: Match map addresses.all: Match all patterns (equivalent to web|email|phone|map).
For example, to set the attribute to match web URLs, use android:autoLink="web".
Using embedded tags in text
In an app that accesses magazine or newspaper articles, the articles that appear would probably come from an online source or might be saved in advance in a database on the device. You can also create text as a single long string in the strings.xml resource.
In either case, the text may contain embedded HTML tags or other text formatting codes. To properly display in a text view, text must be formatted following these rules:
- Enter \n to represent the end of a line, and another \n to represent a blank line. You need to add end-of-line characters to keep paragraphs from running into each other.
- If you have an apostrophe (
') in your text, you must escape it by preceding it with a backslash (\'). If you have a double-quote in your text, you must also escape it (\"). You must also escape any other non-ASCII characters. See the "Formatting and Styling" section of String Resources for more details. - Enter the HTML and </b> tags around words that should be in bold.
- Enter the HTML and </i> tags around words that should be in italics. Note, however, that if you use curled apostrophes within an italic phrase, you should replace them with straight apostrophes.
- You can combine bold and italics by combining the tags, as in ... words...</i></b>. Other HTML tags are ignored.
- To create a long string of text in the
strings.xmlfile, enclose the entire text within<string name="your_string_name"></string>(your_string_name is the name you provide the string resource, such asarticle_text). - As you enter or paste text in the
strings.xmlfile, the text lines don't wrap around to the next line—they extend beyond the right margin. This is the correct behavior—each new line of text starting at the left margin represents an entire paragraph.
Tip: If you want to see the text wrapped in strings.xml, you can press Return to enter hard line endings, or format the text first in a text editor with hard line endings. The endings will not be displayed on the screen.
Referring to a TextView in code
To refer to a TextView in your Java code, use its resource id. For example, to update a TextView with new text, you would:
- Find the
TextViewand assign it to a variable. You use thefindViewById()method of theViewclass, and refer to the view you want to find using this format:
In which view_id is the resource identifier for the view (such asR.id.view_idshow_count) :mShowCount = (TextView) findViewById(R.id.show_count); - After retrieving the
Viewas aTextViewmember variable, you can then set the text to new text (in this case,mCount_text) using thesetText()method of theTextViewclass:mShowCount.setText(mCount_text);
Scrolling views
If the information you want to show in your app is larger than the device's display, you can create a scrolling view that the user can scroll vertically by swiping up or down, or horizontally by swiping right or left.
You would typically use a scrolling view for news stories, articles, or any lengthy text that doesn't completely fit on the display. You can also use a scrolling view to combine views (such as a TextView and a Button) within a scrolling view.
Creating a layout with a ScrollView
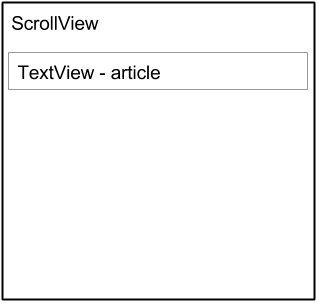
The ScrollView class provides the layout for a vertical scrolling view. (For horizontal scrolling, you would use HorizontalScrollView.) ScrollView is a subclass of FrameLayout, which means that you can place only one View as a child within it; that child contains the entire contents to scroll.

Even though you can place only one child View inside a ScrollView, the child View can be a ViewGroup with a hierarchy of child View elements, such as a LinearLayout. A good choice for a View within a ScrollView is a LinearLayout that is arranged in a vertical orientation.

ScrollView and performance
All of the contents of a ScrollView (such as a ViewGroup with View elements) occupy memory and the view hierarchy even if portions are not displayed on screen. This makes ScrollView useful for smoothly scrolling pages of free-form text, because the text is already in memory. However, a ScrollView with a ViewGroup with View elements can use up a lot of memory, which can affect the performance of the rest of your app.
Using nested instances of LinearLayout can also lead to an excessively deep view hierarchy, which can slow down performance. Nesting several instances of LinearLayout that use the android:layout_weight attribute can be especially expensive as each child View needs to be measured twice. Consider using flatter layouts such as RelativeLayout or GridLayout to improve performance.
Complex layouts with ScrollView may suffer performance issues, especially with images. We recommend that you not use images within a ScrollView. To display long lists of items, or images, consider using a RecyclerView, which is covered in another lesson.
ScrollView with a TextView
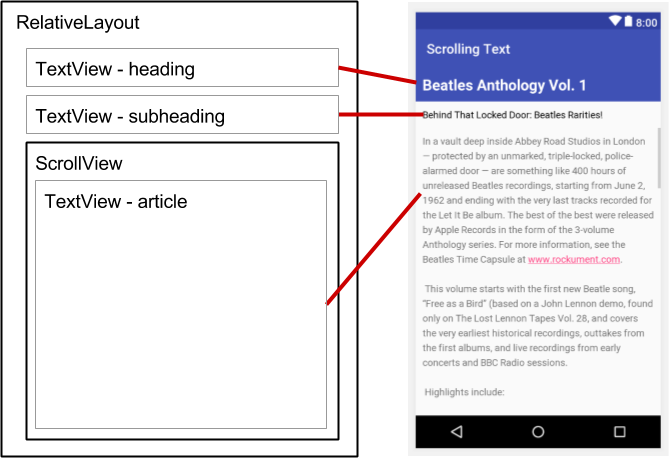
To display a scrollable magazine article on the screen, you might use a RelativeLayout that includes a separate TextView for the article heading, another for the article subheading, and a third TextView for the scrolling article text (see the figure below), set within a ScrollView. The only part of the screen that would scroll would be the ScrollView with the article text.

ScrollView with a LinearLayout
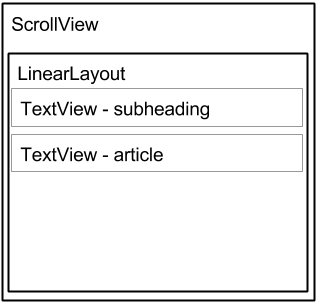
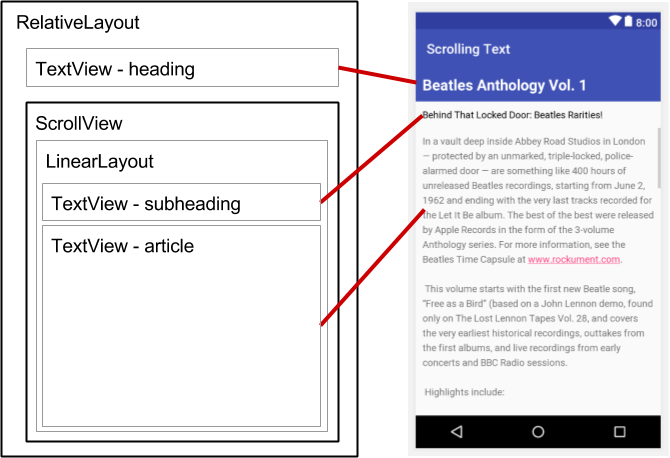
A ScrollView can contain only one child View; however, that View can be a ViewGroup that contains several View elements, such as LinearLayout. You can nest a ViewGroup such as LinearLayout within the ScrollView, thereby scrolling everything that is inside the LinearLayout.
For example, if you want the subheading of an article to scroll along with the article even if they are separate TextView elements, add a LinearLayout to the ScrollView as a single child View as shown in the figure below, and then move the TextView subheading and article elements into the LinearLayout. The user scrolls the entire LinearLayout which includes the subheading and the article.

When adding a LinearLayout inside a ScrollView, use match_parent for the LinearLayout android:layout_width attribute to match the width of the parent ScrollView, and use wrap_content for the LinearLayout android:layout_height attribute to make it only large enough to enclose its contents.
Since ScrollView only supports vertical scrolling, you must set the LinearLayout orientation attribute to vertical (android:orientation="vertical"), so that the entire LinearLayout will scroll vertically. For example, the following XML layout scrolls the article TextView along with the article_subheading TextView:
<ScrollView
   android:layout_width="wrap_content"
   android:layout_height="wrap_content"
   android:layout_below="@id/article_heading">

   <LinearLayout
      android:layout_width="match_parent"
      android:layout_height="wrap_content"
      android:orientation="vertical">

      <TextView
         android:id="@+id/article_subheading"
         android:layout_width="match_parent"
         android:layout_height="wrap_content"
         android:padding="@dimen/padding_regular"
         android:text="@string/article_subtitle"
         android:textAppearance=
                       "@android:style/TextAppearance.DeviceDefault" />

      <TextView
         android:id="@+id/article"
         android:layout_width="wrap_content"
         android:layout_height="wrap_content"
         android:autoLink="web"
         android:lineSpacingExtra="@dimen/line_spacing"
         android:padding="@dimen/padding_regular"
         android:text="@string/article_text" />
   </LinearLayout>

</ScrollView>
Related practical
The related practical for this concept chapter is 1.3: Text and scrolling views.
Learn more
Android Studio documentation:
Android developer documentation:
Other:
- Android Developers Blog: Linkify your Text!
- Codepath: Working with a TextView