8.1: Notifications
Contents
- What is a notification?
- Notification channels
- Delivering notifications
- Updating and reusing notifications
- Clearing notifications
- Notification compatibility
- Notification design guidelines
- Related practical
- Learn more
In this chapter you learn how to create, deliver, and reuse notifications. You also learn how to make notifications compatible with different Android versions.
What is a notification?
A notification is a message your app displays to the user outside your app's normal UI. When your app tells the system to issue a notification, the notification appears to the user as an icon in the notification area, on the left side of the status bar.

If the device is unlocked, the user opens the notification drawer to see the details of the notification. If the device is locked, the user views the notification on the lock screen. The notification area, lock screen, and notification drawer are system-controlled areas that the user can view at any time.
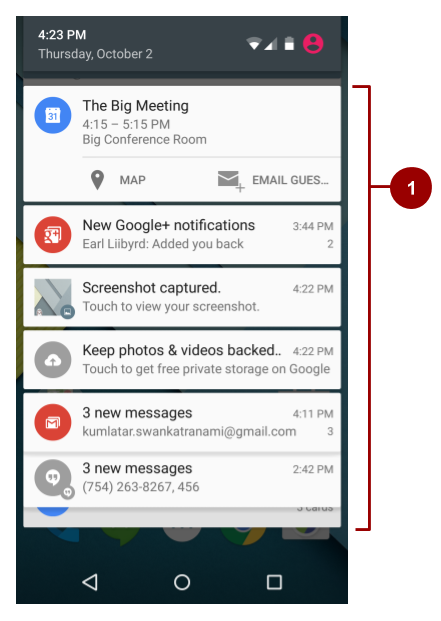
- An "open" notification drawer. The status bar isn't visible in this screenshot, because the notification drawer is open.
App icon badge
In supported launchers on devices running Android 8.0 (API level 26) and higher, an app icon changes its appearance slightly when the app has a new notification to show to the user. The app icon shows a colored badge, also known as a notification dot, as shown on four of the five app icons in the screenshot below.
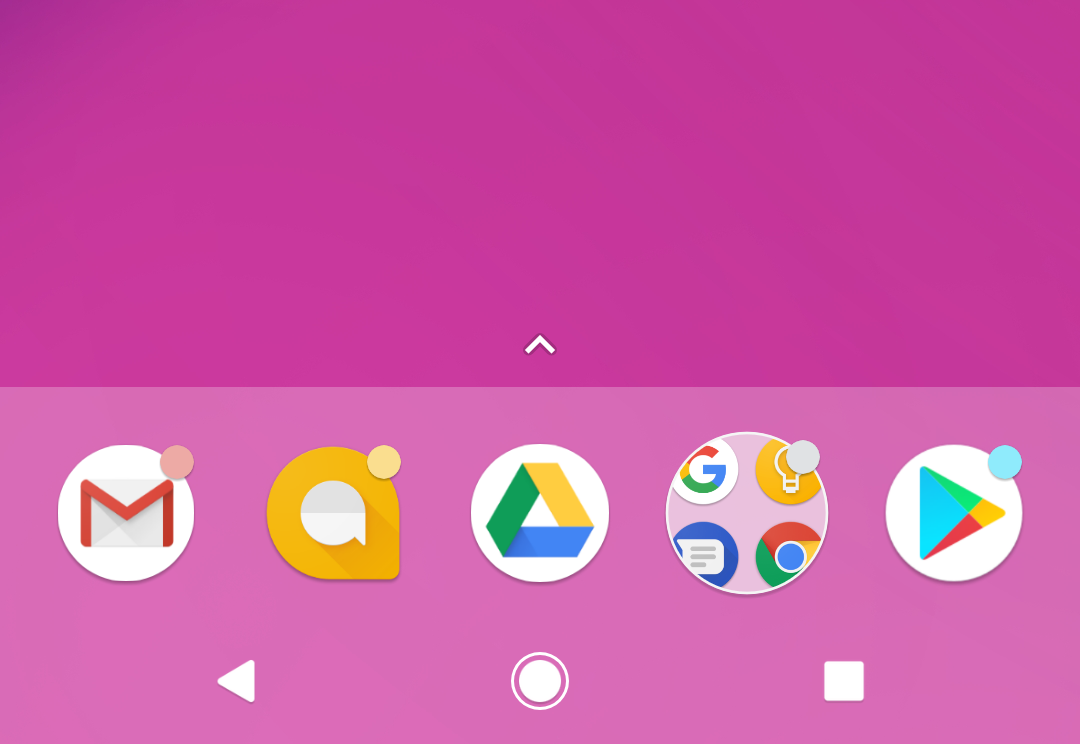
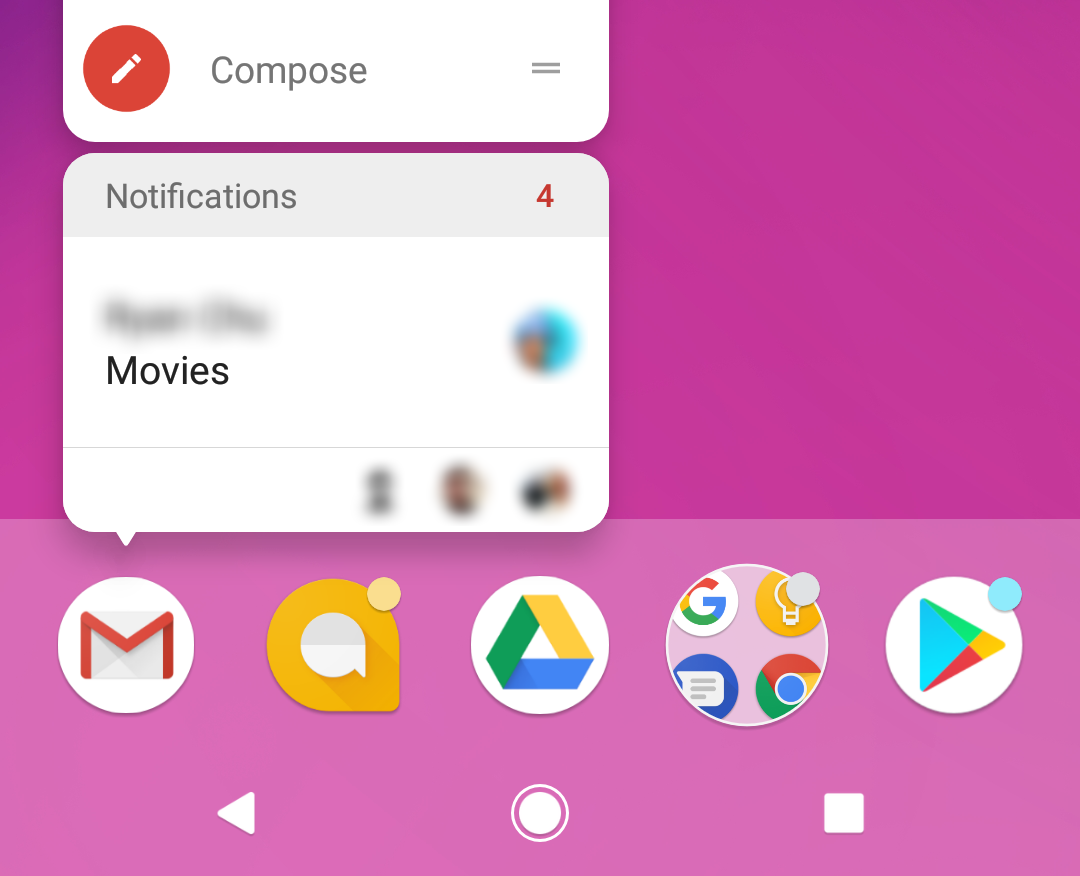
To see the notification for an app with a notification dot, the user long-presses the app icon. The notification menu appears, as shown below, and the user dismisses the notification or acts on it from the menu. This is similar to the way the user interacts with a notification in the notification drawer.
Notification channels
In the Settings app on an Android-powered device, users can adjust the notifications they receive. Starting with Android 8.0 (API level 26), you can assign each of your app's notifications to a notification channel. Each notification channel represents a type of notification, and you can group several notifications in each channel.
If you target only lower-end devices, you don't need to implement notification channels to display notifications, but it's good practice to target the latest available SDK, then check the device's SDK version before building the notification channel.
Notification channels are called Categories in the user-visible Settings app. For example, the screenshot on the left shows the notification settings for the Clock app, which has five notification channels. The screenshot on the right shows the settings for the "Firing alarms & timers" notification channel.
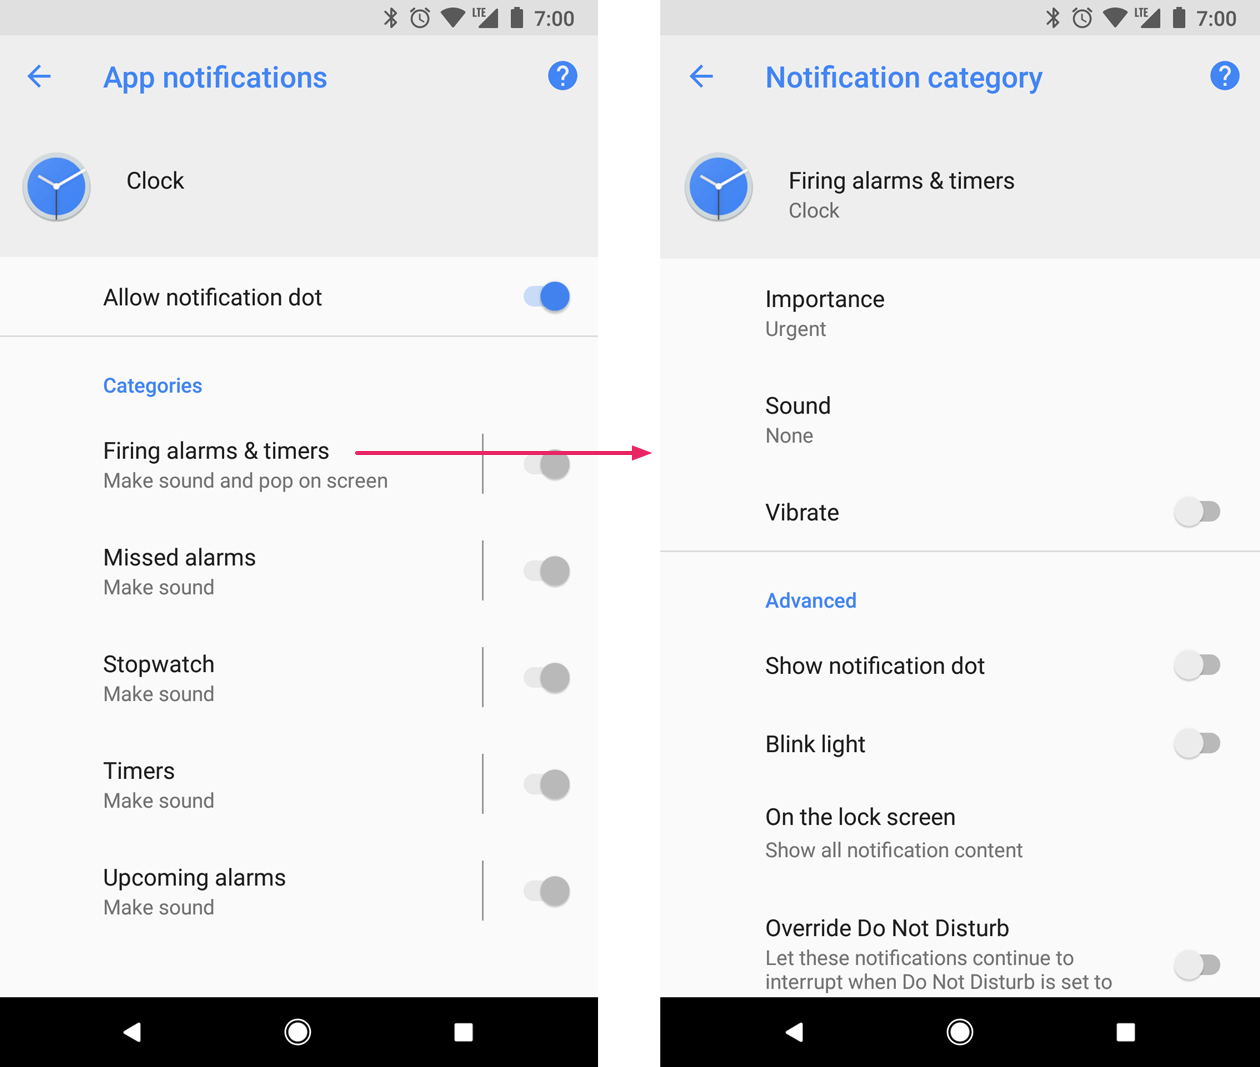
When you create a notification channel in your code, you set behavior for that channel, and the behavior is applied to all of the notifications in the channel. For example, your app might set the notifications in a channel to play a sound, blink a light, or vibrate. Whatever behavior you set for a notification channel, the user can change it, and they can turn off notifications from your app altogether.
targetSdkVersion is set to 25 or lower, when your app runs on Android 8.0 (API level 26) or higher, it behaves the same as it would on devices running Android 7.1 (API level 25) or lower.
Creating a notification channel
To create a notification channel instance, use the NotificationChannel constructor. Specify an ID that's unique within your package, a user-visible channel name, and an importance for the channel:
if (Build.VERSION.SDK_INT >= Build.VERSION_CODES.O) {
    NotificationChannel notificationChannel =
         new NotificationChannel(CHANNEL_ID, "Mascot Notification",
         NotificationManager.IMPORTANCE_DEFAULT);
}
Set the importance level
The NotificationChannel constructor, which is available in Android 8.0 (API level 26) and higher, requires an importance level. The channel's importance determines the instrusiveness of the notifications posted in that channel. For example, notifications with a higher importance might make sound and show up in more places than notifications with a lower importance. There are five importance levels, ranging from IMPORTANCE_NONE(0) to IMPORTANCE_HIGH(4).
To support Android 7.1 (API level 25) or lower, you must also set a priority for each notification. To set a priority, use the setPriority() method with a priority constant from the NotificationCompat class.
mBuilder.setPriority(NotificationCompat.PRIORITY_HIGH);
On devices running Android 8.0 and higher, all notifications, regardless of priority and importance level, appear in the notification drawer and as app icon badges. After a notification is created and delivered, the user can change the notification channel's importance level in the Android Settings app. The following table shows how the user-visible importance level maps to the notification-channel importance level and the priority constants.
| User-visible importance level | Importance (Android 8.0 and higher) | Priority (Android 7.1 and lower) |
| Urgent Notifications make a sound and appear as heads-up notifications. | IMPORTANCE_HIGH
|
PRIORITY_HIGH or PRIORITY_MAX
|
| High Notifications make a sound. | IMPORTANCE_DEFAULT
|
PRIORITY_DEFAULT
|
| Medium Notifications make no sound. | IMPORTANCE_LOW
|
PRIORITY_LOW
|
| Low Notifications make no sound and do not appear in the status bar. | IMPORTANCE_MIN
|
PRIORITY_MIN
|
Configure the initial settings
Configure the notification channel object with initial settings such as an alert sound, a notification light color, and an optional user-visible description.
notificationChannel.enableLights(true);
notificationChannel.setLightColor(Color.RED);
notificationChannel.enableVibration(true);
notificationChannel.setDescription("Notification from Mascot");
Starting from Android 8.1 (API Level 27), apps can only make a notification alert sound once per second. Alert sounds that exceed this rate aren't queued and are lost. This change doesn't affect other aspects of notification behavior, and notification messages still post as expected.
Create the notification channel
To create the notification channel, pass the instance of NotificationChannel to the createNotificationChannel() method from the NotificationManager class.
if (Build.VERSION.SDK_INT >= Build.VERSION_CODES.O) {
NotificationManager mNotificationManager =
        (NotificationManager) getSystemService(Context.NOTIFICATION_SERVICE);
mNotifyManager.createNotificationChannel(notificationChannel);
}
Check the SDK version before using createNotificationChannel(), because this API is only available on Android 8.0 and higher and in support packages.
Once you create a notification and notification channel and submit it to the NotificationManager, you cannot change the importance level using code. However, the user can change their preferences for your app's channels using the Android Settings app on their device.
Creating notifications
You create a notification using the NotificationCompat.Builder class. (NotificationCompat from the Android Support Library provides compatibility back to Android 4.0, API level 14. For more information, see Notification compatibility, below.) The builder classes simplify the creation of complex objects.
To create a NotificationCompat.Builder, pass the application context and notification channel ID to the constructor:
NotificationCompat.Builder mBuilder = new NotificationCompat.Builder(this, CHANNEL_ID);
The NotificationCompat.Builder constructor takes the notification channel ID as one of its parameters. This parameter is only used by Android 8.0 (API level 26) and higher. Lower versions of Android ignore it.
Set notification contents
You can assign components to the notification like a small icon, a title, and the notification message.
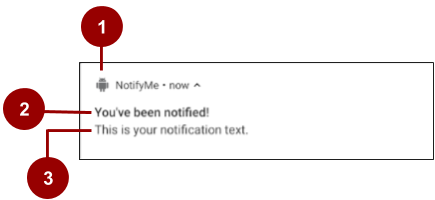
In the screenshot above:
- A small icon, set by
setSmallIcon(). This is the only content that's required. - A title, set by
setContentTitle(). The body text, set by
setContentText(). This text must be fewer than 40 characters, and it should not repeat what is in the title.NotificationCompat.Builder mBuilder =
 new NotificationCompat.Builder(this, CHANNEL_ID)
        .setSmallIcon(R.drawable.android_icon)
        .setContentTitle("You've been notified!")
        .setContentText("This is your notification text.");
Set the intent for the notification's tap action
Every notification must respond when it is tapped, usually by launching an Activity in your app. To launch an Activity in your app, set a content intent using the setContentIntent() method, passing in the Intent wrapped in a PendingIntent object. When your app uses a PendingIntent, the system can launch the Activity in your app on your behalf.
To instantiate a PendingIntent, use one of the following methods, depending on how you want the contained Intent to be delivered:
- To launch an
Activitywhen a user taps the notification, usePendingIntent.getActivity(). Pass in an explicitIntentfor theActivityyou want to launch. ThegetActivity()method corresponds to anIntentdelivered usingstartActivity(). - For an
Intentpassed intostartService(), for example a service to download a file, usePendingIntent.getService(). - For a broadcast
Intentdelivered withsendBroadcast(), usePendingIntent.getBroadcast().
Each of these PendingIntent methods takes the following arguments:
- The application
context. - A request code, which is a constant integer ID for the
PendingIntent. - The
Intentto be delivered. - A
PendingIntentflag that determines how the system handles multiplePendingIntentobjects from the same app.
The following snippet shows how to create a basic Intent to open an Activity when the user taps the notification:
// Create an explicit intent for an Activity in your app
Intent contentIntent = new Intent(this, ExampleActivity.class);
PendingIntent pendingContentIntent = PendingIntent.getActivity(this, 0,
                         contentIntent, PendingIntent.FLAG_UPDATE_CURRENT);

// Set the intent that will fire when the user taps the notification
mBuilder.setContentIntent(pendingContentIntent);
Add notification action buttons
Notification action buttons allow the user to perform an app-related task without launching the app. The system typically displays action buttons adjacent to the notification content. A notification can have up to three notification action buttons.

- "Learn more" and "Update" action buttons
Using action buttons, you can let the user perform a variety of actions, beyond just launching an Activity after the user taps the notification itself. For example, you can use action buttons to let the user start a background task to upload a file, place a phone call, snooze an alarm, or play music. For Android 7.0 (API level 24) and higher, you can use an action button to let the user reply to a message directly from a notification.
Adding an action button is similar to setting up the notification's default tap action: pass a PendingIntent to the addAction() method in the NotificationCompat.Builder class. But this action should not replicate what happens when the user taps the notification itself.
The following code shows how to add an action button using the addAction() method with the NotificationCompat.Builder object, passing in the icon, the title string for the label, and the PendingIntent to trigger when the user taps the action button.
mBuilder.addAction(R.drawable.car, "Get Directions", mapPendingIntent);
Starting from Android 7.0, icons are not displayed in notifications. Instead, more room is provided for the notification labels themselves. But notification action icons are still required, and they are used on older versions of Android and on devices such as Android Wear.
Expandable notifications
Notifications in the notification drawer appear in two main layouts, normal view (which is the default) and expanded view. Expanded view notifications were introduced in Android 4.1. Use them sparingly, because they take up more space and attention than normal view layouts.
To create notifications that appear in an expanded layout, use one of these helper classes to set the style object to the setStyle() method:
- Use
NotificationCompat.BigTextStylefor large-format notifications that include a lot of text. - Use
NotificationCompat.InboxStylefor displaying a list of summary lines, for example for incoming messages or emails. - Use
NotificationCompat.MediaStylefor media playback notifications. - Use
NotificationCompat.MessagingStyleto display sequential messages in an ongoing conversation. This style currently applies only on devices running Android 7.0 and higher. On lower devices, these notifications are displayed in the supported style. - Use
NotificationCompat.BigPictureStylefor large-format notifications that include large image attachments, as shown in the screenshot below.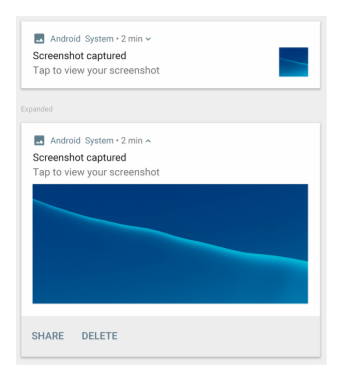
For example, here's how you'd set the BigPictureStyle on a notification:
NotificationCompat notif = new NotificationCompat.Builder(mContext, channelId)
    .setContentTitle("New photo from " + sender.toString())
    .setContentText(subject)
    .setSmallIcon(R.drawable.new_post)
    .setLargeIcon(aBitmap)
    .setStyle(new NotificationCompat.BigPictureStyle()
        .bigPicture(aBigBitmap)
        .setBigContentTitle("Large Notification Title"))
    .build();
To learn more about implementing expanded styles, see the NotificationCompat.Style documentation.
Ongoing notifications
Ongoing notifications are notifications that the user can't dismiss. Use ongoing notifications for background tasks that the user actively engages with, for example playing music. You can also use ongoing notifications to show tasks that are occupying the device, for example file downloads, sync operations, and active network connections.
Ongoing notifications can be a nuisance to your users, because users can't cancel them, so use them sparingly.
To make a notification ongoing, set setOngoing() to true.
Your app must explicitly cancel ongoing notifications by calling cancel() or cancelAll().
Delivering notifications
Use the NotificationManager class to deliver notifications:
- To create an instance of
NotificationManager, callgetSystemService(), passing in theNOTIFICATION_SERVICEconstant. - To deliver the notification, call
notify().
Pass these two values in the notify() method:
- A notification ID, which is used to update or cancel the notification.
- The
NotificationCompatobject that you created using theNotificationCompat.Builderobject.
The following example creates a NotificationManager instance, then builds and delivers a notification:
mNotifyManager = (NotificationManager)
                       getSystemService(NOTIFICATION_SERVICE);

//Builds the notification with all the parameters
NotificationCompat.Builder notifyBuilder =
                new NotificationCompat.Builder(this, PRIMARY_CHANNEL)
       .setContentTitle(getString(R.string.notification_title))
       .setContentText(getString(R.string.notification_text))
       .setSmallIcon(R.drawable.ic_android)
       .setContentIntent(notificationPendingIntent)
       .setPriority(NotificationCompat.PRIORITY_HIGH)
 .setDefaults(NotificationCompat.DEFAULT_ALL);

//Delivers the notification
mNotifyManager.notify(NOTIFICATION_ID, notifyBuilder.build());
Updating and reusing notifications
Sometimes you need to issue a notification multiple times for the same type of event. In this situation, you can update a previous notification by changing some of the notification's values, adding to the notification, or both.
To reuse an existing notification:
- Update a
NotificationCompat.Builderobject and build aNotificationobject from it, as when you first created and built the notification. - Deliver the notification with the same ID you used previously.
Notification object. If the previous notification has been dismissed, a new notification is created and displayed.
Clearing notifications
Notifications remain visible until one of the following happens:
- If the notification can be cleared, it disappears when the user dismisses it by swiping it or by using "Clear All".
- If you called
setAutoCancel()when you created the notification, the notification cancels itself automatically. When the user taps the notification, the notification is removed from the status bar. - If you call
cancel()on theNotificationobject for a specific notification ID, the notification is removed from the status bar. - If you call
cancelAll()on theNotificationobject, all the notifications you've issued are removed from the status bar.
Because the user can't cancel ongoing notifications, your app must cancel them by calling cancel() or cancelAll() on the Notification object.
Notification compatibility
To ensure the best compatibility, create notifications with NotificationCompat and its subclasses. In particular, use NotificationCompat.Builder from the Android Support library.
Keep in mind that not all notification features are available for every Android version, even though the methods to set them are in the NotificationCompat.Builder class. For example, expanded view layouts for notifications are only available on Android 4.1 and higher, but action buttons depend on expanded view layouts. If you use notification action buttons, they don't show up on devices running Android versions lower than 4.1.
To solve this:
Don't rely only on notification action buttons to carry out a notification's action. Instead, give your users a way to perform the same functionality from inside your app.
For example, if you set a notification action that lets the user stop and start media playback, first implement this functionality in an
Activityin your app.Have the
Activitystart when the user taps the notification.- Use
addAction()to add features to the notification as needed. Remember that any functionality you add also has to be available in theActivitythat starts when users tap the notification.
Notification design guidelines
Notifications always interrupt the user, so they should be short, timely, and most of all, relevant.
- Relevant: Ask yourself whether this information is essential for the user. What happens if the user doesn't get the notification? For example, scheduled calendar events are probably relevant.
- Timely: Notifications need to appear when they are useful. For example, notifying the user when it's time to leave for an appointment is useful.
- Short: Use as few words as possible.
For more notification design guidelines, see the Material Design spec for notifications.
Related practical
The related practical is in 8.1: Notifications
Learn more
Guides:
Reference:
NotificationCompat.BuilderreferenceNotificationCompat.StylereferenceBackground Tasks