1.1: Fragments
Contents:
- Understanding fragments
- Creating a fragment
- Creating a layout for a fragment
- Adding a fragment to an activity
- Related practical
- Learn more
A Fragment is a self-contained component with its own user interface (UI) and lifecycle that can be reused in different parts of an app's UI. This chapter explains how a Fragment can be useful for a UI design. (A Fragment can also be used without a UI, in order to retain values across configuration changes, but this chapter does not cover that usage.)
Understanding fragments
A Fragment is a class that contains a portion of an app's UI and behavior, which can be added as part of an Activity UI. While a single Fragment can be shared by different activities, each specific instance of the Fragment is exclusively tied to the Activity that hosts it.
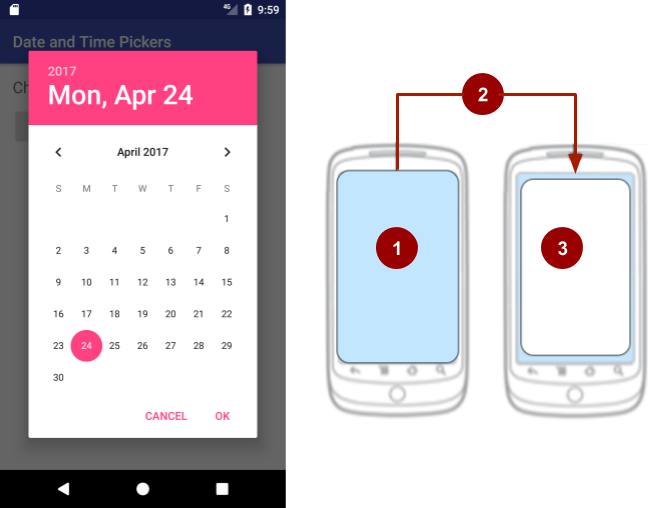
A Fragment is like a miniature Activity. Although it must be hosted by an Activity, a Fragment has its own lifecycle. Also like an Activity, a Fragment receives its own input events. For example, the standard date picker is a Fragment—an instance of DialogFragment, a subclass of Fragment—that enables the user to input a date. The standard date picker shows a dialog window floating on top of the Activity window.
For maximum reusability, a single Fragment should contain the code to define its layout and its behavior for user interaction.

In the above figure, on the right side, the numbers mean the following:
- The
Activitybefore the user event that adds the date picker. - A user event, such as clicking a button, adds the date picker to the UI of the
Activity. - The date picker, an instance of
DialogFragment(a subclass ofFragment), which displays a dialog floating on top of theActivity.
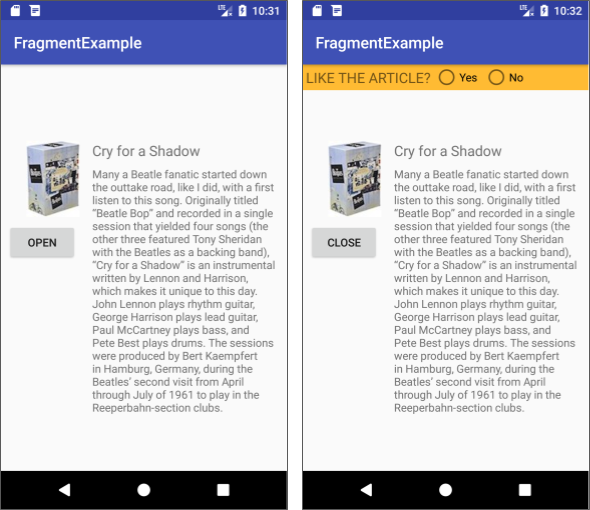
A Fragment can be a static part of an Activity UI so that it remains on the screen during the entire lifecycle of the Activity, or it can be a dynamic part of the UI, added and removed while the Activity is running. For example, the Activity can include buttons to open and close the Fragment.

The benefits of using fragments
Like any Fragment, the date picker includes the code for user interaction (in this case, selecting the date). The Fragment also has its own lifecycle—it can be added and removed by the user. These two characteristics of Fragment let you:
- Reuse a
Fragment. Write theFragmentcode once, and reuse theFragmentin more than oneActivitywithout having to repeat code. - Add or remove a
Fragmentdynamically. Add, replace, or remove aFragmentfrom anActivityas needed. - Integrate a mini-UI within the
Activity. Integrate aFragmentwith anActivityUI or overlay the UI, so that the user can interact with theFragmentUI without leaving theActivity. - Retain data instances after a configuration change. Since a
Fragmenthas its own lifecycle, it can retain an instance of its data after a configuration change (such as changing the device orientation). - Represent sections of a layout for different screen sizes. Encapsulating an interactive UI within a
Fragmentmakes it easier to display the interactive UI on different screen sizes.
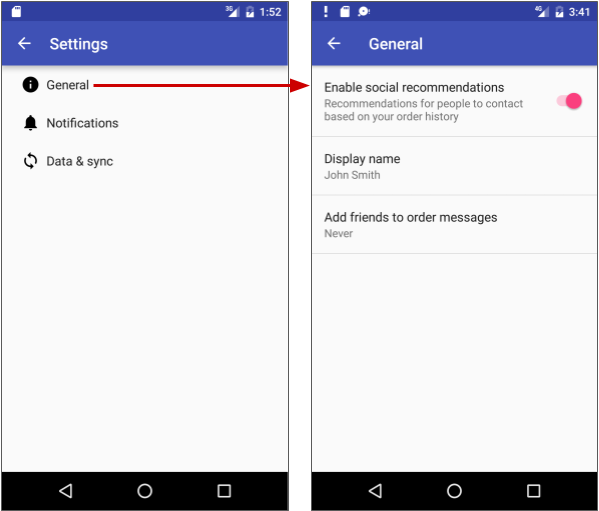
For an example of how a Fragment can be used to show a UI in different screen sizes, start a new Android Studio project for an app and choose the Settings Activity template. Run the app.
The template provides a Fragment to show the list of categories (left side of figure below), and a Fragment for each category (such as General) to show the settings in that category (right side of figure below). In layout terms, the list screen is known as the "master," and the screen showing the settings in a category is known as the "detail."

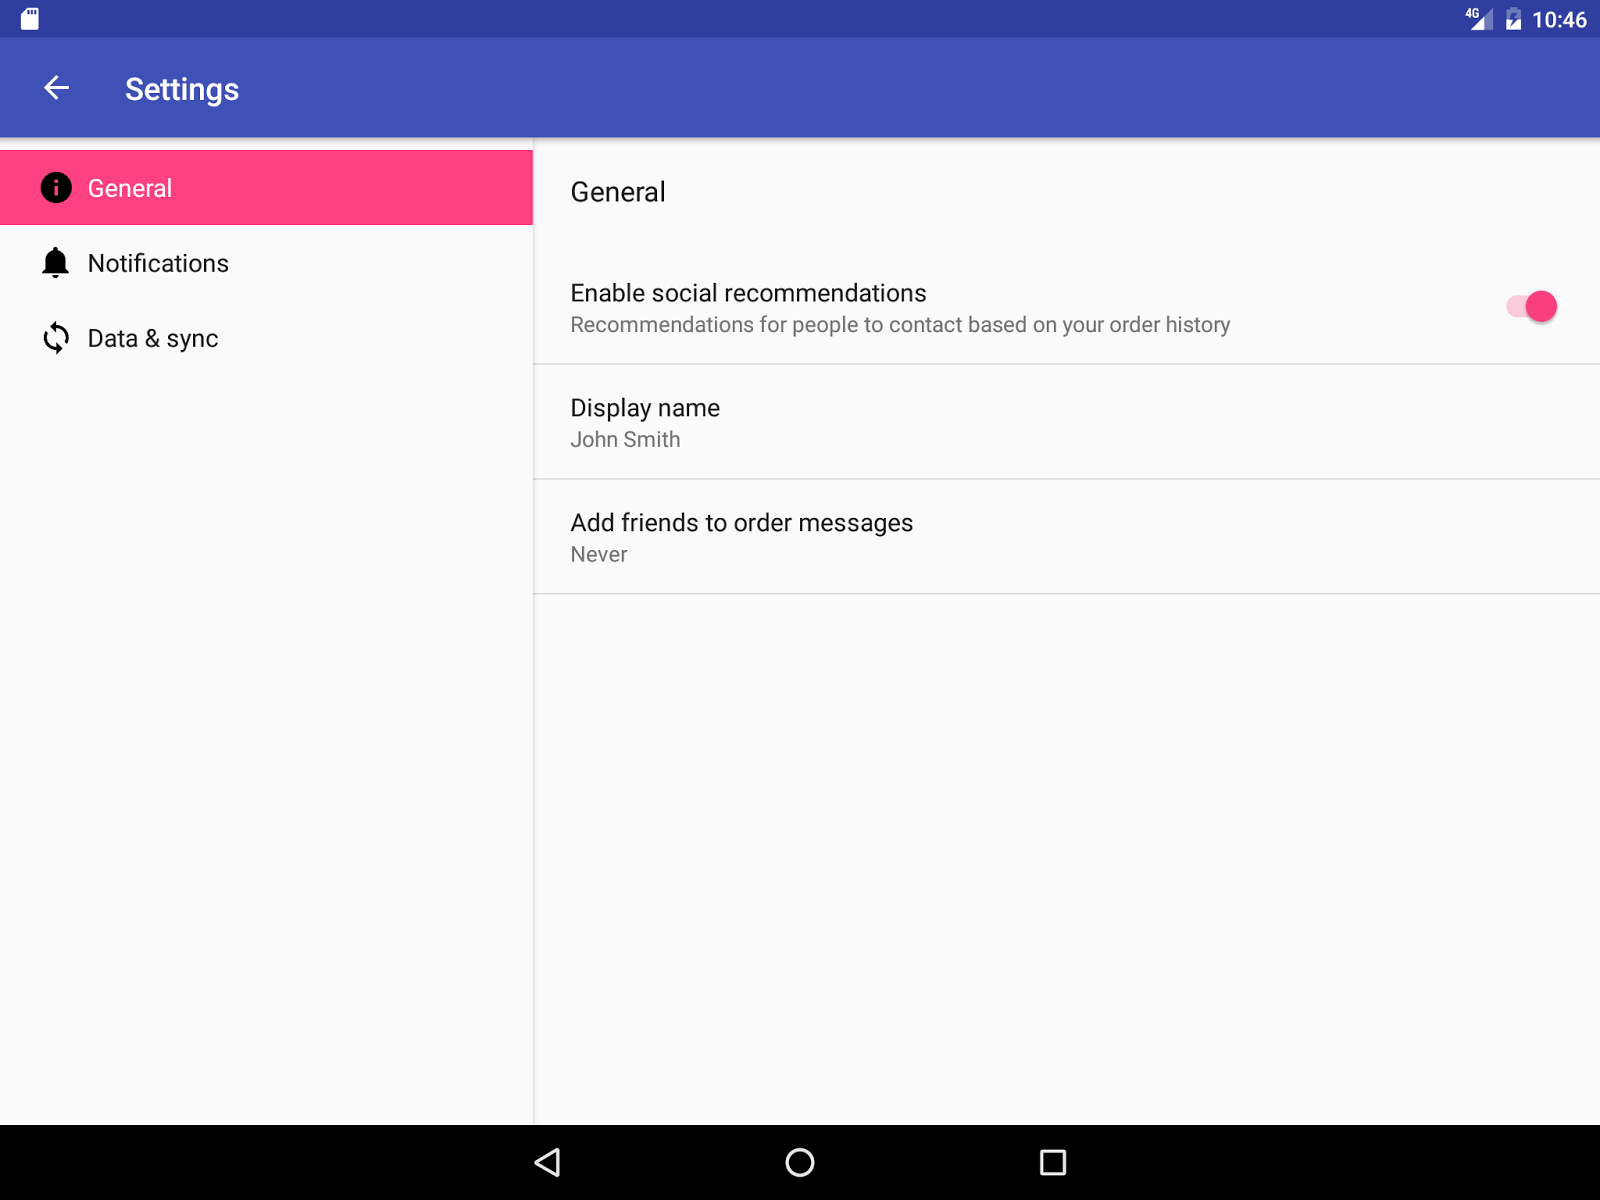
If you run the same app on a large-screen tablet in landscape orientation, the UI for each Fragment appears with the master and detail panes side by side, as shown below.

Using a fragment
The general steps to use a Fragment:
- Create a subclass of
Fragment. - Create a layout for the
Fragment. - Add the
Fragmentto a hostActivity, either statically or dynamically.
Creating a fragment
To create a Fragment in an app, extend the Fragment class, then override key lifecycle methods to insert your app logic, similar to the way you would with an Activity class.
Instead of extending the base Fragment class, you can extend one of these other, more specific Fragment subclasses:
DialogFragment: Displays a floating dialog, such as a date picker or time picker.ListFragment: Displays a list of items that are managed by an adapter (such as aSimpleCursorAdapter).PreferenceFragment: Displays a hierarchy ofPreferenceobjects as a list, similar toPreferenceActivity. This is useful when creating a "settings"Activityfor your app.
You can create a Fragment in Android Studio by following these steps:
- In Project: Android view, expand app > java and select the folder containing the Java code for your app.
- Choose File > New > Fragment > Fragment (Blank).
- Name the
Fragmentsomething like SimpleFragment, or use the supplied name (BlankFragment). If your
Fragmenthas a UI, check the Create layout XML option if it is not already checked. Other options include:- Include fragment factory methods: Include sample factory method code to initialize the
Fragmentarguments in a way that encapsulates and abstracts them. Select this option if the number of arguments would make a constructor too complex. - Include interface callbacks: Select this option if you want to include sample code that defines an interface in the
Fragmentwith callback methods that enable theFragmentto communicate with its hostActivity.
- Include fragment factory methods: Include sample factory method code to initialize the
Click Finish to create the
Fragment.
If you named the Fragment SimpleFragment, the following code appears in the Fragment:
public class SimpleFragment extends Fragment {

    public SimpleFragment() {
        // Required empty public constructor
    }
    // ...
}
All subclasses of Fragment must include a public no-argument constructor as shown, with the code public SimpleFragment(). The Android framework often re-instantiates a Fragment class when needed, in particular during state restore. The framework needs to be able to find this constructor so it can instantiate the Fragment.
Creating a layout for a fragment
If you check the Create layout XML option when creating a Fragment, the layout file is created for you and named after the Fragment, for example "fragment_simple.xml" for SimpleFragment. As an alternative, you can manually add a layout file to your project. The layout includes all UI elements that appear in the Fragment.
For maximum reusability, make your Fragment self-contained. A single Fragment should contain all necessary code to define its layout and its behavior for user interaction. Similar to an Activity, a Fragment inflates its layout to make it appear on the screen. Android calls the onCreateView() callback method to display a Fragment. Override this method to inflate the layout for a Fragment, and return a View that is the root of the layout for the Fragment.
For example, if you chose Fragment (Blank) with just the Create layout XML option, and you name the Fragment SimpleFragment, the following code is generated in SimpleFragment:
@Override
public View onCreateView(LayoutInflater inflater,
                         ViewGroup container, Bundle savedInstanceState) {
    // Inflate the layout for this fragment
    return inflater.inflate(R.layout.fragment_simple, container, false);
}
The container parameter passed to onCreateView() is the parent ViewGroup from the Activity layout. Android inserts the Fragment layout into this ViewGroup.
The onCreateView() callback provides a LayoutInflater object to inflate the UI for the Fragment from the fragment_simple layout resource. The method returns a View that is the root of the layout for the Fragment.
The savedInstanceState parameter is a Bundle that provides data about the previous instance of the Fragment, in case the Fragment is resuming.
The inflate() method inside onCreateView() displays the layout:
// Inflate the layout for this fragment
return inflater.inflate(R.layout.fragment_simple, container, false);
The inflate() method takes three arguments:
- The resource ID of the layout you want to inflate (
R.layout.fragment_simple). - The
ViewGroupto be the parent of the inflated layout (container). - A boolean indicating whether the inflated layout should be attached to the
ViewGroup(container) during inflation. This should befalsebecause the system is already inserting the inflated layout into the container. Passingtruewould create a redundantViewGroupin the final layout.
Tip: The Fragment class contains other lifecycle callback methods to override besides onCreateView(), such as onCreate(), onStart(), onPause(), and onStop(). The only lifecycle callback you need to inflate the layout is onCreateView(). To learn about other lifecycle callbacks, see the lesson on Fragment lifecycle and communications.
Adding a fragment to an activity
A Fragment must be hosted by an Activity and included in its layout. There are two ways you can use a Fragment in an Activity layout:
Add the
Fragmentstatically, inside the XML layout file for theActivity, so that it remains on the screen during the entire lifecycle of theActivity.For example, you may want to devote a portion of a UI for an
Activityto aFragmentthat provides its own user interaction and behavior, such as a set of social media "Like" buttons. You can add thisFragmentto the layouts of different activities.Add the
Fragmentdynamically, using fragment transactions. During the lifecycle of theActivity, your code can add or remove theFragment, or replace it with anotherFragment, as needed.
Adding a fragment statically
Declare the Fragment inside the layout file for the Activity (such as activity_main.xml) using the <fragment> tag. You can specify layout properties for the Fragment as if it were a View. For example, the following shows two Fragment objects included in the Activity layout:
<LinearLayout xmlns:android="http://schemas.android.com/apk/res/android"
    android:orientation="horizontal"
    android:layout_width="match_parent"
    android:layout_height="match_parent">
    <fragment android:name="com.example.news.ArticleListFragment"
            android:id="@+id/list"
            android:layout_weight="1"
            android:layout_width="0dp"
            android:layout_height="match_parent" />

    <fragment android:name="com.example.news.ArticleReaderFragment"
            android:id="@+id/viewer"
            android:layout_weight="2"
            android:layout_width="0dp"
            android:layout_height="match_parent" />
</LinearLayout>
When the system creates the Activity layout, it instantiates each Fragment specified in the layout, and calls the onCreateView() method for each one, to retrieve the layout for each Fragment. Each Fragment returns a View, and the system inserts this View directly in place of the <fragment> element.
The code above uses the android:id attribute to identify each Fragment element. The system uses this id to restore the Fragment if the Activity is restarted. You also use it in your code to refer to the Fragment.
Adding a fragment dynamically
A great feature of the Fragment class is the ability to add, remove, or replace a Fragment dynamically, while an Activity is running. A user performs an interaction in the Activity, such as tapping a button, and the Fragment appears in the UI of the Activity. The user taps another button to remove the Fragment.
To add a Fragment, your Activity code needs to specify a ViewGroup as a placeholder for the Fragment, such as a LinearLayout or a FrameLayout:
<FrameLayout
    android:id="@+id/fragment_container"
    android:name="SimpleFragment"
    android:layout_width="0dp"
    android:layout_height="wrap_content"
    app:layout_constraintLeft_toLeftOf="parent"
    app:layout_constraintRight_toRightOf="parent"
    app:layout_constraintTop_toTopOf="parent"
    tools:layout="@layout/fragment_simple">
</FrameLayout>
To manage a Fragment in your Activity, create an instance of the Fragment, and an instance of FragmentManager using getSupportFragmentManager(). With FragmentManager you can use FragmentTransaction methods to perform Fragment operations while the Activity runs.
Fragment operations are wrapped into a transaction so that all of the operations finish before the transaction is committed for the final result. You start a transaction with beginTransaction() and end it with commit().
Within the transaction you can:
- Add a
Fragmentusingadd(). - Remove a
Fragmentusingremove(). - Replace a
Fragmentwith anotherFragmentusingreplace(). - Hide and show a
Fragmentusinghide()andshow().
The best practice for instantiating the Fragment in the Activity is to provide a newinstance() factory method in the Fragment. For example, if you choose New > Fragment > Fragment Blank to add a Fragment to your Android Studio project, and you select the Include fragment factory methods option, Android Studio automatically adds a newinstance() method to the Fragment as a factory method to set arguments for the Fragment when the Fragment is called by the Activity.
Add a simple newinstance() method to SimpleFragment, and instantiate the Fragment in MainActivity:
- Open
SimpleFragment, and add the following method to the end for instantiating theFragment:public static SimpleFragment newInstance() { return new SimpleFragment(); } - In the
Activity, instantiate theFragmentby calling thenewInstance()method inSimpleFragment:SimpleFragment fragment = SimpleFragment.newInstance(); In the
Activity, get an instance ofFragmentManagerwithgetSupportFragmentManager().FragmentManager fragmentManager = getSupportFragmentManager();Tip: Use the Support Library version—
getSupportFragmentManager()rather thangetFragmentManager()—so that the app remains compatible with devices running earlier versions of Android platform.Use
beginTransaction()with an instance ofFragmentTransactionto start a series of edit operations on theFragment:FragmentTransaction fragmentTransaction = fragmentManager.beginTransaction();You can then add a
Fragmentusing theadd()method, and commit the transaction withcommit(). For example:fragmentTransaction.add(R.id.fragment_container, fragment); fragmentTransaction.commit();The first argument passed to
add()is theViewGroupin which thefragmentshould be placed (specified by its resource IDfragment_container). The second parameter is thefragmentto add.In addition to the
add()transaction, calladdToBackStack(null)in order to add the transaction to a back stack ofFragmenttransactions. This back stack is managed by theActivity. It allows the user to return to the previousFragmentstate by pressing the Back button:fragmentTransaction.add(R.id.fragment_container, fragment); fragmentTransaction.addToBackStack(null); fragmentTransaction.commit();To replace a
Fragmentwith anotherFragment, use thereplace()method. To remove aFragment, useremove(). Once you've made your changes withFragmentTransaction, you must callcommit()for the changes to take effect.
The following shows a transaction that removes the Fragment simpleFragment using remove():
// Get the FragmentManager.
FragmentManager fragmentManager = getSupportFragmentManager();
// Check to see if the fragment is already showing.
SimpleFragment simpleFragment = (SimpleFragment) fragmentManager
.findFragmentById(R.id.fragment_container);
if (simpleFragment != null) {
// Create and commit the transaction to remove the fragment.
 FragmentTransaction fragmentTransaction =
                                  fragmentManager.beginTransaction();
fragmentTransaction.remove(simpleFragment).commit();
}
In addition to learning about how a Fragment can be added, replaced, and removed, you should also learn how to manage the lifecycle of a Fragment within the Activity, as described in the lesson on Fragment lifecycle and communications.
Related practical
The related practical is Creating a Fragment with a UI.
Learn more
Android developer documentation:
- Fragments
- FragmentManager
- FragmentTransaction
- Creating a Fragment
- Building a Flexible UI
- Building a Dynamic UI with Fragments
- Supporting Tablets and Handsets
Video:
- What the Fragment? (Google I/O 2016)
- Fragment Tricks (Google I/O '17)
- Por que Precisamos de Fragments?