2.1: App widgets
Contents:
- Introduction
- About app widgets
- Adding an app widget to an app
- Updating the widget provider-info file
- Defining the widget layout
- Implementing the widget-provider class
- Using a configuration activity
- Related practical
- Learn more
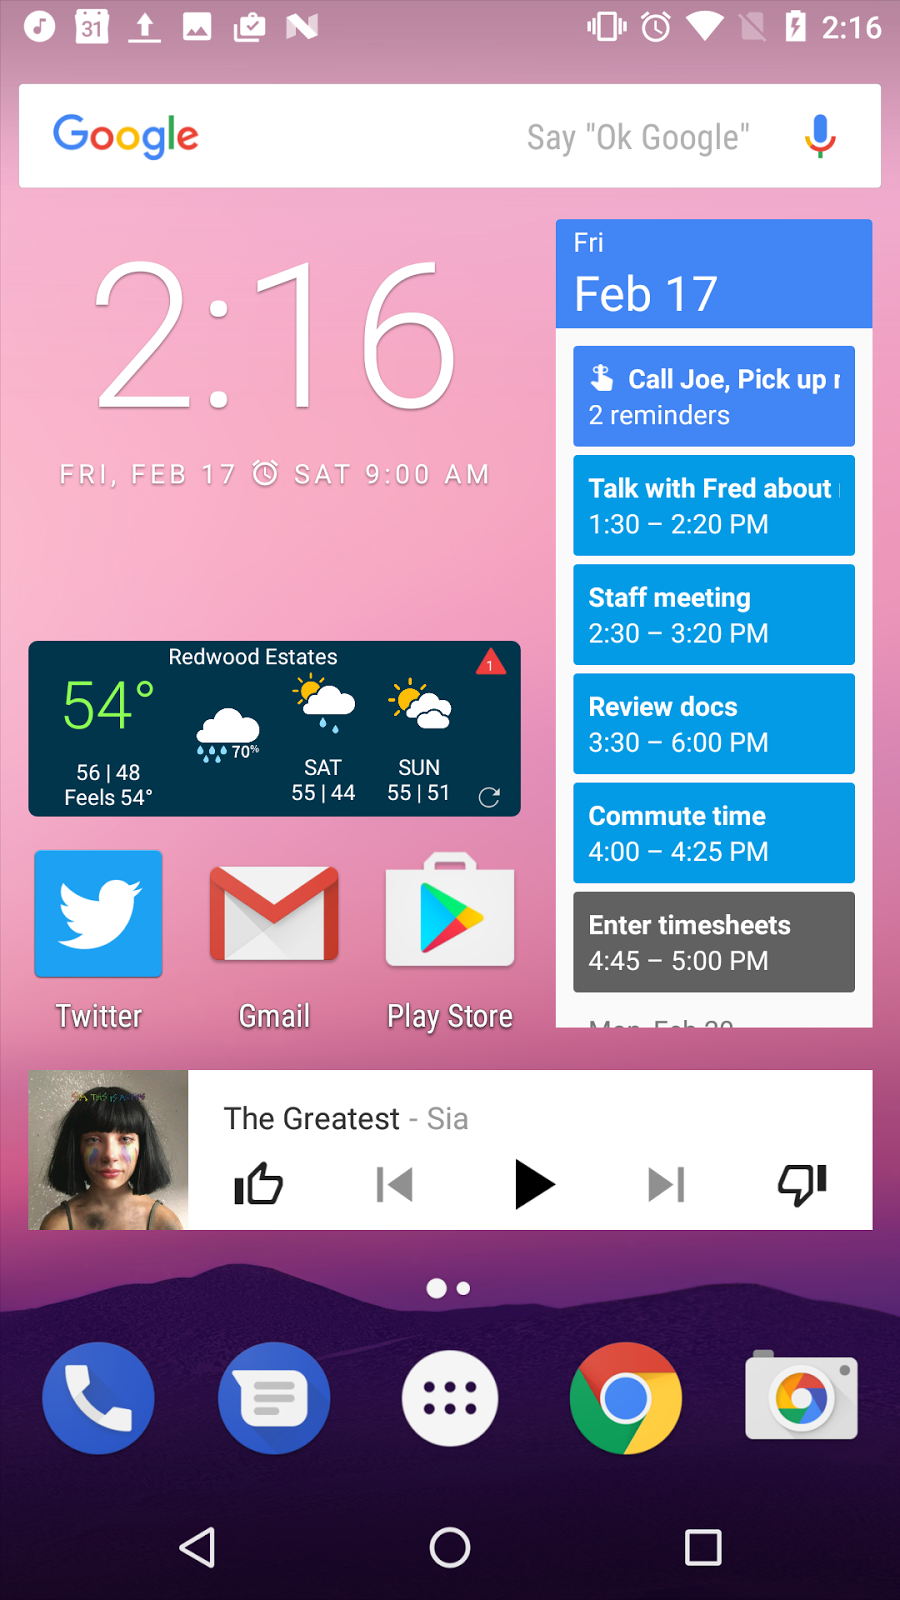
An app widget is a miniature app view that appears on the Android home screen and can be updated periodically with new data. App widgets display small amounts of information or perform simple functions such as showing the time, summarizing the day's calendar events, or controlling music playback.

In this chapter you learn how to provide an app widget for your Android app, how to update that app widget with new data, and how to provide click actions for that widget or any of its parts.
About app widgets
App widgets are miniature apps that appear on any Android home screen panel. Widgets provide an at-a-glance view of your app's most important data and features, even if that app is not running.
When the user installs your app on a device, that app's associated widgets are listed on the widget install screen. To get to the widget install screen, touch & hold on an empty spot on a home screen and tap Widgets. Touch & hold any widget to pick it up and add it to a home screen, move it around, or resize it, if it is resizeable.
App widgets can display data, be interactive, or both. Data widgets can have a simple flat layout (such as a clock or weather widget) or use a scrolling list for a collection of items (such as a calendar or to do list widget). App widget controls can provide shortcut actions (such as play/pause for a music player). Even simple app widgets may include an action to open their associated app when tapped.
As a general rule, app widgets should be small, simple, and provide limited information or functionality.
The components of an app widget
App widgets are add-ons for an existing app and are made available to users when the app is installed on a device. Your app can have multiple widgets. You cannot create a stand-alone app widget without an associated app.
App widgets include the following components in your Android Studio project. You learn more about these components in the latter part of this chapter.
- Provider-info file: App widgets include an XML file that defines metadata about the widget. That metadata includes the widget's initial or minimum size, its update interval, configuration activity (if any), and preview image.
- Layout: You define the user interface for your app widget in an XML layout file, just as you do for regular apps. However, app widgets support a more limited set of layouts and views than regular apps.
- Widget-provider class: The app widget provider contains the Java code for your app widget. App widgets are actually broadcast receivers—they extend the
AppWidgetProviderclass, which in turn extends fromBroadcastReceiver.AppWidgetProviderobjects receive only broadcasts relevant to the app widget, including intents for update, enabled, disabled, and deleted. As with all broadcast receivers, app widget providers are declared in the Android manifest. - Configuration activity (optional): If your app widget must be configured before it is used, you can implement an activity that provides that configuration. The configuration activity is then listed in the app widget's provider-info file and is automatically launched when the user adds a widget to the home screen. You can see this behavior with the Android News & Weather widget, which asks you to choose whether to display weather and stories, weather only, or stories only.
App widgets exist within a system framework controlled by the app widget manager and the app widget host.
The app widget manager (AppWidgetManager) manages widget updates and sends the broadcast intents that app widget providers receive to do the actual work of updating.
The app widget host (AppWidgetHost) is an app component that can hold and display other app widgets. The Android home screen is by far the most frequently used app widget host, although it is possible to create your own app widget host.
App widget updates
App widgets that display information can be updated regularly for new or updated information. The data a widget contains can be updated in two ways:
- The widget updates itself at regular intervals. You can define the interval in the widget's provider-info file, but that interval must be at least 30 minutes.
- The widget's associated app can request a widget update explicitly.
In both these cases, the update occurs because the app widget manager sends a broadcast intent with the action ACTION_APPWIDGET_UPDATE. The app widget-provider class receives that intent and calls the onUpdate() method.
Implement the onUpdate() method in your widget-provider class to update your widget. For simple widgets, you might just update the data in the widget's views. More complex widgets may need to interact with additional services to retrieve data from content providers or other data storage locations.
Update performance
Widget updates consume device resources such as battery life. Updates occur whether or not the underlying app is running, and widgets can wake a sleeping device to perform the update. It is a best practice to design your widgets so that they do not need frequent updates, to conserve these device resources.
AlarmManager. Set the alarm type to either ELAPSED_REALTIME or RTC, which will only deliver the alarm when the device is awake.
Configurable app widgets
Some widgets need to be configured before they can be used. For example, a widget that displays a single photo would need to prompt the user to pick the photo from a gallery. A stock-ticker widget would need a list of stock symbols to display.
The configuration activity appears when the user first adds your widget onto the home screen.

With configurable widgets, the user can place multiple copies of the same widget on their home screens, with different configurations. If any of those widgets receives an update request, you must update all the installed widgets at once.
You learn more about widget configuration activities in Using a configuration activity, below.
Adding an app widget to an app
To add a widget to your app project in Android Studio, select File > New > Widget > App Widget.
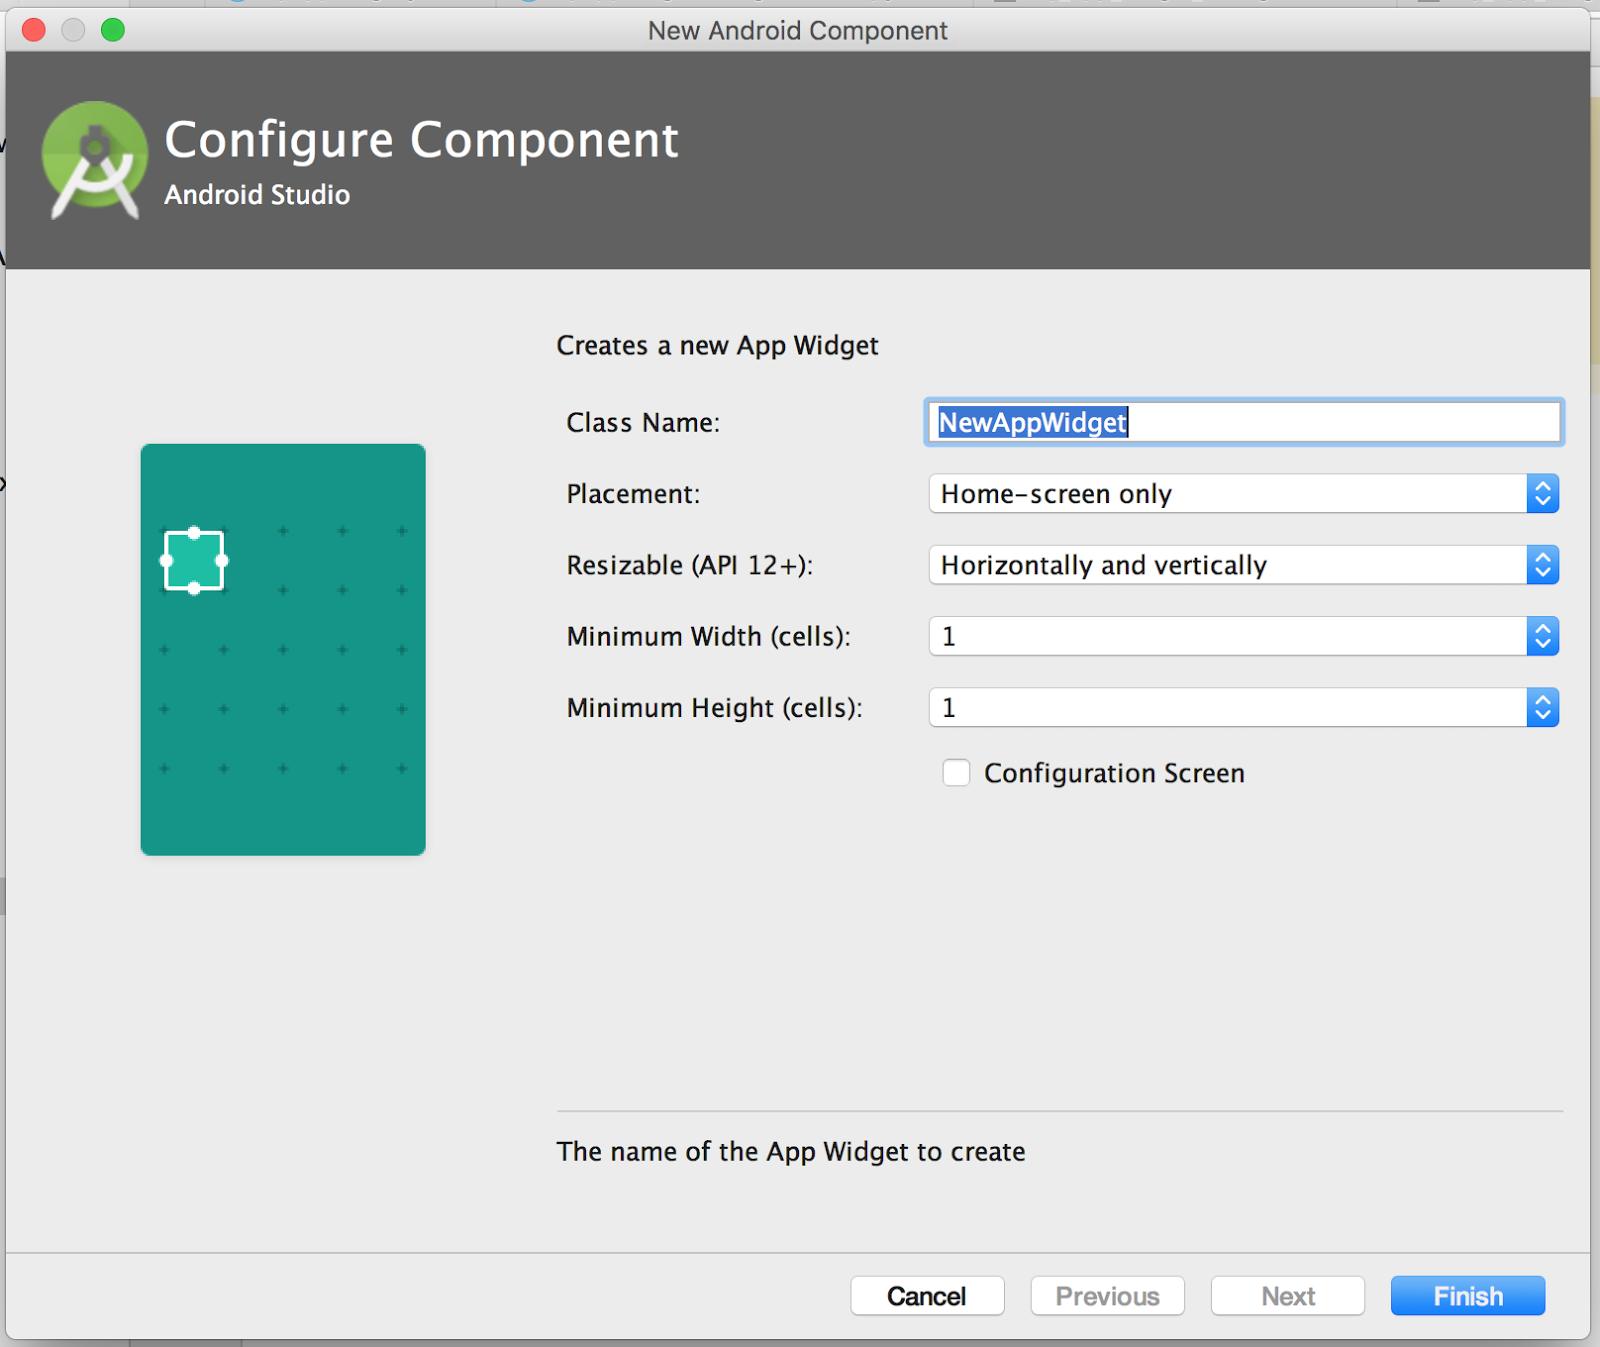
The New Android Component dialog appears for your new widget:

In the above figure:
- Class Name is the name for your widget's provider class. This class should contain the word "Widget."
- Placement should almost always be Home-screen only.
- Resizeable indicates whether your widget should be resizeable after it is placed. You can restrict the resizability of your widget to horizontal or vertical only, or make your widget not resizeable.
- Minimum Width and Minimum Height are the minimum sizes for your widget, measured in cells on the home screen.
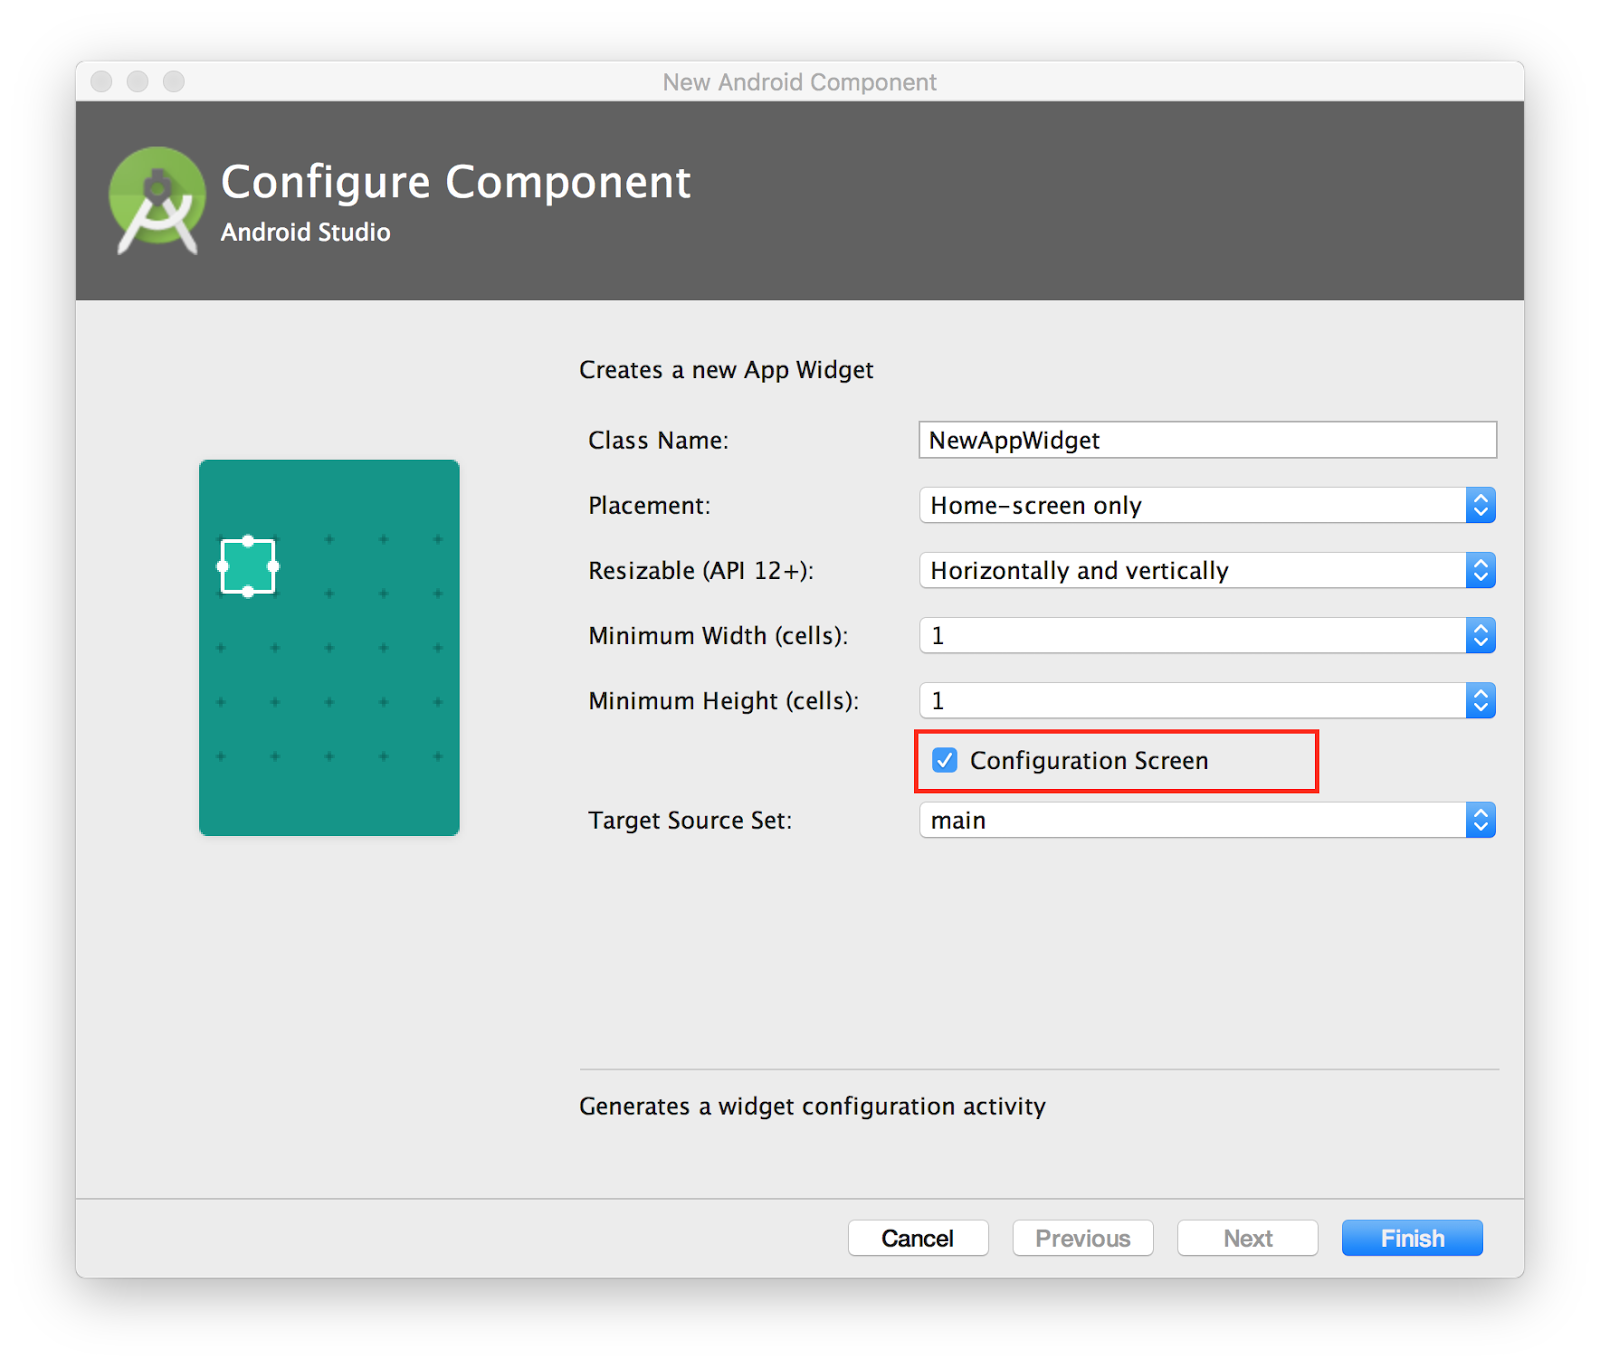
- Configuration Screen is an option to include an initial widget configuration activity.
After you click Finish, several files are added to or modified in your project. For example, if you name your app widget NewAppWidget:
- A provider class called
NewAppWidget.javais added to your project. - A new layout file is added for the widget in
res/layouts/new_app_widget.xml. - A new provider-info file is added in
res/xml/new_app_widget_info.xml. - If you selected Configuration Screen, a new configuration activity class called
NewAppWidgetConfigurationActivity.javais added to your project. - The Android manifest is updated to include the provider and configuration activity classes.
Updating the widget provider-info file
The provider-info file defines metadata and initial properties for your app widget, including the widget's initial size, update interval, and configuration activity. These properties are used to display your widget in the widget picker, to configure the widget (if configuration is needed), and to place the widget in the right number of cells on the home screen.
The provider info is an XML resource located in the res/xml/ folder, and it contains a single <appwidget-provider> element. Android Studio creates a template provider-info file when you add a new widget, based on the values you provided in the New Android Component dialog.
Here's an example of a provider-info file.
<?xml version="1.0" encoding="utf-8"?>
<appwidget-provider
   xmlns:android="http://schemas.android.com/apk/res/android"
   android:minHeight="40dp"
   android:minWidth="40dp"
   android:initialLayout="@layout/new_app_widget"
   android:updatePeriodMillis="86400000"
   android:previewImage="@drawable/new_appwidget_preview"
   android:resizeMode="horizontal|vertical"
   android:widgetCategory="home_screen"
   android:configure=
      "com.example.android.widgettest.MyAppWidgetConfigureActivity">
</appwidget-provider>
The following sections describe key attributes of the file. See the AppWidgetProviderInfo class for more information on the attributes for the <appwidget-provider> element.
android:minHeight and android:minWidth attributes
The android:minHeight and android:minWidth attributes define the minimum initial size of the widget, in dp. Android Studio provides these values in the provider-info file based on the number of grid spaces you specify when you create the widget.
The Android home screen provides a grid of available spaces (cells) into which users can place widgets and icons. The available cells in the grid vary by device—phones may only allow a 4x4 grid, but tablets can offer a larger grid. When your widget is added to a user's home screen, it is stretched both horizontally and vertically to occupy as many grid cells as satisfy the minWidth and minHeight values.
The rule for how many dp fit into a grid cell is based on the equation 70 × grid_size − 30, where grid_size is the number of cells you want your widget to take up. Generally speaking, you can use this table to determine what your minWidth and minHeight should be:
| # of columns or rows | minWidth or minHeight
|
| 1 | 40 dp |
| 2 | 110 dp |
| 3 | 180 dp |
| 4 | 250 dp |
android:initialLayout attribute
The android:initialLayout attribute defines the XML layout file for your widget, for example @layout/my_app_widget. You will learn more about widget layout in the next section.
android:updatePeriodMillis attribute
The android:updatePeriodMillis attribute defines update interval in milliseconds for the app widget, that is, how often the app widget manager should send a broadcast intent to update the widget. The default update interval is 86,400,000 milliseconds, or 24 hours. The minimum possible update interval is 1,800,000 milliseconds or 30 minutes. Because widget updates use device resources and may even awaken a sleeping device, design your widget to update as infrequently as possible (use a larger value for android:updatePeriodMillis).
To disable automatic updates, set android:updatePeriodMillis to 0.
android:updatePeriodMillis value determines how often the app widget manager requests an update for an app widget. A running app can update its associated widget at any time.
android:previewImage attribute
The android:previewImage attribute specifies an image or drawable that previews what the app widget will look like when it has been configured and placed on the user's home screen. The user sees the preview image in the widget picker when they choose an app widget.
The widget preview can be any image or drawable in the res/drawable folder. When you create a new widget, Android Studio provides an "example" widget preview image for you (@drawable/new_appwidget_preview)

Replace this sample preview with any image or drawable that better represents your app widget. If you do not include the android:previewImage line in the provider-info file, the launcher icon for your app is used instead.
android:resizeMode attribute
If your app widget is resizeable, the android:resizeMode attribute specifies whether your widget can be resized horizontally, vertically, both, or neither. The possible values are "horizontal", "vertical", "horizontal|vertical", and "none".
Users touch & hold a widget to show the widget's resize handles, then drag the handles to change the size of the widget on the home screen grid.
android:widgetCategory attribute
The android:widgetCategory attribute declares whether your app widget can be displayed on the home screen ("home_screen"), the lock screen ("keyguard"), or both. Android Studio provides this attribute based on the value you choose for the Placement drop-down menu when you create the widget. For Android 5.0 and higher, only home_screen is valid. Keyguard (lock screen) widgets were only available in Android 4.2 (API 17) to Android 4.4.4 (API 19.0).
android:configure attribute
The android:configure attribute defines the app widget's configuration activity, if you selected the Configuration Screen checkbox in the Add Android Component dialog. The configuration activity is specified in this attribute with its fully qualified class name. You will learn more about configuration activities later in this chapter.
Defining the widget layout
You can create app widget layouts in the Android Studio Design tab, the same way you create activity layouts. However, app widget layouts are based on RemoteViews object hierarchies, not View object hierarchies. Remote views do not support every kind of layout or view that standard views support, and remote views do not support custom views.
How are remote views different from regular views? A remote view is a view hierarchy that can be displayed in a process different from the original app but with the same permissions. Widgets and custom notifications are the primary examples for this situation.
Each time your widget updates, you create a RemoteViews object from the layout, update the views in the layout with data, and then pass that remote view to the app widget manager to display.
Because app widgets are typically small in size and display limited information, you should design your widgets with simple layouts. The Widgets and App Widget Design Guidelines pages provide guidelines and suggestions for good app widget designs.
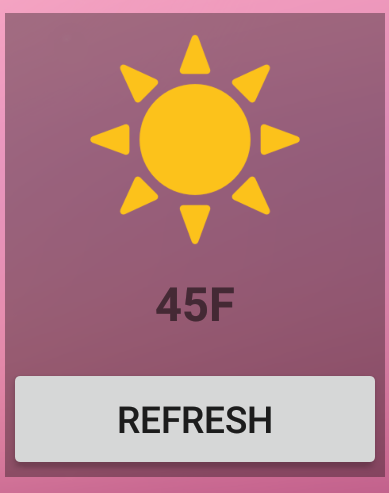
Here's a simple example layout for a 1x2 weather widget (one cell wide and two cells high). This app widget shows an image, a text view, and a button, in a linear layout.

<LinearLayout xmlns:android="http://schemas.android.com/apk/res/android"
   android:layout_width="match_parent"
   android:layout_height="match_parent"
   android:background="@color/colorPrimary"
   android:orientation="vertical"
   android:padding="@dimen/widget_margin">

   <ImageView
       android:id="@+id/imageView"
       android:layout_width="wrap_content"
       android:layout_height="0dp"
       android:paddingTop="8dp"
       android:layout_gravity="center"
       android:layout_weight="2"
       android:src="@drawable/sun" />

   <TextView
       android:id="@+id/textView"
       android:layout_width="match_parent"
       android:layout_height="0dp"
       android:layout_weight="1"
       android:gravity="center"
       android:text="45F"
       android:textSize="18dp"
       android:textStyle="bold" />

   <Button
       android:id="@+id/actionButton"
       android:layout_width="match_parent"
       android:layout_height="0dp"
       android:layout_weight="1"
       android:text="Refresh" />
</LinearLayout>
Supported views
A RemoteViews object (and, consequently, an app widget) can support the following layout classes:
And the following view classes:
AnalogClockButtonChronometerImageButtonImageViewProgressBarTextViewViewFlipperListViewGridViewStackViewAdapterViewFlipper
Descendants of these classes are not supported. The RemoteViews class also supports ViewStub, which is an invisible, zero-sized View. You can use ViewStub to lazily inflate layout resources at runtime.
Widget margins
App widgets look best with a little extra space around the edges so that the widgets do not display edge-to-edge on the user's home screen. Before Android 4.0 (API 14), you had to add that extra space to your widget layout yourself. After API 14 the system adds the space for you. If your app targets a version of Android higher than API 14, do not add space to the edges of your app widgets.
When you use Android Studio to create your app widget, Android Studio automatically creates a layout and dimension resources that support both older (pre-API 14) and newer Android versions. Specifically, the layout template that Android Studio creates includes an android:padding attribute:
<RelativeLayout xmlns:android="http://schemas.android.com/apk/res/android"
   android:layout_width="match_parent"
   android:layout_height="match_parent"
   android:background="#09C"
   android:padding="@dimen/widget_margin">
...
</RelativeLayout>
The widget_margin value is defined in the default dimens.xml file (res/values/dimens.xml):
<dimen name="widget_margin">8dp</dimen>
When Android Studio creates your widget it also adds a dimens.xml (v14) (res/values-v14/dimens.xml) file, which removes the extra space for API 14 and higher versions:
<dimen name="widget_margin">0dp</dimen>
You do not need to do anything additional to support widget padding.
Implementing the widget-provider class
The widget-provider class implements the widget's behavior such as updating the widget's data at regular intervals or providing on-click behavior for the widget itself or any of its components.
Widget providers are subclasses of the AppWidgetProvider class. The AppWidgetProvider class extends BroadcastReceiver as a convenience class to receive and handle broadcasts specific to app widgets, such as when the app widget is updated, deleted, enabled, and disabled.
To create a widget provider:
- Extend
AppWidgetProviderfor your own class. - Override the
onUpdate()method, at minimum, to construct the widget layout and manage widget updates. - Optionally, implement additional widget actions.
- Declare the widget provider as a broadcast receiver in the app manifest (
AndroidManifest.xml).
When you create a new widget, Android Studio provides a template widget-provider class for you that does most of this implementation for you.
Create a widget-provider class
This is a skeleton widget-provider class:
public class NewAppWidget extends AppWidgetProvider {
   // Standard onUpdate() method override
   @Override
   public void onUpdate(Context context,
      AppWidgetManager appWidgetManager, int[] appWidgetIds) {

      // There may be multiple widgets active, so update all of them
      for (int appWidgetId : appWidgetIds) {
         // Update the app widget
       }
   }
}
In addition to onUpdate(), the AppWidgetProvider class includes other handler methods for different events including onDeleted(), onEnabled(), and onDisabled(). See AppWidgetProvider for more details on these methods.
Declare the widget provider in the Android manifest
The app widget-provider class you create is a broadcast receiver, and it must be declared in the Android manifest the same way as any other receiver. Android Studio adds a <receiver> element to your manifest when you add a new widget:
<receiver android:name="NewAppWidgetProvider" >
    <intent-filter>
        <action android:name="android.appwidget.action.APPWIDGET_UPDATE" />
    </intent-filter>
    <meta-data android:name="android.appwidget.provider"
               android:resource="@xml/example_appwidget_info" />
</receiver>
The key parts of this element are as follows:
- The
nameattribute in<receiver>contains the class name for the widget provider. - The
<intent-filter>element declares an action ofAPPWIDGET_UPDATE. This element indicates that the receiver can receive broadcast intents from the app widget manager to update the widget. - The
<meta-data>element specifies the location of the widget provider-info file.
Implement widget updates
For your widget to receive updated data, implement the onUpdate() method in your provider class. The onUpdate() method is called when the user adds the app widget, and every time the widget receives an update broadcast intent from the app widget manager or from your associated app. Perform all essential widget setup in the onUpdate() method, such as creating the widget layout, defining event handlers for views, or starting services.
onUpdate() method is not called when the user adds the app widget, but it is called for all subsequent updates. Your configuration activity must request the first update when configuration is complete. See Using a configuration activity for details.
Here is a simple onUpdate() method:
@Override
public void onUpdate(Context context,
      AppWidgetManager appWidgetManager, int[] appWidgetIds) {

   // There may be multiple widgets active, so update all of them
   for (int appWidgetId : appWidgetIds) {
     // Construct the RemoteViews object
     RemoteViews views = new RemoteViews(
         context.getPackageName(), R.layout.new_app_widget2);
     // Update a text view to display the app widget ID
     views.setTextViewText(R.id.appwidget_id,
       String.format("%s",appWidgetId));
     // Instruct the widget manager to update the widget
     appWidgetManager.updateAppWidget(appWidgetId, views);
}
The core of the onUpdate() method is a loop that iterates over an array of widget IDs. All instances of your widget that are currently active are identified by an internal ID. When onUpdate() is called, it is passed and array of IDs for the widgets that need updating. Your widget may have multiple instances active for several reasons, including most typically one widget with different configurations. For example, multiple weather widgets may be active to display the current weather in different locations. Make sure your onUpdate() method loops through all the widgets by ID and updates each widget individually.
In each update, you also need to reconstruct the widget's layout by creating a new RemoteViews object and updating any data that the remote view contains. The last line in the loop tells the app widget manager to update the widget with the current RemoteViews object.
Provide app widget actions
Some app widgets only display information. Other widgets perform actions when tapped, such as launching the associated app. You can create click-event handlers to perform actions for the widget as a whole, or for any view of the widget layout such as a button.
Unlike activities where the click-event handlers run methods in your activity code, you attach actions to your widget with pending intents. The setOnClickPendingIntent() method (defined in the RemoteViews class) enables you to connect a PendingIntent object to one or more views in your widget. The Android system delivers those intents to your app (or to any other app).
Add click-event handlers to your onUpdate() method. For example, this code launches the widget's associated app.
public void onUpdate(Context context,
   AppWidgetManager appWidgetManager, int[] appWidgetIds) {
   ...
   // Create a new explicit intent object
   Intent intent = new Intent(context, MainActivity.class);
   // Wrap that intent in a pending intent that starts a new activity
   PendingIntent configPendingIntent =
      PendingIntent.getActivity(context, 0, intent, 0);
   // Attach the pending intent to a view in the layout file
   // for the widget (here, appwidget_layout is the entire widget)
   views.setOnClickPendingIntent(
      R.id.appwidget_layout, configPendingIntent);
   ...
}
Using a configuration activity
For some widgets it makes sense to let the user configure the settings for a new widget when they add that widget. For example, a stock-ticker widget needs the stock symbol that the user is interested in.
To provide widget configuration, you can add an optional widget configuration activity to your app's project. The configuration activity is launched when the user first adds your widget onto the home screen, and typically never appears again. (If the user needs to change the configuration of a widget, they have to delete the current widget and add a new one.)
Add a configuration activity to your project
To add the widget configuration activity to your project when you initially create the widget in Android Studio, select the Configuration Screen checkbox.

You can also create a configuration activity manually, but adding it with the Android Studio wizard provides a lot of template code that can save you a lot of work.
The configuration activity is declared in the Android manifest file, with an intent-filter that accepts the ACTION_APPWIDGET_CONFIGURE action. For example:
<activity android:name=".ExampleAppWidgetConfigure">
    <intent-filter>
        <action
           android:name=
           "android.appwidget.action.APPWIDGET_CONFIGURE"/>
    </intent-filter>
</activity>
The configuration activity must also be declared in the provider-info XML file, using the android:configure attribute. (See Updating the provider info, above.) For example:
<appwidget-provider xmlns:android="http://schemas.android.com/apk/res/android"
    android:configure="com.example.android.ExampleAppWidgetConfigure"
    ... >
</appwidget-provider>
Both of these declarations (in the manifest and in the provider-info file) are done for you automatically when you add a new widget using the Android Studio wizard.
Implement the configuration activity
Implement your widget's configuration activity the same way you implement any other activity. If you created the configuration activity when you used the wizard to add a widget to your project, the generated configuration activity class can serve as a starting point.
It is the activity's responsibility to update the app widget when configuration is complete. Here's a summary of the procedure to properly update the app widget and close the configuration activity.
- In your
onCreate()method, get the widget ID from the intent that launched the activity. You'll need it to update the widget when configuration is complete. The app widget ID is in the incoming intentextras, with the keyAppWidgetManager.EXTRA_APPWIDGET_ID.Intent intent = getIntent(); Bundle extras = intent.getExtras(); if (extras != null) { mAppWidgetId = extras.getInt( AppWidgetManager.EXTRA_APPWIDGET_ID, AppWidgetManager.INVALID_APPWIDGET_ID); } - Also in
onCreate(), set the default activity result toRESULT_CANCELED. This covers the case where the user backs out of widget configuration before it is complete. A canceled result alerts the widget host (the Android home screen) that the widget should not be added.// Set the result to CANCELED. This causes the widget host to cancel // the widget placement if the user presses the back button. setResult(RESULT_CANCELED); - Get the widget configuration data from the user as needed, and store that data so the widget can access it later. For example, store the data in shared preferences.
- The method that closes the activity is often a click-event handler for a button that the user clicks when the app widget configuration is complete. In that method, request an update for the widget. Here is the code to do that:
// Get an instance of the AppWidgetManager: AppWidgetManager appWidgetManager = AppWidgetManager.getInstance(this); // Create a new RemoteViews object with the widget layout resource RemoteViews views = new RemoteViews(context.getPackageName(), R.layout.example_appwidget); // Update the app widget with the widget ID and the new remote view: appWidgetManager.updateAppWidget(mAppWidgetId, views); - To finish and close the activity, create a new intent and add the original app widget ID to the intent
extraswith the keyAppWidgetManager.EXTRA_APPWIDGET_ID. Set the result toRESULT_OKand call thefinish()method:Intent resultValue = new Intent(); resultValue.putExtra(AppWidgetManager.EXTRA_APPWIDGET_ID, mAppWidgetId); setResult(RESULT_OK, resultValue); finish();
Related practical
The related practical documentation is in Building app widgets.
Learn more
Android developer documentation:
Android API Reference: