11.1: The Canvas class
Contents:
- Drawing in Android
- What is a Canvas object?
- Steps for creating and drawing on a Canvas object
- Drawing shapes and text
- Transformations
- Clipping
- Saving and restoring a canvas
- Related practicals
- Learn more
Drawing in Android
In Android, you have several techniques available for implementing custom 2D graphics and animations. Which techniques you choose depends on the type of graphics you want to display, as well as the needs of your app.
Drawables
A
Drawableis a graphic that can be drawn to the screen. You createDrawableobjects for things such as textured buttons or frame-by-frame animations and display them into a standard or custom view. The drawing of your graphics is handled by the system's view hierarchy drawing process. Using a drawable is your best choice when you want to draw simple graphics that do not need to change dynamically and are not part of a performance-intensive game. For more informations, seeDrawablesand the chapter about drawables in Android Developer Fundamentals.Canvas
You can do your own custom 2D drawing using the drawing methods of the Canvas class. Draw to a Canvas when your app needs to regularly re-draw itself. In this chapter, you learn how to create and draw on a canvas.
- SurfaceView
An instance of SurfaceView is a drawing surface that is part of your view hierarchy and managed and rendered by the system along with the view hierarchy. One of the purposes of this class is to provide a surface in which a secondary thread can render into the screen. The challenge is that you have to correctly manage your thread to only draw to the surface when it exists. The SurfaceView chapter includes an example of using a SurfaceView.
In addition, the following techniques are available but not covered in this course:
- Hardware Acceleration. Beginning in Android 3.0, you can hardware-accelerate most of the drawing done by the
CanvasAPIs to further increase their performance. OpenGL. Android supportsOpenGL ES 1.0and2.0, with Android framework APIs as well as natively with the Native Development Kit (NDK). Using the framework APIs is desireable when you want to add a few graphical enhancements to your application that are not supported with theCanvasAPIs, or if you desire platform independence and don't demand high performance.
What is a Canvas object?
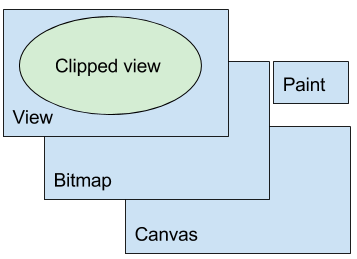
When you want to draw shapes or text into a view on Android, you can do so via a Canvas object. Very simplified:
- A
Canvasis a 2D drawing surface that provides methods for drawing to a bitmap. - The bitmap, an instance of the
Bitmapclass is associated with aViewinstance that displays it. - A
Paintobject holds the style and color information about how to draw geometries (such as line, rectangle, oval, and paths), text, and bitmap.
Canvas defines shapes that you can draw on the screen, while Paint defines the color, style, font, and so forth, of each shape you draw.
The Canvas class also provides methods for clipping. Clipping is the action of defining geometrically what portion of the canvas is shown to the user in the view.
The figure below shows all the pieces required to draw.

The types of operations you can perform on a canvas include:
- Fill the whole canvas with color.
- Draw shapes, such as rectangles, arcs, paths styled as defined in a
Paintobject. - Draw text styled by the properties in a
Paintobject. - Save the current
Canvasstate and restore a previous state. - Apply transformations, such as translation, scaling, or custom transformations.
- Clip, that is, apply a shape or path to the
Canvasthat defines its visible portions.
Steps for creating and drawing on a Canvas object
After you have a project and activity, you need the following to work with a Canvas object.
Create a custom
Viewclass. You can extend any view that has the features you need. You do not need a customViewto draw, as discussed in the Simple Canvas practical. Typically you use a customViewso that you can draw by overriding theonDraw()method of theView.public class MyCanvasView extends View {...}
In
onCreate()of theMainActivity, set the contentViewof the activity to be an instance of your customView.myCanvasView = new MyCanvasView(this); setContentView(myCanvasView);
In the constructor of the custom
View, create aPaintobject and set initialPaintproperties. Initialize member variables and get a reference to the context. You cannot create yourCanvashere because theViewhas not been inflated yet and thus has no size.MyCanvasView(Context context) { this(context, null); } public MyCanvasView(Context context, AttributeSet attributeSet) { super(context); int backgroundColor; mDrawColor = ResourcesCompat.getColor(getResources(), R.color.opaque_orange, null); backgroundColor = ResourcesCompat.getColor(getResources(), R.color.opaque_yellow, null); // Holds the path we are currently drawing. mPath = new Path(); // Set up the paint with which to draw. mPaint = new Paint(); mPaint.setColor(backgroundColor); // Smoothes out edges of what is drawn without affecting shape. mPaint.setAntiAlias(true); // Dithering affects how colors with higher-precision than the device // are down-sampled. mPaint.setDither(true); mPaint.setStyle(Paint.Style.STROKE); // default: FILL mPaint.setStrokeJoin(Paint.Join.ROUND); // default: MITER mPaint.setStrokeCap(Paint.Cap.ROUND); // default: BUTT mPaint.setStrokeWidth(12); // default: Hairline-width (really thin) }- In the custom
View, overrideonSizeChanged()and create aBitmap, then create aCanvaswith theBitmap. TheonSizeChanged()method is called when yourViewis first assigned a size, and again if the size of yourViewchanges for any reason. Calculate positions, dimensions, and any other values related to yourView's size inonSizeChanged().@Override protected void onSizeChanged(int width, int height, int oldWidth, int oldHeight) { super.onSizeChanged(width, height, oldWidth, oldHeight); // Create bitmap, create canvas with bitmap, fill canvas with color. mBitmap = Bitmap.createBitmap(width, height, Bitmap.Config.ARGB_8888); mCanvas = new Canvas(mBitmap); mCanvas.drawColor(mDrawColor); } - In the custom
View, override theonDraw()method. What happens in theonDraw()method can be as short as drawing aPaththat was calculated in another method, or it can include drawing, transformations, and clipping, which are discussed below.@Override protected void onDraw(Canvas canvas) { super.onDraw(canvas); // First, draw the bitmap as created. canvas.drawBitmap(mBitmap, 0, 0, mPaint); // Then draw the path on top, styled by mPaint. canvas.drawPath(mPath, mPaint); } If any drawing is to happen in response to user motion, override
onTouchEvent(). In this example, when the user drags their finger, and then lifts it off the screen, the x,y coordinates are handed off for some drawing action. You must callinvalidate()every time the screen needs to be redrawn.@Override public boolean onTouchEvent(MotionEvent event) { float x = event.getX(); float y = event.getY(); switch (event.getAction()) { case MotionEvent.ACTION_DOWN: touchStart(x, y); // No need to invalidate because we are not drawing anything. break; case MotionEvent.ACTION_MOVE: touchMove(x, y); invalidate(); break; case MotionEvent.ACTION_UP: touchUp(); invalidate(); break; default: // do nothing } return true; }Note:This work all happens on the UI thread, which is why you should not use this technique for lengthy operations. For more complex operations, manage aSurfaceViewand perform draws to theCanvasas fast as your thread is capable. See theSurfaceViewchapter.
Drawing shapes and text
You can draw primitive shapes using predefined methods, and use a Path to create any shape you need.
- Draw primitive shapes using
drawRect(),drawOval(), anddrawArc(). Change whether the shapes are filled, outlined, or both by callingsetStyle(). - Draw more complex shapes using the
Pathclass. Define a shape by adding lines and curves to aPathobject, then draw the shape usingdrawPath(). As with primitive shapes, paths can be outlined, filled, or both, depending on thesetStyle(). - Draw text using
drawText(). Specify the typeface by callingsetTypeface(), and the text color by calling setColor(). - Define gradient fills by creating
LinearGradientobjects. CallsetShader()to use yourLinearGradienton filled shapes. - Draw bitmaps using
drawBitmap().
See the documentation for details of each method, and the practicals for examples on how these methods are used.
Transformations
Transformations are operations that change the canvas itself:
- Use
translate()to move the origin of the canvas. For example, when you are drawing the same shape in multiple places, instead of recalculating the shape, you can move the origin of the canvas and draw the same shape again. See the Applying clipping to a canvas practical for an example.canvas.translate(dx, dy); - Use rotate to turn the
Canvasby a number of degrees.canvas.rotate(180); - Skew the
Canvasby calling theskew()method. You can achieve interesting effects with text using skewing.
See themPaint.setTextSize(120); canvas.translate(100, 1800); canvas.skew(0.2f, 0.3f); canvas.drawText("Clipping", 400, 60, mPaint);Canvasdocumentation for details on these and additional methods.
Clipping
Clipping is a method for defining regions of an image, canvas, or bitmap that are selectively drawn or not drawn onto the screen. One purpose of clipping is to reduce overdraw . When you reduce overdraw, you minimize the number of times a pixel or region of the display is drawn, in order to maximize drawing performance. You can also use clipping to create interesting effects in user interface design and animation.
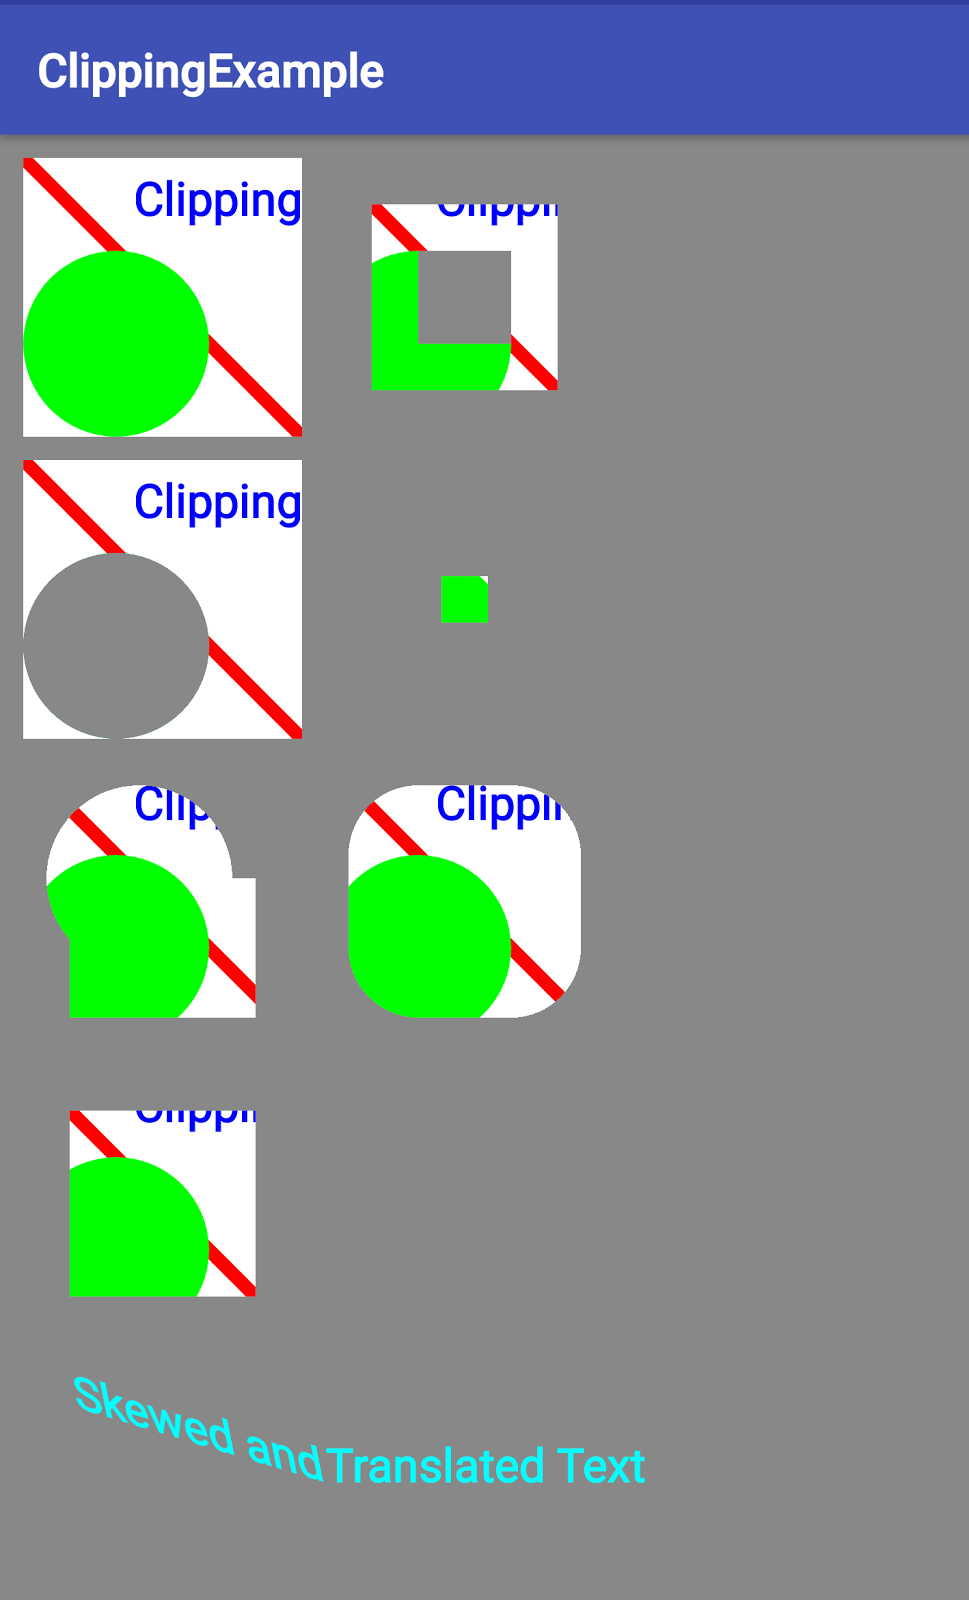
The following screenshot from the Applying clipping to a canvas practical shows how you can clip and combine clipping regions.

Canvas provides methods for clipping, and you can also clip by defining a custom path.
- Use
canvas.clipRect()to set a rectangular clipping region. Define a
Pathand apply it withcanvas.clipPath()for a custom clipping region. For example, to create a circular clipping region.CCWstands for counterclockwise and indicates in which direction the circle should be drawn.Region.Op.DIFFERENCEspecifies how the clipping region should be applied to the canvas. See theRegion.Opdocumentation for other operators.
Here is the code:
mPath.addCircle(mCircleRadius, mClipRectBottom-mCircleRadius, mCircleRadius, Path.Direction.CCW);
canvas.clipPath(mPath, Region.Op.DIFFERENCE);
For a list of all clipping methods and supported operators for different versions of Android, see the Canvas documentation.
quickReject()
The quickReject() method allows you to check whether a specified rectangle or path would lie completely outside the currently visible regions, after all transformations have been applied.
The quickReject() method is incredibly useful when you are constructing more complex drawings and need to do so as fast as possible. With quickReject(), you can decide efficiently which objects you do not have to draw at all, and there is no need to write your own intersection logic.
- The method returns true if the rectangle or path would not be visible at all. For partial overlaps, you still have to do your own checking.
- The
EdgeTypeis eitherAA(Antialiased: Treat edges by rounding-out, because they may be antialiased) orBW(Black-White: Treat edges by just rounding to nearest pixel boundary) for just rounding to the nearest pixel.booleanquickReject (float left, float top, float right, float bottom,Canvas.EdgeTypetype)booleanquickReject (RectFrect,Canvas.EdgeTypetype)booleanquickReject (Pathpath,Canvas.EdgeTypetype)
Saving and restoring a canvas
The activity context maintains a stack of drawing states. Each state includes the currently applied transformations and clipping regions. You can't remove clipping regions. Undoing a transformation by reversing it is error-prone, as well as chaining too many transformations relative to each other. Translation is straightforward to reverse, but if you also stretch, rotate, or custom deform, it gets complex quickly. Instead, save the state of the canvas, apply your transformations, draw, and then restore the previous state.
canvas.save();
mPaint.setTextSize(120);
canvas.translate(100, 1800);
canvas.skew(0.2f, 0.3f);
canvas.drawText("Skewing", 400, 60, mPaint);
canvas.restore();

canvas.save();
mPaint.setColor(Color.CYAN);
canvas.translate(600, 1800);
canvas.drawText("Save/Restore", 400, 60, mPaint);
canvas.restore();
For a complete example, see the Clipping Canvas practical.
Related practicals
The related exercises and practical documentation is in Advanced Android: Practicals.
Learn more
Android developer docs:
CanvasclassBitmapclassViewclassPaintclassBitmap.configconfigurationsRegion.OpoperatorsPathclassandroid.graphicsgraphics toolsBitmap.ConfigCanvasconfigurations- Canvas and Drawables
- Understanding save() and restore() for the Canvas context
Also see the Graphics Architecture series of articles for an in-depth explanation of how the Android framework draws to the screen.