5.1: Languages and layouts
Contents:
- Understanding language and locale settings
- Preparing an app for localization
- Using the Translations Editor
- Adjusting layouts for RTL languages
- Testing languages and locales with apps
- Related practical
- Learn more
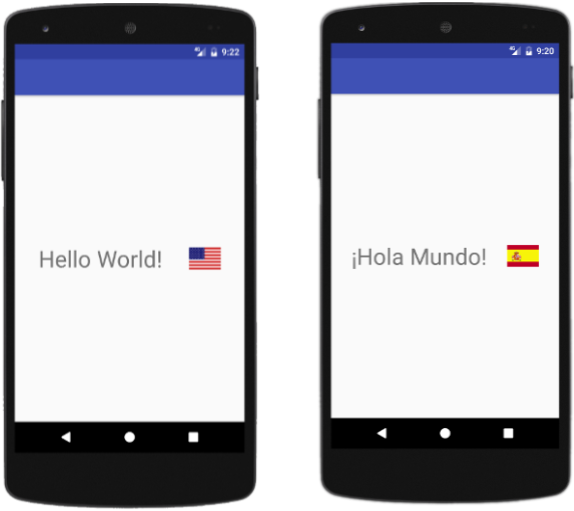
Android runs on devices in different languages, and in different places (referred to as locales ). To reach the most users, your app should display information in ways appropriate to those locales. For an app developer, localization is about tailoring the entire app experience to a user's language and locale.
An app can include sets of resource directories customized for different languages and locales. When a user runs the app, Android automatically selects and loads the resources that best match the device.
(This chapter focuses on localization and locale. For a complete description of resource-switching and all the types of configurations that you can specify — screen orientation, touchscreen type, and so on — see Providing Alternative Resources.)
Understanding language and locale settings
Android users can choose both the language and the locale for their devices in the Settings app. For example, a user can choose English (U.S.) for the United States locale, or English (U.K.) for the United Kingdom locale. You can add to your app support for dialects of a language for different locales, such as Français (France) and Français (Canada).
To localize an app for different countries, add a language for each country if possible. For each language, obtain a translation for all of the app's text—content, menu choices, navigation elements, notifications, alerts, and messages. You may also have to alter your layouts to accommodate languages that take up more space or read from right to left. If the user chooses a different language than the ones supported by your app, your app will use the default language. Your app also should handle numbers, dates, times, and currencies in formats appropriate to different locales.
This chapter focuses on language and layout, and the following chapter describes locale-specific issues such as formatting dates and currencies.
Preparing an app for localization
To decide which languages to support in your app, you need to first know who will be using the app—which locales, and which languages in those locales. You may want to pick certain locales to receive your app first, identify the languages required for those locales, and add more languages over time as you enhance your app to support more locales.
The following is an overview of the steps for preparing an app for a different language:
- Extract all strings as resources into
strings.xml, including text content, menu choices, navigation tabs, messages, and any other UI elements that use text. - Use Android Studio's Translations Editor to add a language, and add translations for the strings. You may want to use a translation service, which sends back a
strings.xmlfile with the translations. - If you are adding a right-to-left (RTL) language, change your layouts to add a "start" and "end" attribute for each "left" and right" attribute.
- To test your app, change the device's language in the Settings app before each test run.
- When making your app available on Google Play, provide your app's store description, campaign ads, and in-app purchase products in multiple languages.
Tip: For details on getting a translation service and preparing an app for Google Play, see Translate & localize your app in the Play Console.
Identifying UI elements to translate and format
In the app itself you need to identify at a minimum :
- All the UI text that needs to be translated, including menu choices, headings, and labels for entry fields.
- All the elements that need locale formatting, such as dates, times, numbers, and currencies.
- Layout changes to accommodate each language, such as leaving enough space for text elements to grow or shrink.
- Images you should replace or adjust in the layout for each locale.
You may also need to identify media resources, such as audio and video, that need captions or subtitles.
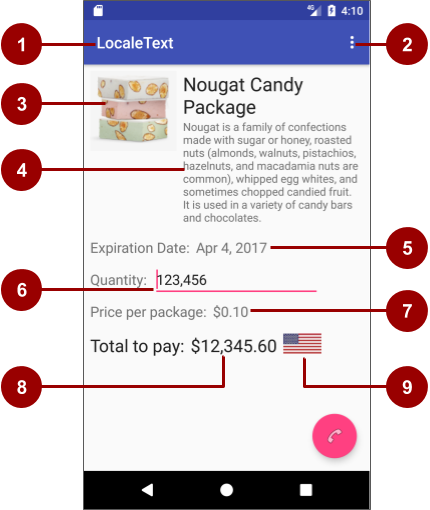
For example, in the figure above:
- App name: The choice of translating the app name is up to you. Many apps add translated names so that the users in other languages understand the app's purpose and can find the app in Google Play in their own languages. Apps that use brand names for app names don't translate the app name.
- Options menu: Translate all choices in the options menu.
- Images: Adjust the layout so that the image appears on the opposite side of the screen for a right-to-left (RTL) language, such as Hebrew or Arabic. You may also want to use a different image for a specific language or locale based on cultural preference.
- Text: All text in the UI should be translated. The sizes of text elements should be flexible to allow them to grow larger for a language that takes up more space.
- Date format: Dates appear in different formats depending on the locale.
- Number format: Numbers appear with different punctuation marks (such as commas or periods) depending on the locale.
- Currency format: Each locale may have its own currency. It is up to you to decide how many different currencies you want to support in your app.
- Currency with amount calculations: If you provide different currencies, you must also use currency exchange rates.
- Image tied to a locale: You can change an image depending on the locale. In this example, the locale country's flag appears.
Tip: The floating action button at the bottom of the screen in this example does not need to be adjusted for an RTL language, because it "floats" on the screen and is adjusted automatically by Android's layout mirroring feature.
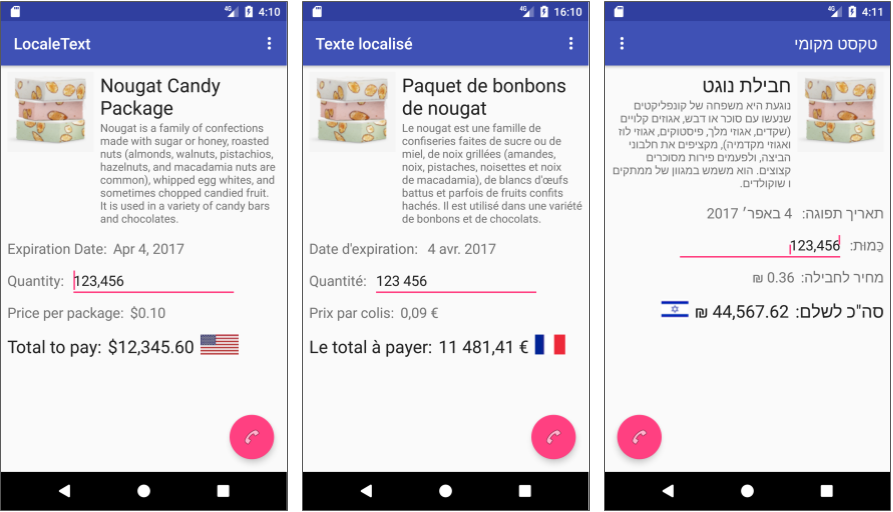
The following figure shows the same app in the English language and U.S. locale (left), in French in the France locale (center), and in Hebrew, an RTL language, in the Israel locale (right).
Best practices for localizing text
- Keep text separated from the rest of your app. Never embed text in code.
- To create string resources for other languages, use the Android Studio Translations Editor, which automatically places strings.xml files into appropriately named directories within the app project's project_name
/app/src/main/resdirectory. - Don't concatenate pieces of text to make a sentence or phrase. The pieces may not be in the proper order in the translated version of the sentence or phrase.
- If you must combine pieces of text, use format strings as placeholders, and use
String.format()to supply the arguments to create the completed string. Format strings are a convenient way to build up one string that has variable content. For details on using format strings, see Android SDK Quick Tip: Formatting Resource Strings. To ensure that format strings are not translated, used the<xliff:g>placeholder tag to mark it, as described in the "Mark message parts that should not be translated" section of Localizing with Resources.
Addressing design and layout issues
Fitting design elements around translated text is a challenge. The elements of the design may no longer fit around translated titles, and menus may appear to be wider or longer, because the translated words take up more or less space than the original words.
As you create your layouts, make sure that any UI elements that hold text are designed generously. It's good to allow more space than necessary—at least 30% more space. For example, if a heading is not wide enough, it may require two lines as shown below. The text body may shrink or grow depending on the language. Use layout attributes to constrain UI elements to other elements, so that if a text element grows in size, it does not overlap another element.

Tip: If you design your UI carefully, you can typically use a single set of layouts for all the languages you support. While you can also use the Layout Editor to create alternative layouts for specific locales, alternate layouts make your app harder to maintain.
Communicating effectively
To be successful, apps need to communicate effectively. Translation may not be enough, and you may also need to adapt your app to local culture and customs.
Be especially careful with brand names and slogans. Get the writing right first, before translation. Consult a translator who knows the language. Keep in mind the following issues:
- Plurals and genders are handled differently in different languages.
- If you use an acronym, provide the full term as well so that it can be translated.
- Trademarked names are rarely if ever translated, unless they are also registered in the country you are targeting with the translation.
- Ensure correct grammatical structure and proper punctuation in the original language.
- Be consistent with word usage.
- Translation services often use memory to translate the same words and phrases from one project to the next. Consider reusing words and phrases that were translated previously.
- Avoid humor, which rarely translates well and may unintentionally offend someone in another culture.
- Avoid jargon, regional phrases, and metaphors. For example, users may not know enough about American baseball to understand "knocking it out of the park" or a "grand slam."
The following are tips on how to prepare media, including graphics and images:
- Be aware of cross-cultural differences, as not all images and symbols carry the same meaning across borders. Maps, flags, location names, and cultural, historical, and political references may be offensive to users in another country.
- Do not include text within images because it is not easily translated.
- Include comments in the strings.xml file that you send out for translation, in order to describe the context in which each string is used. This information will be invaluable to the translator and result in better quality translation.
Using the Translations Editor
You can use Android Studio's Translations Editor to add a language to your app and create the string resources for the language.
To use the Translations Editor, open the strings.xml file, and click the Open editor link in the top right corner, or you can use a shortcut: right-click the strings.xml file and select Open Translations Editor.
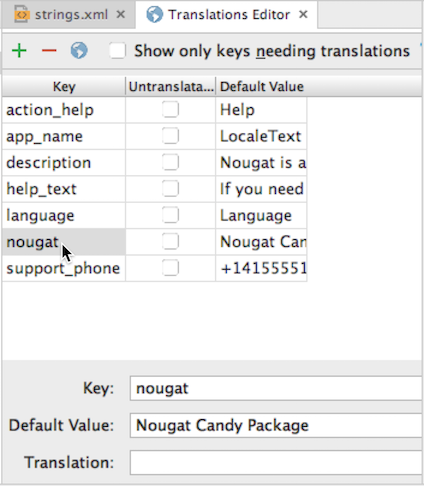
The Translations Editor opens with a row for each resource key and its default value.
Adding a language to the app
To add a language, click the globe button in the top left corner of the Translations Editor ("1" in the following figure), and select the language in the dropdown menu.
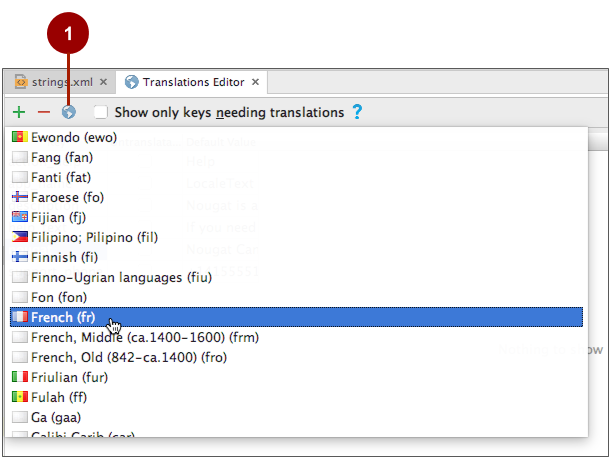
After you choose a language, a new column with blank entries appears in the Translation Editor for that language, and the keys that have not yet been translated appear in red.
Translating strings
To add translations to the string resource values, follow these steps:
- Select a key. The Key, Default Value, and Translation fields appear at the bottom of the Translations Editor window.
For each key in the Key column of the Translations Editor, select the blank cell in the language column on the same row, and enter your translation in the empty Translation field at the bottom of the Translations Editor window.

The translation appears in the language column for the key.
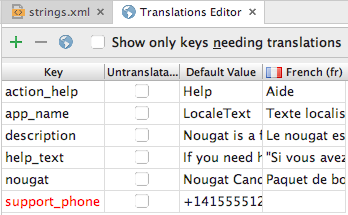
Select the Untranslatable checkbox for any key that should not be translated. For example,
support_phonein the above figure should not be translated, and remains in red until you click Untranslatable. You should mark all untranslatable text so that the translator doesn't change it. The Translation Editor automatically adds thetranslatable="false"attribute to the string resource.To show only the keys that require translation, select the Show only keys needing translation checkbox option at the top of the Translation Editor window.
In the far left column of Android Studio, switch to Project: Project Files view, and expand the res directory. The Translations Editor created a new
valuesdirectory for the language:values-fr(for French). Thevaluesdirectory is the default directory with colors, dimensions, strings, and styles, while thevalues-frdirectory has only string resources translated into French.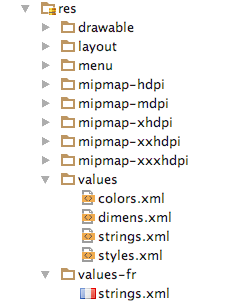
An app can include multiple values directories, each customized for a different language and locale combination. When a user runs the app, Android automatically selects and loads the values directory that best matches the user's chosen language and locale.
Adjusting layouts for RTL languages
Latin (or Roman) script for most Western and Central European alphabets, for example, is read from left to right. Devanagari script, the alphabet used for over 120 languages, including Hindi, is also read from left to right. However, Arabic script, used for several languages of Asia and Africa, reads right to left (RTL). Hebrew and Persian (Farsi) scripts are also RTL.
If you're distributing to countries where RTL languages are used, consider implementing support for RTL layouts.
Using RTL layout mirroring
Android 4.2 and newer versions provide full native support for RTL layouts, including layout mirroring. Layout mirroring redraws the layout for a right-to-left orientation for RTL languages. As a result, UI elements are all automatically moved to the opposite side of the screen.
Tip: Use layout mirroring rather than alternate layouts for RTL languages, in order to avoid the overhead of managing the layouts. While you can build alternate layouts for languages, you may also want to build other layouts to support different screen sizes. (See Supporting Multiple Screens for a detailed explanation, and Build a UI with Layout Editor for instructions on using Android Studio to create the layouts.) RTL layout mirroring reduces the need for multiple layouts.
For each new project, Android Studio includes a declaration in the
android:supportsRtl="true"
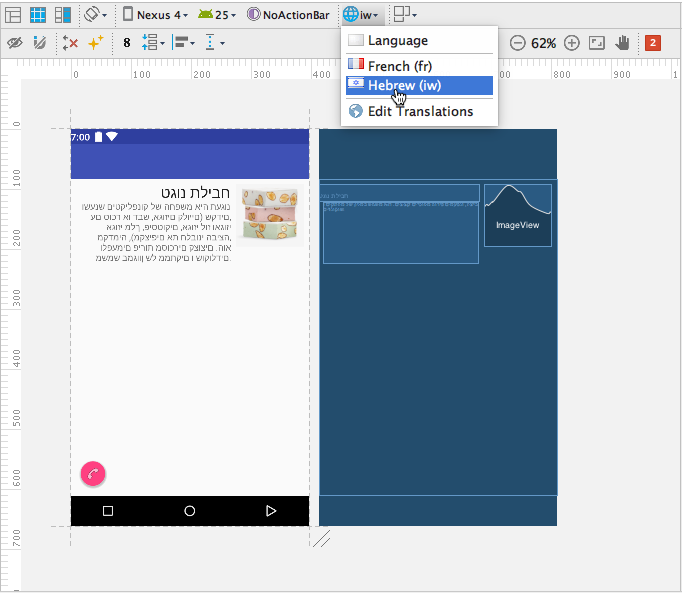
After adding the RTL language (such as Hebrew), you can see a preview of layout mirroring. Click the Design tab, and choose a language from the Language menu at the top of the Layout Editor. The layout reappears with a preview of what it will look like in that language.
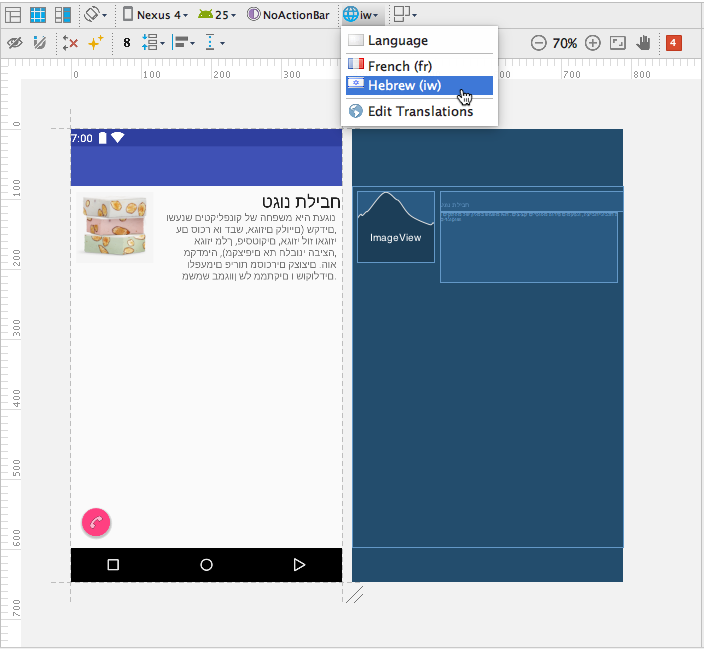
Changing the language can affect the layout. In this case, the RTL text is on the opposite side of the layout, as you would expect with layout mirroring. The floating action button has also been moved to the left side of the screen, as it should be for an RTL language. However, since the ImageView is still constrained to the left margin, it didn't move to the other side of the screen, as it should in an RTL layout.
Adjusting the left/right positioning attributes to start/end
To adjust the layout so that it fully supports an RTL language, you need to do one of the following:
- If you are targeting your app to Android 4.2 (the app's
targetSdkVersionorminSdkVersionis 17 or higher), use "start" and "end" layout attributes in place of "left" and "right" attributes. For example, replaceandroid:layout_marginLeftwithandroid:layout_marginStart. - If you want your app also to work with versions earlier than Android 4.2 (the app's
targetSdkVersionorminSdkVersionis 16 or less), add "start" and "end" layout attributes in addition to "left" and "right." For example, use bothandroid:layout_marginLeftandandroid:layout_marginStart.
With the ConstraintLayout root view, add "start" and "end" constraint attributes to any "right" and "left" constraint attributes. For example:
app:layout_constraintLeft_toRightOf="@+id/product_image"
app:layout_constraintStart_toEndOf="@+id/product_image"
The constraintStart_toEndOf attribute is the same as the constraintLeft_toRightOf attribute for an LTR language, but is the reverse position for an RTL language.
When you preview the layout after adding the "start" and "end" attributes, the layout shows the image on the right side of the screen (the "start" side), and the text views are constrained to its left ("end") side.
There are many other attributes with "right" and "left" positions. For example, in a RelativeLayout, you may be using the android:layout_alignParentLeft attribute. To support an RTL language, you would add the android:layout_alignParentStart attribute.
Margins and padding in text views are also important. The android:layout_marginStart and android:layout_marginEnd attributes are key to setting a proper margin for RTL languages.
Testing languages and locales with apps
To test language and locale settings with an app, use an Android device or emulator. Choose both the language and the locale in the Settings app.
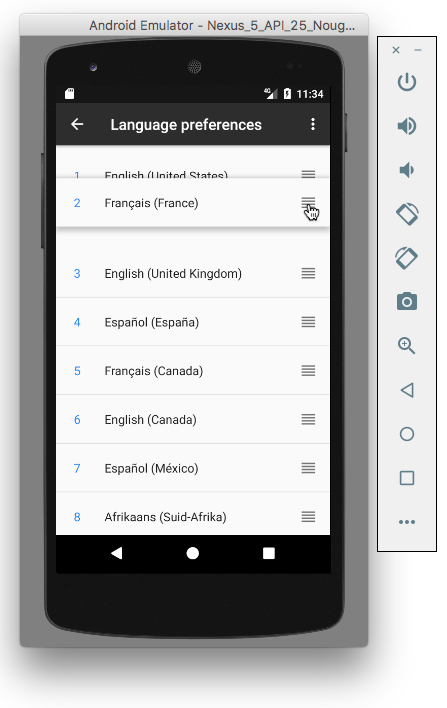
Users of Android 7.0 (Nougat) and newer versions can select multiple languages on a single device and assign preferences to them. If you don't provide language resources for the top preference in your app, the system switches to the next language preference in the list before choosing the default language resource.
To switch the preferred language in your device or emulator, open the Settings app. If your Android device is in another language, look for the gear icon:
![]()
Follow these steps in the Settings app for Android versions previous to Android 7.0 (Nougat):
- Choose Languages & input > Language. The Languages choice is the first choice in the list for any language.
- Select a language and locale such as Français (France).
Follow these steps in the Settings app for Android 7.0 (Nougat) or newer versions:
- Choose Languages & input > Languages. The Languages choice is the first choice in the list for any language.
- To add a language not on the list, click Add a language, select the language (for example, Français), and then select the locale (such as France).
- Click the move icon on the right side of the Language preferences screen, and drag the language to the top of the list. The language takes effect immediately after you drag it to the top of the list.
Tip: When using the Settings app, be sure to remember the globe icon
![]() for the Languages & input choice, so that you can find it again if you switch to a language you do not understand.
for the Languages & input choice, so that you can find it again if you switch to a language you do not understand.
Related practical
The related practical documentation is Using resources for languages.
Learn more
Android developer documentation:
- Supporting Different Languages and Cultures
- Localizing with Resources
- Localization checklist
- Language and Locale
- Testing for Default Resources
Material Design: Usability - Bidirectionality
Android Developers Blog:
Android Play Console: Translate & localize your app
Video: Welcome to the World of Localization
Other: