5.1: Using resources for languages
Contents:
- What you should already KNOW
- What you will LEARN
- What you will DO
- App overview
- Task 1. Add another language
- Task 2. Add a right-to-left (RTL) language
- Task 2 solution code
- Task 3. Add a Language option to the options menu
- Task 3 solution code
- Coding challenge
- Challenge solution code
- Summary
- Related concept
- Learn more
Users run Android devices in many different languages. To reach the most users, your app should handle text and layouts in ways appropriate for those languages.
An Android user can change the language for a device in the Settings app. As a developer, you should localize your app to support different languages in the locales in which your app is released.
In this chapter, you learn how to provide support for different languages using string resources and the Translations Editor in Android Studio.
What you should already KNOW
You should be able to:
- Create and run apps in Android Studio.
- Extract string resources and use string resources in the code.
- Use the Layout Editor to align views in a
ConstraintLayout. - Edit layouts in XML.
- Change and add an options menu in the Basic Activity template.
What you will LEARN
You will learn how to:
- Add support for different languages.
- Use the Translations Editor to edit translations.
- Modify layouts to support right-to-left (RTL) languages.
What you will DO
- Add languages to an app.
- Use the Translations Editor to edit translations.
- Modify the app's layouts to support RTL languages, such as Hebrew.
- Add a Language option to the options menu to switch languages.
Apps overview
In this lesson you work from a starter app called LocaleText_start, which is a simple app created using the Basic Activity template. Its UI uses the default ConstraintLayout provided by the template. It has text, an image, and a floating action button that can make a phone call. The options menu has a single menu item, Help, that launches a second activity with help information.
This lesson demonstrates how you can localize an app for a locale, and provide translated text within your app for the other languages.
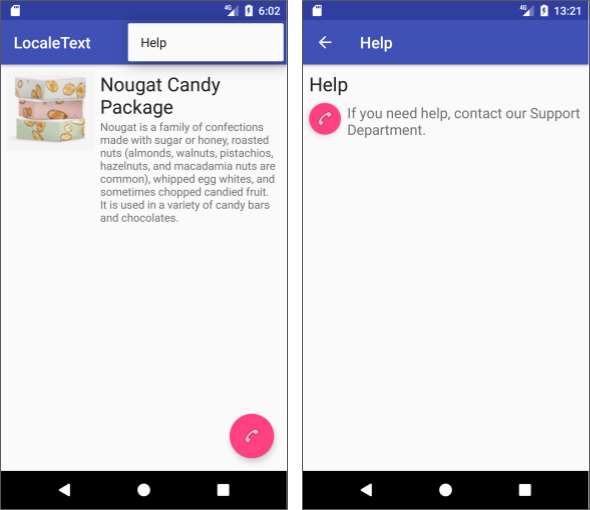
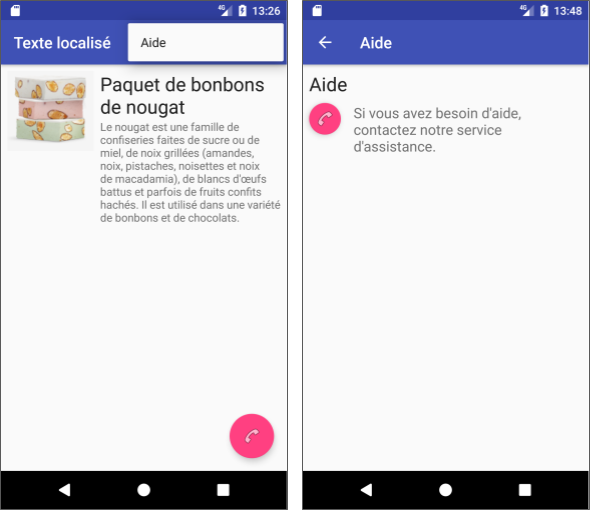
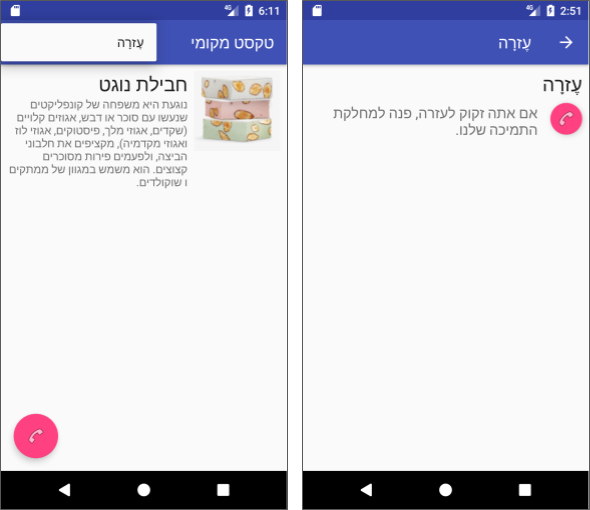
After adding an RTL language, you will use XML layout attributes to take advantage of the layout mirroring feature added to Android 4.2. Layout mirroring redraws the layout for a right-to-left orientation for RTL languages. As a result, the image, the TextView elements, the options menu, and the floating action button are all automatically moved to the opposite side of the screen as shown below. The app demonstrates the attributes you use for layout mirroring.
Task 1. Add another language
In this task you will learn the following key practices for adding different languages:
- Save all text strings as resources in the default version of
strings.xml. - Add a new language in the Translations Editor.
- Translate the text.
- Test your app in different languages.
1.1 Examine the startup app's layout
To save time, the LocaleText_start starter app has been prepared with a layout to show the effects of changing languages.
- Download the LocaleText_start app.
- Rename the
LocaleText_startproject folder toLocaleText, open it in Android Studio, and refactor it to use the nameLocaleText. - Run the app to see what it looks like.
- Examine the app's layouts.
The MainActivity layout includes:
- An
ImageViewconstrained to the left margin of the parent (the screen). - A
TextViewwith a heading constrained to the right side of theImageView. - Another
TextViewwith description text, also constrained to the right side of theImageView. - A floating action button with a phone icon in the lower right side.
- The options menu in the app bar with one choice: Help.
The HelpActivity layout includes:
- A
TextViewfor the title, constrained to the left margin of the parent (the screen). - A floating action button with a phone icon on the left side.
- Another
TextViewwith body text, constrained to the right side of the floating action button and to the titleTextView. - The Up button and
Activityname in the app bar.
Open content_main.xml to see the MainActivity layout in the Design tab. You should see an ImageView and two TextView elements in the layout (shown in the figure below).
- The
product_imageImageViewis constrained to the top and left side of the screen. - The
headingTextViewis constrained to the top and right side of theproduct_imageImageView, and to the right side of the parent. - The
descriptionTextViewis constrained to the bottom ofheadingTextViewand to the right side ofproduct_imageTextViewand parent/screen.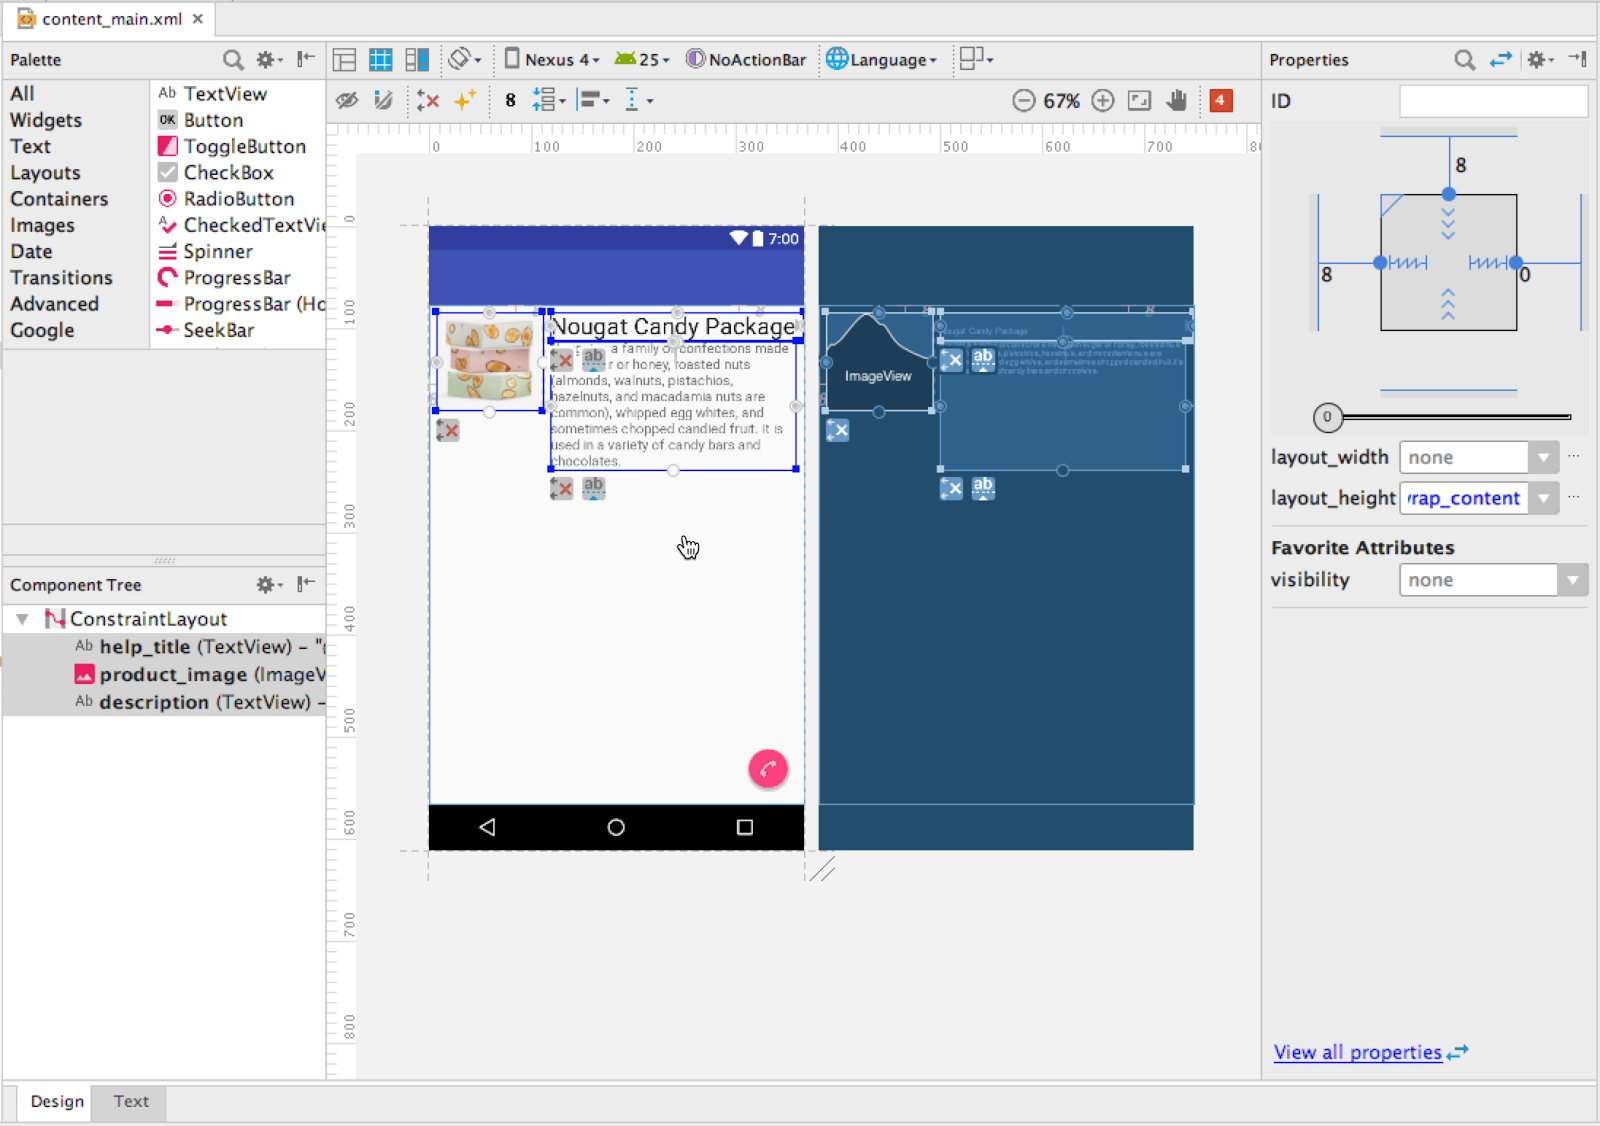
1.2 Examine the startup app's layout and resources
To prepare an app to be translated into another language, save all text strings as resources in strings.xml, including text from menu items such as the options menu, text on tabs, and any other navigation elements that use text.
To save time, the LocaleText_start starter app has been prepared with all text strings in strings.xml. Open strings.xml—known as the default strings.xml file because it is used for the default language—to see the string resources in the app. It includes every piece of text in the app including the action_help resource for the options menu item (Help). The file include comments that provide the context for the translator to translate your strings—such as the use of grammar structures and product terms.
<resources>
<!-- All comments are notes to translators. -->
<string name="app_name">LocaleText</string>

<!-- The Help option in the options menu, no more than 30 chars. -->
<string name="action_help">Help</string>
...
</resources>
Include comments in the strings.xml file to describe the context in which each string is used. If you use a translator to translate your strings, the translator will understand the context from the comments you provide, which will result in a better quality translation.
1.3 Add another language resource to the app
Use the Android Studio Translations Editor to create the string resources for each language.
Open the
strings.xmlfile, and click the Open editor link in the top right corner.The Translations Editor appears with a row for each resource key (such as
action_help,app_name, andnougat). The Default Value column is the default value of the resource key in the default language.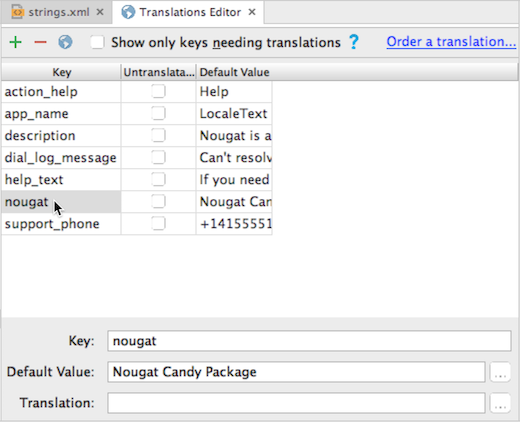
Click the globe button in the top left corner of the Translations Editor pane ("1" in the following figure), and select French in the dropdown menu:
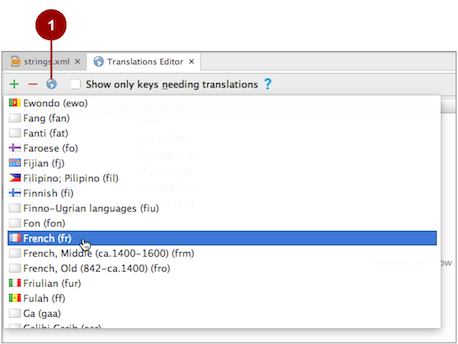
After you choose a language, a new column with blank entries appears in the Translations Editor for that language, and the keys that have not yet been translated appear in red.
To show only the keys that require translation, check the Show only keys needing translation checkbox option at the top of the Translations Editor pane, next to the globe.
Select a key (such as
description). The Key, Default Value, and Translation fields appear at the bottom of the Translations Editor pane.- Add the French translation for the key by selecting the key's cell in the column for the language (French), and entering the translation in the Translation field at the bottom of the pane as shown in the following figure.

strings.xml file, which you can copy into your project folder as described in the concept chapter, and the translations appear in the Translations Editor. For this example, if you don't know French use Google Translate.
1.4 Enter the translations for the strings
Enter the translations in the French column for each key, as shown in the following figure:
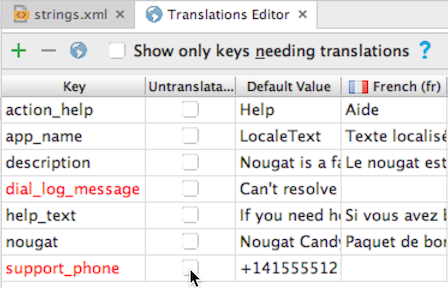
Click the Untranslatable checkboxes for the
support_phoneanddial_log_messagekeys; they change from red to black. Keys shown in black don't need to be translated, either because they've already been translated, or because you've indicated that they are untranslatable.Since there is no translation for the
support_phoneanddial_log_messagekeys, the default values will be used in the layout no matter what language and locale the user chooses in the Settings app.If you don't want to translate the app name, you can click the Untranslatable checkbox for it; however, you can also modify the app name for each language, as shown in the above figure. The choice of translating the app name is up to you. Many apps add translated names so that the users in other languages understand the app's purpose and can find the app in Google Play in their own languages.
To see a preview of the layout in the new language, open
content_main.xmlin the Design tab, and choose the language you added from the Language menu at the top of the Layout Editor. The layout reappears with a preview of what it looks like in that language.
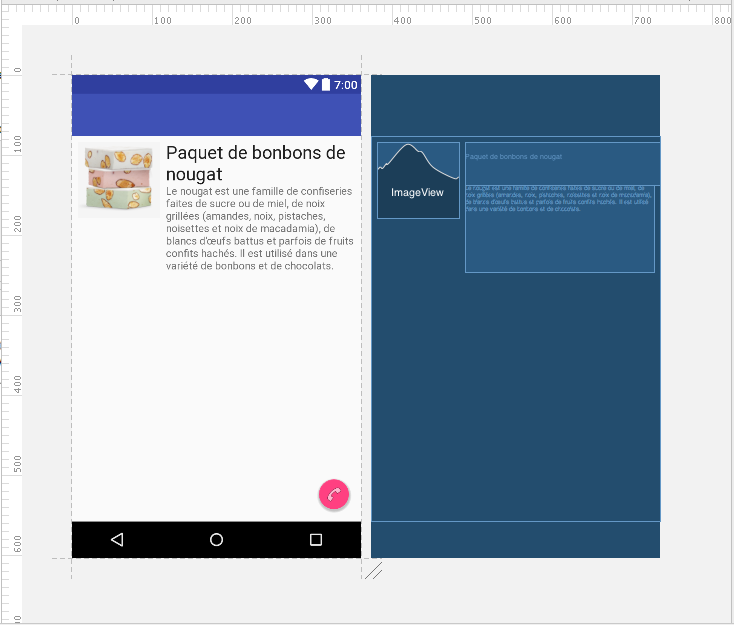
Changing the language can affect the layout. In this case, the headline in the previous figure, "Pacquet de bonbons de nougat," takes up two lines. To prepare for different languages, you need to create layouts that have enough room in their text fields to expand at least 30 percent, because a translated version of the text may take more room.
Switch to Project: Project Files view, and expand the res directory. You see that the Translations Editor created a new directory for the French language:
values-fr. Thevaluesdirectory is the default directory for colors, dimensions, strings, and styles, while for now, thevalues-frdirectory has only string resources.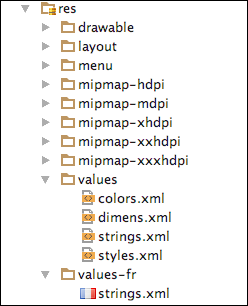
An app can include multiple values directories, each customized for a specific language and locale combination. When a user runs the app, Android automatically selects and loads the values directories that best match the user's chosen language and locale. For example, if the user chooses French as the language for the device in the Settings app, the French strings.xml file in the values-fr directory is used rather than the strings.xml file in the default values directory.
1.5 Run the app and switch languages
Run the app on the emulator or on a device. The strings appear in the language used in the default
strings.xmlfile (in this case, English). Click the options menu, which offers one option (Help). Click Help to see the secondActivity.
To switch the preferred language in your device or emulator, open the Settings app. If your Android device is in another language, look for the gear icon:
Find the Languages & input settings in the Settings app, and choose Languages.
Be sure to remember the globe icon for the Languages & input choice, so that you can find it again if you switch to a language you do not understand. Languages is the first choice on the Languages & input screen.

For devices and emulators running a version of Android previous to Android 7, choose Language on the Languages & input screen, select Français (France), and skip the following steps.
(In versions of Android previous to Android 7, users can choose only one language. In Android 7 and newer versions, users can choose multiple languages and arrange them by preference. The primary language is numbered 1, as shown in the following figure, followed by lower-preference languages.)
For devices and emulators running Android 7 or newer, follow these steps:
Choose Languages on the Languages & input screen.
- To add a language not on the list, click Add a language, select Français, and then select France for the locale.
Use the move icon on the right side of the Language preferences screen to drag Français (France) to the top of the list.
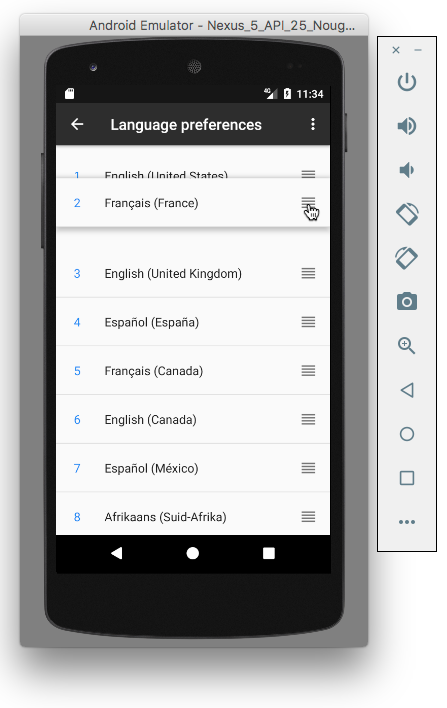
Run the app again. The app now appears in French:

If the user has chosen a language that your app does not support, the app displays the strings that are in the default strings.xml file. For example, if the user has chosen Spanish (or any other language which your app does not support), the app displays strings in English, which is the language used in the default strings.xml file for this app.
strings.xml file. If the default file is absent, or if it is missing a string that the app needs, the app may stop.
Task 2. Add a right-to-left (RTL) language
Some languages, such as English, are read from left to right (LTR), while others, such as Arabic or Hebrew, are read from right to left (RTL). While the text fields in an LTR language would be arranged in a layout from left to right, they should be reversed in a layout for an RTL language. Android 4.2 and newer versions provide full native support for RTL layouts so that you can use the same layout for both types of languages.
So far, the app uses two LTR languages: English (for the default) and French. In this task you add Hebrew, an RTL language.
2.1 Check for RTL support
Android provides the layout mirroring feature, which redraws the layout for RTL languages so that the image view, the text view, the options menu, and the floating action button are all automatically moved to the opposite side of the layout.
Open AndroidManifest.xml to check that the following attribute is part of the <application> element. This enables RTL layout mirroring:
android:supportsRtl="true"
Android Studio adds the above attribute to new projects. If you change true to false, RTL layout mirroring is not supported, and the views and other elements that use the RTL language appear as they would for an LTR language.
2.2 Add an RTL language
Add Hebrew to the LocaleText app:
- Open the LocaleText app from the previous task in Android Studio.
Add Hebrew and translate the strings using the Translations Editor (see previous task for details). The translations appear in the new Hebrew (iw) column for the key.
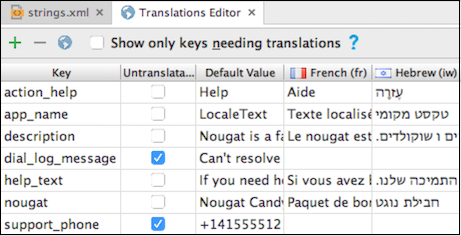
To see a preview of the layout in the new language, open
content_main.xml, click the Design tab if it is not already selected, and choose Hebrew (iw) from the Language menu at the top of the Layout Editor. The layout reappears with a preview of what it will look like in Hebrew.
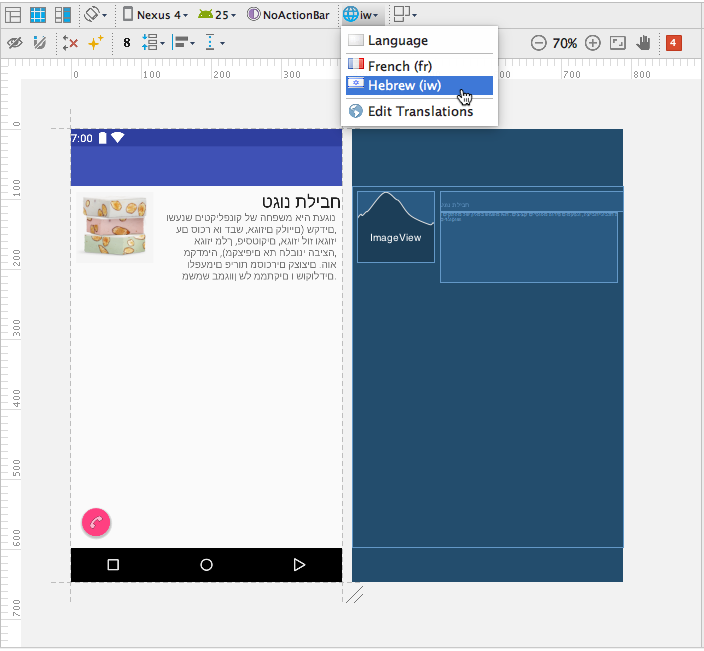
As shown in the figure, adding an RTL language can affect the layout, because Android Studio automatically supplies a declaration in the <application> element in the AndroidManifest.xml file that automatically turns on RTL layout support: android:supportsRtl="true". The RTL language characters are properly set from right to left, and the RTL text is justified to the right margin.
However, the UI elements—with the exception of the floating action button—are still in the same place in the layout, as if they were showing an LTR language. The floating action button moves to the opposite (left) side of the screen, as it should for an RTL language. But the ImageView is still constrained to the left margin, and the two TextView elements are constrained to the right side of the ImageView.
The ImageView and TextView elements should move to the opposite side of the screen, where a Hebrew reader would expect them to be. In the next step you will fix the layout to fully support an RTL language.
2.3 Modify the content layout for RTL languages
To adjust a layout so that it fully supports an RTL language, you need to add a "start" and "end" attribute for every "left" and "right" attribute in each layout. For example, if you use android:layout_marginLeft, add android:layout_marginStart:
Open
content_main.xmland look at the XML code.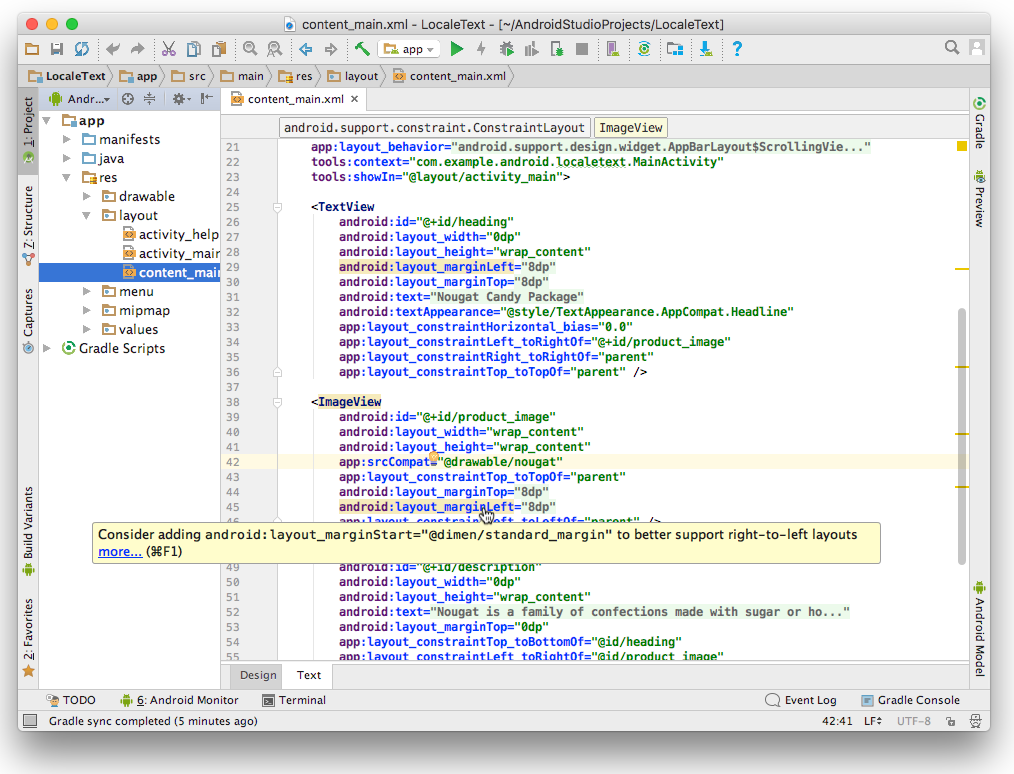
Android Studio highlights "right" and "left" attributes (such as
layout_marginLeftin the figure) and provides suggestions about including "start" and "end" attributes to better support right-to-left languages.Add a "start" attribute for every "left" attribute, and an "end" attribute for every "right" attribute. For example, add the
android:layout_marginStartattribute to all uses of thelayout_marginLeftattribute:android:layout_marginLeft="@dimen/standard_margin" android:layout_marginStart="@dimen/standard_margin"The "start" attribute defines the start of the view, which is the same as the "left" attribute for an LTR language; however, in RTL languages, the start side is the right side.
The "end" attribute defines the end of the view, which is the same as the "right" attribute for an LTR language; however, in RTL languages, the end side is the left side.
Be sure to add "start" and "end" to the constraint attributes. For example:
app:layout_constraintLeft_toRightOf="@+id/product_image" app:layout_constraintStart_toEndOf="@+id/product_image"- To see a preview of the layout in the new language, click the Design tab, and choose Hebrew (iw) in the Language menu at the top of the Layout Editor. The layout reappears with a preview of what it will look like, now that you have added the "start" and "end" attributes.
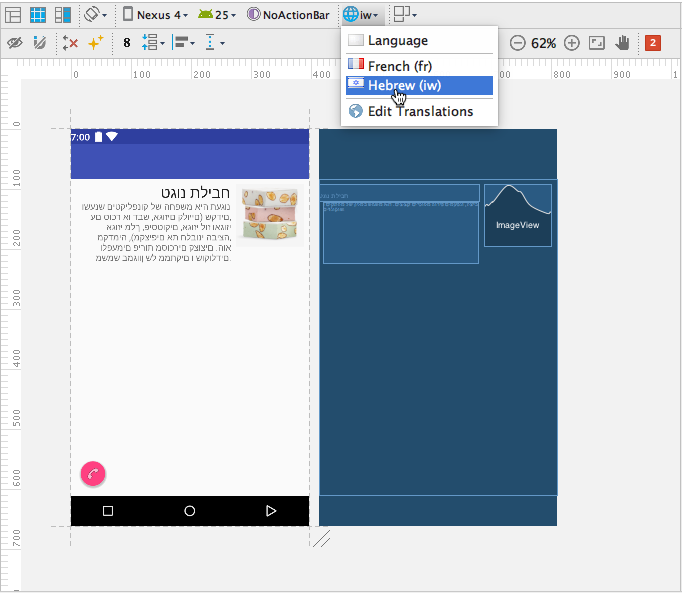
Compare this layout preview with the layout preview in the previous task. As a result of adding the "start" and "end" attributes for margins and constraints, the layout now shows the image on the right side of the screen (the "start" side), and the TextView elements are constrained to its left ("end") side.
The following snippet is the revised XML code for the two TextView elements and the ImageView in content_main.xml:
<TextView
android:id="@+id/heading"
android:layout_width="0dp"
android:layout_height="wrap_content"
 android:layout_marginLeft="@dimen/standard_margin"
 android:layout_marginStart="@dimen/standard_margin"
android:layout_marginTop="@dimen/standard_margin"
android:text="@string/nougat"
android:textAppearance=
"@style/TextAppearance.AppCompat.Headline"
app:layout_constraintHorizontal_bias="0.0"
app:layout_constraintLeft_toRightOf="@+id/product_image"
app:layout_constraintStart_toEndOf="@+id/product_image"
app:layout_constraintRight_toRightOf="parent"
app:layout_constraintEnd_toEndOf="parent"
app:layout_constraintTop_toTopOf="parent" />
<ImageView
android:id="@+id/product_image"
android:layout_width="wrap_content"
android:layout_height="wrap_content"
app:srcCompat="@drawable/nougat"
app:layout_constraintTop_toTopOf="parent"
android:layout_marginTop="@dimen/standard_margin"
android:layout_marginLeft="@dimen/standard_margin"
android:layout_marginStart="@dimen/standard_margin"
app:layout_constraintLeft_toLeftOf="parent"
app:layout_constraintStart_toStartOf="parent"/>
<TextView
android:id="@+id/description"
android:layout_width="0dp"
android:layout_height="wrap_content"
android:text="@string/description"
android:layout_marginTop="0dp"
app:layout_constraintTop_toBottomOf="@id/heading"
app:layout_constraintLeft_toRightOf="@id/product_image"
app:layout_constraintStart_toEndOf="@id/product_image"
android:layout_marginLeft="@dimen/standard_margin"
android:layout_marginStart="@dimen/standard_margin"
android:layout_marginRight="@dimen/standard_margin"
android:layout_marginEnd="@dimen/standard_margin"
app:layout_constraintRight_toRightOf="parent"
app:layout_constraintEnd_toEndOf="parent"
app:layout_constraintHorizontal_bias="0.0" >
</TextView>
2.4 Modify the help layout for RTL languages
Modify the activity_help.xml layout for the RTL language: Add a "start" attribute for every "left" attribute, and an "end" attribute for every "right" attribute, as done previously for content.xml, for the two TextView elements and the floating action button. The following snippet shows the XML code for these elements in activity_help.xml:
<TextView
    android:id="@+id/help_title"
    android:layout_width="wrap_content"
    android:layout_height="wrap_content"
    android:layout_marginLeft="@dimen/standard_margin"
    android:layout_marginStart="@dimen/standard_margin"
    android:layout_marginTop="@dimen/standard_margin"
    android:text="@string/action_help"
    android:textAppearance=
                "@style/TextAppearance.AppCompat.Headline"
    app:layout_constraintLeft_toLeftOf="parent"
    app:layout_constraintStart_toStartOf="parent"
    app:layout_constraintTop_toTopOf="parent" />

<android.support.design.widget.FloatingActionButton
    android:id="@+id/fab"
    android:layout_width="wrap_content"
    android:layout_height="wrap_content"
    android:clickable="true"
    app:fabSize="mini"
    app:srcCompat="@android:drawable/ic_menu_call"
    android:layout_marginLeft="@dimen/standard_margin"
    android:layout_marginStart="@dimen/standard_margin"
    app:layout_constraintLeft_toLeftOf="parent"
    app:layout_constraintStart_toStartOf="parent"
    android:layout_marginTop="@dimen/standard_margin"
    app:layout_constraintTop_toBottomOf="@+id/help_title" />

<TextView
    android:id="@+id/help_body"
    android:layout_width="0dp"
    android:layout_height="wrap_content"
    android:padding="@dimen/standard_margin"
    android:text="@string/help_text"
    android:textAppearance="@style/TextAppearance.AppCompat.Medium"
    android:layout_marginLeft="@dimen/standard_margin"
    android:layout_marginStart="@dimen/standard_margin"
    android:layout_marginRight="@dimen/standard_margin"
    android:layout_marginEnd="@dimen/standard_margin"
    app:layout_constraintRight_toRightOf="parent"
    app:layout_constraintEnd_toEndOf="parent"
    app:layout_constraintTop_toBottomOf="@+id/help_title"
    app:layout_constraintLeft_toRightOf="@+id/fab"
    app:layout_constraintStart_toEndOf="@+id/fab"
    app:layout_constraintHorizontal_bias="1.0" >
</TextView>
To see the changes, run the app on the device or emulator, and then change the language to Hebrew and run the app again.
The image now appears on the right of the screen, at the start of the text in the main activity. The help activity's layout is also mirrored for the RTL language.

Note also that the app name, the Help title for HelpActivity, and the Up button for HelpActivity (shown on the right side of the figure) are also moved to the opposite side of the layout, which is proper for RTL languages.
Task 2 solution code
Android Studio project: LocaleText1
Task 3. Add a Language option to the options menu
Would you like a quicker way than going back to the Settings app to change the language for testing this app? In this task, you add a Language option to the options menu in the LocaleText app. When tapped, this option uses an Intent to open the language list in the Settings app.
The Language menu option will make it easier for the user to open the language list without having to look for and launch the Settings app. The user can also immediately return to the LocaleText app and see the app in the new language by tapping the Back button.
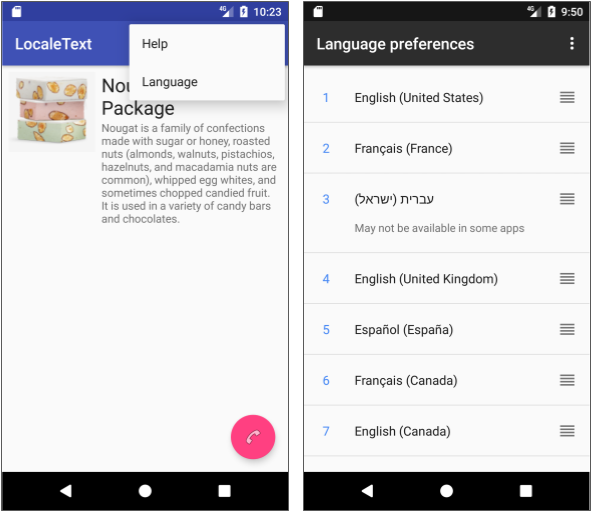
3.1 Add the menu option
Open the LocaleText app project from the previous section (or download the LocaleText1 app project).
Add the Language item to menu_main.xml, using action_language as the id. Set the android:orderInCategory attribute value to a higher number than action_help so that it appears below the Help option in the menu.
<item
    android:id="@+id/action_language"
    android:orderInCategory="110"
    android:title="Language"
    app:showAsAction="never" >
</item>
Extract the string resource for the option's android:title attribute ("Language"). Use the Translations Editor to provide that string resource for French and Hebrew.
3.2 Modify onOptionsItemSelected()
In MainActivity, change the code in the onOptionsItemSelected() method to a switch block that handles both Help and Language:
@Override
public boolean onOptionsItemSelected(MenuItem item) {
    // Handle options menu item clicks here.
    switch (item.getItemId()) {
        case R.id.action_help:
            showHelp();
            return true;
        case R.id.action_language:
            Intent languageIntent = new
                             Intent(Settings.ACTION_LOCALE_SETTINGS);
            startActivity(languageIntent);
           return true;
        default:
           // Do nothing.
        }
    return super.onOptionsItemSelected(item);
}
The Language case uses an Intent with Settings.ACTION_LOCALE_SETTINGS to navigate directly to the language list.
Task 3 solution code
Android Studio project: LocaleText2
Coding challenge
Challenge: Localize the UI elements of another app.
Developers often work in teams and are asked to update existing apps to localize them. In such cases you may not know everything about the code in the app, but you can apply localization best practices to update the code.
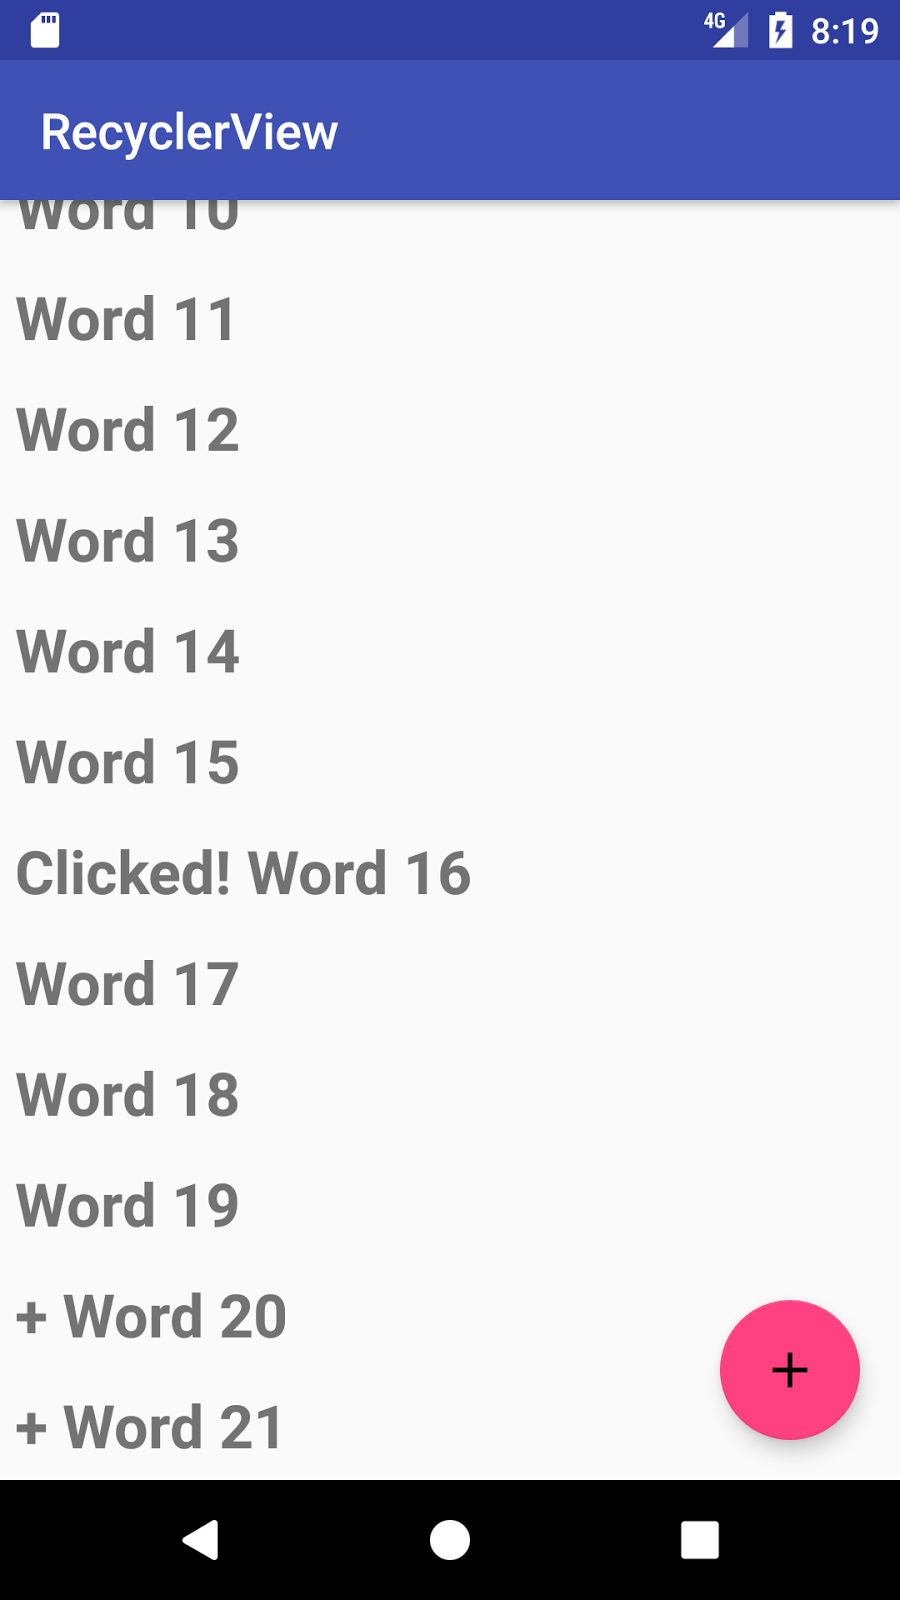
For this challenge, download the RecyclerView_start starter app, rename it to RecyclerView, and run the app. It shows a list of "Word" items. The floating action button adds a "Word" item each time you click it. Clicking on an item displays "Clicked!" with "Word" (as shown in the figure).
The following are the general steps for this challenge:
Add string resources to the project with translations for French (or any LTR language) and Hebrew (or any RTL language).

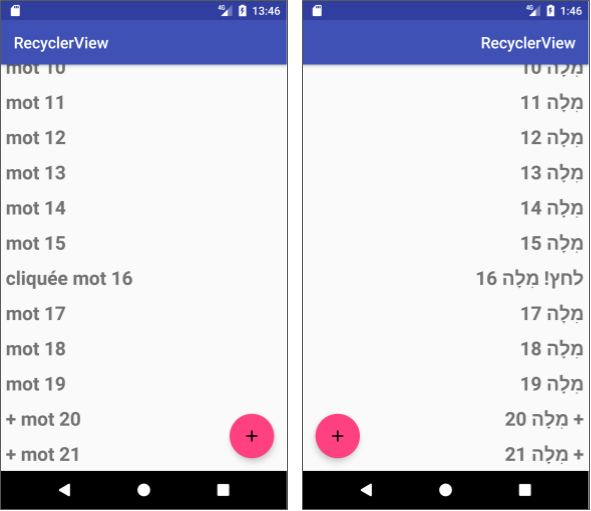
The challenge requires you to support a RTL language. The number that appears after "Word" for an LTR language ("Word 20") should appear before "Word" ("20 מִלָה") for an RTL language. To control placement, use a string format with an argument for the number, as described in the Formatting and Styling section of String Resources.
Open
MainActivity, find the code In theonCreate()method that puts the initial data into the word list (shown in the comment below), and replace it with code to use thewordstring resource:// Original code: mWordList.addLast("Word " + i) mWordList.addLast(String.format(getResources() .getString(R.string.word, i));- Within the
onCreate()method, find the code for the floating action button inonClick()that adds a new word to the word list (shown in the comment below), and replace it to use thewordstring resource:// Original code: mWordList.addLast("+ Word " + wordListSize) mWordList.addLast("+ " + getResources().getString(R.string.word, wordListSize)); - Open
WordListAdapter, and use thegetString()method to replace the hardcoded "Clicked!" withR.string.clicked. In theWordViewHolderclass within WordListAdapter, change theonClick()method to the following:public void onClick(View v) { String clickOutput = v.getContext().getString(clicked) + wordItemView.getText(); wordItemView.setText(clickOutput); } - Run the app and click the floating action button twice to add two more entries: "+ Word 20" and "+ Word 21." Click the Word 16 item to ensure that it displays "Clicked! Word 16" as shown in the previous figure. Then change your device or emulator to another language, run the app, and perform the same steps.
Challenge solution code
Android Studio project: LocaleRecyclerView
Summary
- To prepare an app to support different languages, extract and save all strings as resources in
strings.xml, including menu items, tabs, and any other navigation elements that use text. - To use the Translations Editor, open the
strings.xmlfile, and click the Open editor link in the top right corner. - To add a language, click the globe button in the top left corner of the Translations Editor.
- To see a preview of the layout in the new language, open the layout XML file, click the Design tab, and choose the language in the Language menu at the top of the layout editor.
- To support right-to-left (RTL) languages with RTL layout mirroring, Android Studio automatically includes the
android:supportsRtlattribute, set totrue, as part of the<application>element inAndroidManifest.xmlfor each project. - To support RTL languages in a layout, add the "start" and "end" XML attributes for all "left" and "right" attributes.
- Switch the preferred language in your device or emulator by choosing Languages & input > Languages in Settings. In Android 7 and newer you can add another language by clicking Add a language. Drag the preferred language to the top of the list.
- Use the default
strings.xmlfile to define each and every string in the app, so that if a language or dialect is not available, the app shows the default language.
Related concept
The related concept documentation is in Languages and layouts.
Learn more
Android developer documentation:
- Supporting Different Languages and Cultures
- Localizing with Resources
- String Resources
- Localization checklist
- Language and Locale
- Testing for Default Resources
Material Design: Usability - Bidirectionality
Android Developers Blog: Native RTL support in Android 4.2
Android Play Console: Translate & localize your app
Other:
