
Now available as codelabs!
The practical workbook for the Advanced Android Development course is now available as a series of Codelabs. Visit the course overview for more information.
11.1C: Applying clipping to a Canvas object
Contents:
- What you should already KNOW
- What you will LEARN
- What you will DO
- App overview
- Task 1. Create an app that demonstrates clipping regions
- Solution code
- Summary
- Related concept
- Learn more
For the purpose of this practical, clipping is a method for defining regions of an image, canvas, or bitmap that are selectively drawn or not drawn onto the screen. One purpose of clipping is to reduce overdraw . You can also use clipping to create interesting effects in user interface design and animation.
For example, when you draw a stack of overlapping cards as shown below, instead of fully drawing each card, it is usually more efficient to only draw the visible portions. "Usually", because clipping operations also have a cost.

You do this by specifying a clipping region for each card. For example in the diagram below, when a clipping rectangle is applied to an image, only the portion inside that rectangle is displayed. The clipping region is commonly a rectangle, but it can be any shape or combination of shapes. You can also specify whether you want the region inside the clipping region included or excluded. The screenshot below shows an example. When a clipping rectangle is applied to an image, only the portion inside that rectangle is displayed.

What you should already KNOW
You should be able to:
- Create apps with Android Studio and run them on a physical or virtual mobile device.
- Add event handlers to views.
- Create a custom
View. - Create and draw on a
Canvas. - Create a
Bitmapand associate it with aView; create aCanvasfor aBitmap; create and customize aPaintobject for styling; draw on the canvas and refresh the display. - Create a custom
View, overrideonDraw()andonSizeChanged().
What you will LEARN
You will learn how to:
- Apply different kinds of clipping to a canvas.
- How to save and restore drawing states of a canvas.
What you will DO
- Create an app that draws clipped shapes on the screen.
App overview
The ClippingExample app demonstrates how you can use and combine shapes to specify which portions of a canvas are displayed in a view.

Task 1. Create an app that demonstrates clipping regions
1.1 Create the ClippingExample project
- Create the ClippingExample app with the Empty Activity template. Uncheck Generate layout file as you don't need it.
- In the
MainActivityclass, in theonCreate()method, set the content view to a new instance ofClippedView.@Override protected void onCreate(Bundle savedInstanceState) { super.onCreate(savedInstanceState); setContentView(new ClippedView(this)); } - Create a new class for a custom view called
ClippedViewwhich extendsView. The rest of the work will all be insideClippedView.private static class ClippedView extends View {...}
1.2 Add convenience variables for the ClippedView class
- Define member variables
mPaintandmPathin theClippedViewclass.private Paint mPaint; private Path mPath; For the app to look correct on smaller screens, define dimensions for the smaller screen in the default
dimens.xmlfile.<dimen name="clipRectRight">90dp</dimen> <dimen name="clipRectBottom">90dp</dimen> <dimen name="clipRectTop">0dp</dimen> <dimen name="clipRectLeft">0dp</dimen> <dimen name="rectInset">8dp</dimen> <dimen name="smallRectOffset">40dp</dimen> <dimen name="circleRadius">30dp</dimen> <dimen name="textOffset">20dp</dimen> <dimen name="strokeWidth">4dp</dimen> <dimen name="textSize">18sp</dimen>Create a
values-sw480dpfolder and define values for the larger screens indimens.xmlin thevalues-sw480dpfolder. (Note: If the empty folder does not show up in Android Studio, manually add a resource file to theClippingExample/app/src/main/res/values-sw480dpdirectory. This makes the folder show in your Project pane.)<dimen name="clipRectRight">120dp</dimen> <dimen name="clipRectBottom">120dp</dimen> <dimen name="rectInset">10dp</dimen> <dimen name="smallRectOffset">50dp</dimen> <dimen name="circleRadius">40dp</dimen> <dimen name="textOffset">25dp</dimen> <dimen name="strokeWidth">6dp</dimen>In
ClippedView, add convenience member variables for dimensions, so that you only have to fetch the resources once.private int mClipRectRight = (int) getResources().getDimension(R.dimen.clipRectRight); private int mClipRectBottom = (int) getResources().getDimension(R.dimen.clipRectBottom); private int mClipRectTop = (int) getResources().getDimension(R.dimen.clipRectTop); private int mClipRectLeft = (int) getResources().getDimension(R.dimen.clipRectLeft); private int mRectInset = (int) getResources().getDimension(R.dimen.rectInset); private int mSmallRectOffset = (int) getResources().getDimension(R.dimen.smallRectOffset); private int mCircleRadius = (int) getResources().getDimension(R.dimen.circleRadius); private int mTextOffset = (int) getResources().getDimension(R.dimen.textOffset); private int mTextSize = (int) getResources().getDimension(R.dimen.textSize);In
ClippedView, add convenience member variables for row and column coordinates so that you only have to calculate them once.private int mColumnOne = mRectInset; private int mColumnnTwo = mColumnOne + mRectInset + mClipRectRight; private int mRowOne = mRectInset; private int mRowTwo = mRowOne + mRectInset + mClipRectBottom; private int mRowThree = mRowTwo + mRectInset + mClipRectBottom; private int mRowFour = mRowThree + mRectInset + mClipRectBottom; private int mTextRow = mRowFour + (int)(1.5 * mClipRectBottom);- In
ClippedView, add a private final member variable for a rectangle of typeRectF:private final RectF mRectF;
1.3 Add constructors for the ClippedView class
Add a constructor that initializes the
PaintandPathobjects for the canvas.Note that the
Paint.Alignproperty specifies which side of the text to align to the origin (not which side of the origin the text goes, or where in the region it is aligned!). Aligning the right side of the text to the origin places it on the left of the origin.public ClippedView(Context context) { this(context,null); } public ClippedView(Context context, AttributeSet attributeSet) { super(context, attributeSet); setFocusable(true); mPaint = new Paint(); // Smooth out edges of what is drawn without affecting shape. mPaint.setAntiAlias(true); mPaint.setStrokeWidth( (int) getResources().getDimension(R.dimen.strokeWidth)); mPaint.setTextSize((int) getResources().getDimension(R.dimen.textSize)); mPath = new Path(); mRectF = new RectF(new Rect(mRectInset, mRectInset, mClipRectRight-mRectInset, mClipRectBottom-mRectInset)); }Run your app to make sure the code is correct. You should see the name of the app and a white screen.
1.4 Understand the drawing algorithm
In onDraw(), you define seven different clipped rectangles as shown in the app screenshot below. The rectangles are all drawn the same way; the only difference is their defined clipping regions.
The algorithm used to draw the rectangles works as shown in the screenshot and explanation below. In summary, drawing a series of rectangles by moving the origin of the Canvas. (1) Translate Canvas. (2) Draw rectangle. (3) Restore Canvas and Origin.
 Translate <code>Canvas</code>. (2) Draw rectangle. (3) Restore <code>Canvas</code> and <code>Origin</code>.")
- Fill the
Canvaswith the gray background color. - Save the current state of the
Canvasso you can reset to that initial state. - Translate the
Originof the canvas to the location where you want to draw the next rectangle. That is, instead of calculating where the next rectangle and all the other shapes need to be drawn, you move theCanvasorigin, that is, its coordinate system, and then draw the shapes at the same location in the translated coordinate system. This is simpler and slightly more efficient. - Apply clipping shapes and paths.
- Draw the rectangle.
- Restore the state of the
Canvas. - GOTO Step 2 and repeat until all rectangles are drawn.
1.5 Add a helper method to draw clipped rectangles
The app draws the rectangle below seven times, first with no clipping, then six time with various clipping paths applied.

The drawClippedRectangle() method factors out the code for drawing one rectangle.
- Create a
drawClippedRectangle()method that takes aCanvascanvasargument.private void drawClippedRectangle(Canvas canvas) {...} Apply a clipping rectangle that constraints to drawing only the square to the
canvas.canvas.clipRect(mClipRectLeft, mClipRectTop, mClipRectRight, mClipRectBottom);The
Canvas.clipRect(left, top, right, bottom)method reduces the region of the screen that future draw operations can write to. It sets the clipping boundaries (clipBounds) to be the spatial intersection of the current clipping rectangle and the rectangle specified. There are lot of variants of theclipRect()method that accept different forms for regions and allow different operations on the clipping rectangle.Fill the
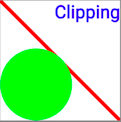
canvaswith white color. Because of the clipping rectangle, only the region defined by the clipping rectangle is filled, creating a white rectangle.canvas.drawColor(Color.WHITE);- Draw the red line, green circle, and text, as shown in the completed method below.
After you paste the code, create a string resource
"Clipping"to get rid of the error forR.string.clippingin the last line.private void drawClippedRectangle(Canvas canvas) { // Set the boundaries of the clipping rectangle for whole picture. canvas.clipRect(mClipRectLeft, mClipRectTop, mClipRectRight, mClipRectBottom); // Fill the canvas with white. // With the clipped rectangle, this only draws // inside the clipping rectangle. // The rest of the surface remains gray. canvas.drawColor(Color.WHITE); // Change the color to red and // draw a line inside the clipping rectangle. mPaint.setColor(Color.RED); canvas.drawLine(mClipRectLeft, mClipRectTop, mClipRectRight, mClipRectBottom, mPaint); // Set the color to green and // draw a circle inside the clipping rectangle. mPaint.setColor(Color.GREEN); canvas.drawCircle(mCircleRadius, mClipRectBottom - mCircleRadius, mCircleRadius, mPaint); // Set the color to blue and draw text aligned with the right edge // of the clipping rectangle. mPaint.setColor(Color.BLUE); // Align the RIGHT side of the text with the origin. mPaint.setTextAlign(Paint.Align.RIGHT); canvas.drawText(getContext().getString(R.string.clipping), mClipRectRight, mTextOffset, mPaint); }- If you run your app, you still only see the white screen, because you have not overridden
onDraw()and thus are not drawing anything yet.
1.6 Override the onDraw() method
In the onDraw() method you apply various combinations of clipping regions to achieve graphical effects and learn how you can combine clipping regions to create any shape you need.
When you use View classes provided by the Android system, the system clips views for you to minimize overdraw. When you use custom View classes and override the onDraw() method, clipping what you draw becomes your responsibility.
clipPath() methods have been replaced with clipOutPath() and clipOutRect() methods, and some Region.Op operators have been deprecated. Depending on the version of Android you are using, you may need to adjust the methods and operators you use to create the exact effects shown in the app screenshot. See the Canvas and documentation for details.
Create the
onDraw()method, if it is not already present as a code stub.@Override protected void onDraw(Canvas canvas) { ... }Next, add code to draw the first rectangle, which has no additional clipping.
In
onDraw(), fill thecanvaswith gray color.canvas.drawColor(Color.GRAY);Save the drawing state of the
canvas.Context maintains a stack of drawing states. Each state includes the currently applied transformations and clipping regions. Undoing a transformation by reversing it is error-prone, as well as chaining too many transformations relative to each other. Translation is straightforward to reverse, but if you also stretch, rotate, or custom deform, it gets complex quickly. Instead, you save the state of the canvas, apply your transformations, draw, and then restore the previous state.
canvas.save();- Translate the origin of the canvas to the top-left corner of the first rectangle.
canvas.translate(mColumnOne, mRowOne); - Call the
drawClippedRectangle()method to draw the first rectangle.drawClippedRectangle(canvas); - Restore the previous state of the canvas.
canvas.restore(); - Run your app. You should now see the first rectangle drawn on a gray background.
Next, add code to draw the second rectangle, which uses the difference between two clipping rectangles to create a picture frame effect.
![]()
Use the code below which does the following:
- Save the canvas.
- Translate the origin of the canvas into open space to the right of the first rectangle.
- Apply two clipping rectangles. The
DIFFERENCEoperator subtracts the second rectangle from the first one. - Call the
drawClippedRectangle()method to draw the modified canvas. - Restore the canvas state.
- Run your app.
Next, add code to draw the third rectangle, which uses a circular clipping region created from a circular path.// Draw a rectangle that uses the difference between two // clipping rectangles to create a picture frame effect. canvas.save(); // Move the origin to the right for the next rectangle. canvas.translate(mColumnnTwo, mRowOne); // Use the subtraction of two clipping rectangles to create a frame. canvas.clipRect(2 * mRectInset, 2 * mRectInset, mClipRectRight-2 * mRectInset, mClipRectBottom-2 * mRectInset); canvas.clipRect(4 * mRectInset, 4 * mRectInset, mClipRectRight-4 * mRectInset, mClipRectBottom-4 * mRectInset, Region.Op.DIFFERENCE); drawClippedRectangle(canvas); canvas.restore();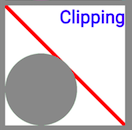
Here is the code:
// Draw a rectangle that uses a circular clipping region
// created from a circular path.
canvas.save();
canvas.translate(mColumnOne, mRowTwo);
// Clears any lines and curves from the path but unlike reset(),
// keeps the internal data structure for faster reuse.
mPath.rewind();
mPath.addCircle(mCircleRadius, mClipRectBottom-mCircleRadius,
       mCircleRadius, Path.Direction.CCW);
canvas.clipPath(mPath, Region.Op.DIFFERENCE);
drawClippedRectangle(canvas);
canvas.restore();
Next, add code to draw the intersection of two clipping rectangles.
![]()
Here is the code:
// Use the intersection of two rectangles as the clipping region.
canvas.save();
canvas.translate(mColumnnTwo, mRowTwo);
canvas.clipRect(mClipRectLeft, mClipRectTop,
       mClipRectRight-mSmallRectOffset,
       mClipRectBottom-mSmallRectOffset);
canvas.clipRect(mClipRectLeft+mSmallRectOffset,
       mClipRectTop+mSmallRectOffset,
       mClipRectRight, mClipRectBottom, Region.Op.INTERSECT);
drawClippedRectangle(canvas);
canvas.restore();
Next, combine shapes and draw any path to define a clipping region.
![]()
Here is the code:
// You can combine shapes and draw any path to define a clipping region.
canvas.save();
canvas.translate(mColumnOne, mRowThree);
mPath.rewind();
mPath.addCircle(mClipRectLeft+mRectInset+mCircleRadius,
       mClipRectTop+mCircleRadius+mRectInset,
       mCircleRadius, Path.Direction.CCW);
mPath.addRect(mClipRectRight/2-mCircleRadius,
       mClipRectTop+mCircleRadius+mRectInset,
       mClipRectRight/2+mCircleRadius,
       mClipRectBottom-mRectInset,Path.Direction.CCW);
canvas.clipPath(mPath);
drawClippedRectangle(canvas);
canvas.restore();
Next, add a rounded rectangle which is a commonly used clipping shape:
![]()
Here is the code:
// Use a rounded rectangle. Use mClipRectRight/4 to draw a circle.
canvas.save();
canvas.translate(mColumnnTwo, mRowThree);
mPath.rewind();
mPath.addRoundRect(mRectF, (float)mClipRectRight/4,
       (float)mClipRectRight/4, Path.Direction.CCW);
canvas.clipPath(mPath);
drawClippedRectangle(canvas);
canvas.restore();
Next, clip the outside around the rectangle.
![]()
Here is the code:
// Clip the outside around the rectangle.
canvas.save();
// Move the origin to the right for the next rectangle.
canvas.translate(mColumnOne, mRowFour);
canvas.clipRect(2 * mRectInset, 2 * mRectInset,
       mClipRectRight-2*mRectInset,
       mClipRectBottom-2*mRectInset);
drawClippedRectangle(canvas);
canvas.restore();
Finally, draw and transform text.
![]()
In the previous steps you used the translate transform to move the origin of the canvas. You can apply transformations to any shape, including text, before you draw it, as shown in the following example.
// Draw text with a translate transformation applied.
canvas.save();
mPaint.setColor(Color.CYAN);
// Align the RIGHT side of the text with the origin.
mPaint.setTextAlign(Paint.Align.LEFT);
// Apply transformation to canvas.
canvas.translate(mColumnnTwo, mTextRow);
// Draw text.
canvas.drawText(
        getContext().getString(R.string.translated), 0, 0, mPaint);
canvas.restore();

// Draw text with a translate and skew transformations applied.
canvas.save();
mPaint.setTextSize(mTextSize);
mPaint.setTextAlign(Paint.Align.RIGHT);
// Position text.
   canvas.translate(mColumnnTwo, mTextRow);
   // Apply skew transformation.
   canvas.skew(0.2f, 0.3f);
   canvas.drawText(
           getContext().getString(R.string.skewed), 0, 0, mPaint);
   canvas.restore();
} // End of onDraw()
Solution code
Android Studio project: ClippingExample
Summary
- The
Contextof an activity maintains a state that preserves transformations and clipping regions for theCanvas. - Use
canvas.save()andcanvas.restore()to draw and return to the original state of your canvas. - To draw multiple shapes on a canvas, you can either calculate their location, or you can move (translate) the origin of your drawing surface. The latter can make it easier to create utility methods for repeated draw sequences.
- Clipping regions can be any shape, combination of shapes or path.
- You can add, subtract, and intersect clipping regions to get exactly the region you need.
- You can apply transformations to text.
Related concepts
The related concept documentation is in The Canvas class.
Learn more
Android developer documentation: