1.2: Communicating with a Fragment
Contents:
- What you should already KNOW
- What you will LEARN
- What you will DO
- Apps overview
- Task 1. Communicating with a fragment
- Task 1 solution code
- Task 2. Changing an app to a master/detail layout
- Task 2 solution code
- Summary
- Related concept
- Learn more
An Activity hosting a Fragment can send data to and receive data from the Fragment. A Fragment can't communicate directly with another Fragment, even within the same Activity. The host Activity must be used as an intermediary.
This practical demonstrates how to use an Activity to communicate with a Fragment. It also shows how to use a Fragment to implement a two-pane master/detail layout. A master/detail layout is a layout that allows users to view a list of items (the master view) and drill down into each item for more details (the detail view).
What you should already KNOW
You should be able to:
- Create a
Fragmentwith an interactive UI. - Add a static
Fragmentto the UI layout of anActivity. - Add, replace, and remove a dynamic
Fragmentwhile anActivityis running.
What you will LEARN
You will learn how to:
- Send data to a
Fragment. - Retrieve data from a
Fragment. - Implement a master/detail layout for wide screens.
What you will DO
- Use an argument
Bundleto send data to aFragment. - Define a listener interface with a callback method in a
Fragment. - Implement the listener for the
Fragmentand a callback to retrieve data from theFragment. - Move
Activitycode to aFragmentfor a master/detail layout.
Apps overview
In FragmentExample2, the app from the lesson on using a Fragment, a user can tap the Open button to show the Fragment, tap a radio button for a "Yes" or "No" choice, and tap Close to close the Fragment. If the user opens the Fragment again, the previous choice is not retained.
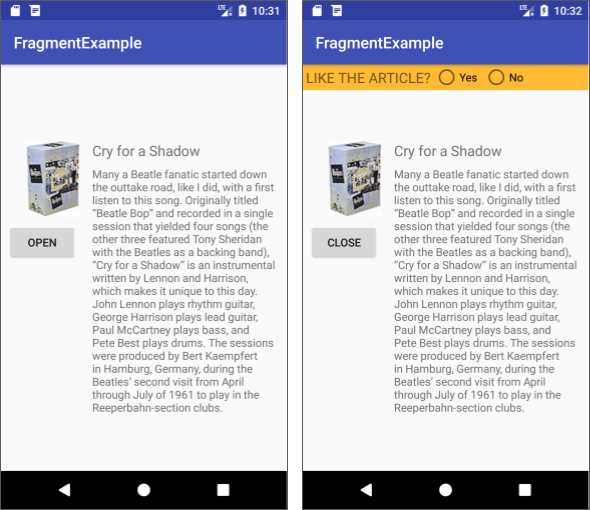
In this lesson you modify the code in the FragmentExample2 app to send the user's choice back to the host Activity. When the Activity opens a new Fragment, the Activity can send the user's previous choice to the new Fragment. As a result, when the user taps Open again, the app shows the previously selected choice.
The second app, SongDetail, demonstrates how you can:
- Use a
Fragmentto show a master/detail layout on tablets. - Provide the
Fragmentwith the information it needs to perform tasks.
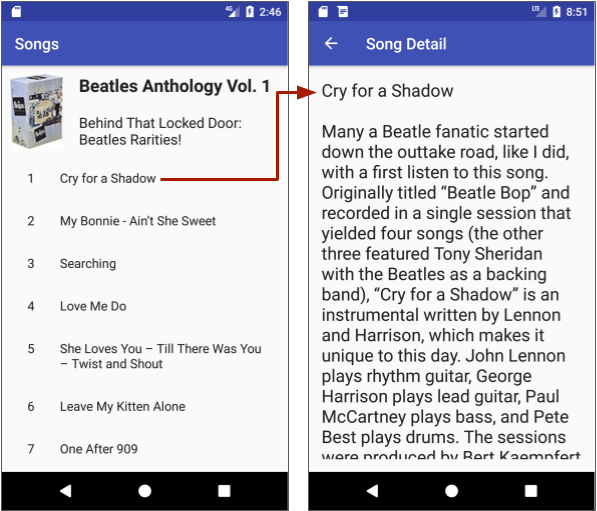
On a mobile phone screen, the SongDetail app looks like the following figure:
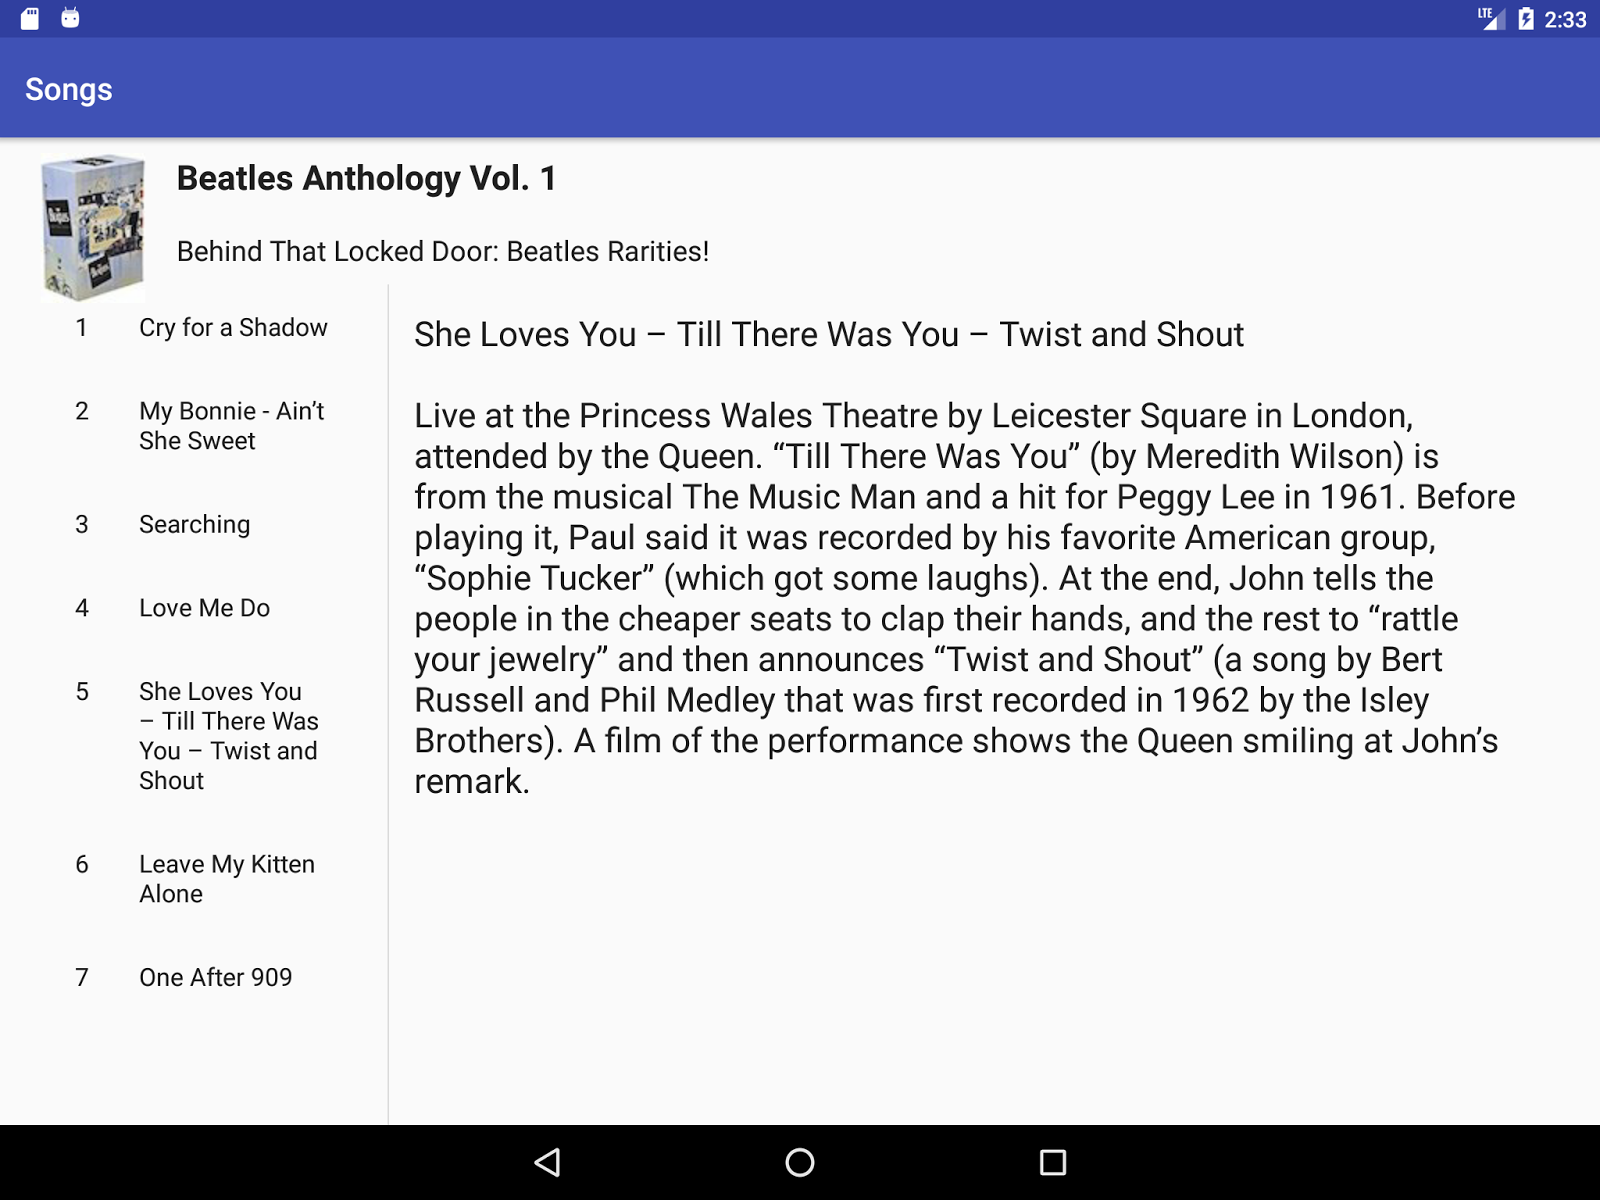
On a tablet in horizontal orientation, the SongDetail app displays a master/detail layout:
Task 1. Communicating with a fragment
You will modify the FragmentExample2 app from the lesson on creating a Fragment with a UI, so that the Fragment can tell the host Activity which choice ("Yes" or "No") the user made. You will:
- Define a listener interface in the
Fragmentwith a callback method to get the user's choice. - Implement the interface and callback in the host
Activityto retrieve the user's choice. - Use the
newInstance()factory method to provide the user's choice back to theFragmentwhen creating the nextFragmentinstance.
1.1 Define a listener interface with a callback
To define a listener interface in the Fragment:
- Copy the
FragmentExample2project in order to preserve it as an intermediate step. Open the new copy in Android Studio, and refactor and rename the new project toFragmentCommunicate. (For help with copying projects and refactoring and renaming, see Copy and rename a project.) - Open
SimpleFragment, and add another constant in theSimpleFragmentclass to represent the third state of the radio button choice, which is 2 if the user has not yet made a choice:private static final int NONE = 2; - Add a variable for the radio button choice:
public int mRadioButtonChoice = NONE; - Define a listener interface called
OnFragmentInteractionListener. In it, specify a callback method that you will create, calledonRadioButtonChoice():interface OnFragmentInteractionListener { void onRadioButtonChoice(int choice); } - Define a variable for the listener at the top of the
SimpleFragmentclass. You will use this variable inonAttach()in the next step:OnFragmentInteractionListener mListener; Override the
onAttach()lifecycle method inSimpleFragmentto capture the hostActivityinterface implementation:@Override public void onAttach(Context context) { super.onAttach(context); if (context instanceof OnFragmentInteractionListener) { mListener = (OnFragmentInteractionListener) context; } else { throw new ClassCastException(context.toString() + getResources().getString(R.string.exception_message)); } }The
onAttach()method is called as soon as theFragmentis associated with theActivity. The code makes sure that the hostActivityhas implemented the callback interface. If not, it throws an exception.The string resource
exception_messageis included in the starter app for the text "must implement OnFragmentInteractionListener".In
onCreateView(), get themRadioButtonChoiceby adding code to eachcaseof theswitch caseblock for the radio buttons:case YES: // User chose "Yes." textView.setText(R.string.yes_message); mRadioButtonChoice = YES; mListener.onRadioButtonChoice(YES); break; case NO: // User chose "No." textView.setText(R.string.no_message); mRadioButtonChoice = NO; mListener.onRadioButtonChoice(NO); break; default: // No choice made. mRadioButtonChoice = NONE; mListener.onRadioButtonChoice(NONE); break;
1.2 Implement the callback in the Activity
To implement the callback:
- Open
MainActivityand implementOnFragmentInteractionListenerin order to receive the data from theFragment:public class MainActivity extends AppCompatActivity implements SimpleFragment.OnFragmentInteractionListener { - In Android Studio, the above code is underlined in red, and a red bulb appears in the left margin. Click the bulb and choose Implement methods. Choose onRadioButtonChoice(choice:int):void, and click OK. An empty
onRadioButtonChoice()method appears inMainActivity. - Add a member variable in
MainActivityfor the choice the user makes with the radio buttons, and set it to the default value:private int mRadioButtonChoice = 2; // The default (no choice). - Add code to the new
onRadioButtonChoice()method to assign the user's radio button choice from theFragmenttomRadioButtonChoice. Add aToastto show that theActivityhas received the data from theFragment:@Override public void onRadioButtonChoice(int choice) { // Keep the radio button choice to pass it back to the fragment. mRadioButtonChoice = choice; Toast.makeText(this, "Choice is " + Integer.toString(choice), Toast.LENGTH_SHORT).show(); } - Run the app, tap Open, and make a choice. The
Activityshows theToastmessage with the choice as an integer (0 is "Yes" and 1 is "No").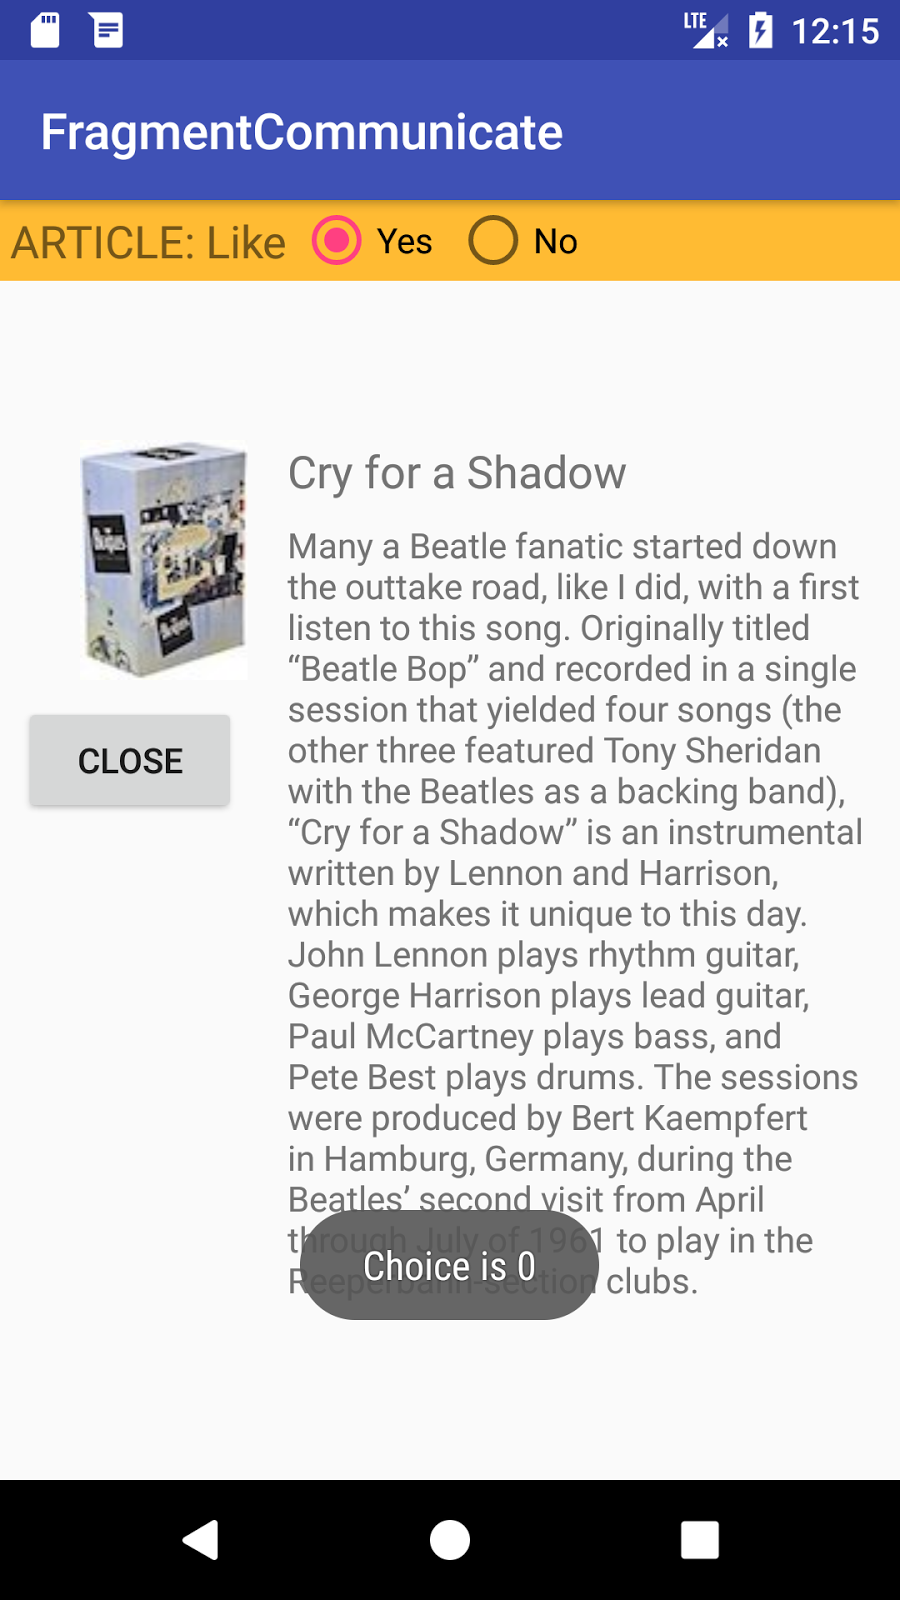
1.3 Provide the user's choice to the fragment
To provide the user's previous "Yes" or "No" choice from the host Activity to the Fragment, pass the choice to the newInstance() method in SimpleFragment when instantiating SimpleFragment. You can set a Bundle and use the Fragment.setArguments(Bundle) method to supply the construction arguments for the Fragment.
Follow these steps:
- Open
MainActivity, and change thenewInstance()statement indisplayFragment()to the following:SimpleFragment fragment = SimpleFragment.newInstance(mRadioButtonChoice); - Open
SimpleFragmentand add the following constant, which is the key to finding the information in theBundle:private static final String CHOICE = "choice"; - In
SimpleFragment, change thenewInstance()method to the following, which uses aBundleand thesetArguments(Bundle)method to set the arguments before returning theFragment:public static SimpleFragment newInstance(int choice) { SimpleFragment fragment = new SimpleFragment(); Bundle arguments = new Bundle(); arguments.putInt(CHOICE, choice); fragment.setArguments(arguments); return fragment; } - Now that a
Bundleof arguments is available in theSimpleFragment, you can add code to theonCreateView()method inSimpleFragmentto get the choice from theBundle. Right before the statement that sets theradioGrouponCheckedChangedlistener, add the following code to retrieve the radio button choice (if a choice was made), and pre-select the radio button.if (getArguments().containsKey(CHOICE)) { // A choice was made, so get the choice. mRadioButtonChoice = getArguments().getInt(CHOICE); // Check the radio button choice. if (mRadioButtonChoice != NONE) { radioGroup.check (radioGroup.getChildAt(mRadioButtonChoice).getId()); } } - Run the app. At first, the app doesn't show the
Fragment(see the left side of the following figure). - Tap Open and make a choice such as "Yes" (see the center of the figure below). The choice you made appears in a
Toast. - Tap Close to close the
Fragment. - Tap Open to reopen the
Fragment. TheFragmentappears with the choice already made (see the right side of the figure). Your app has communicated the choice from theFragmentto theActivity, and then back to theFragment.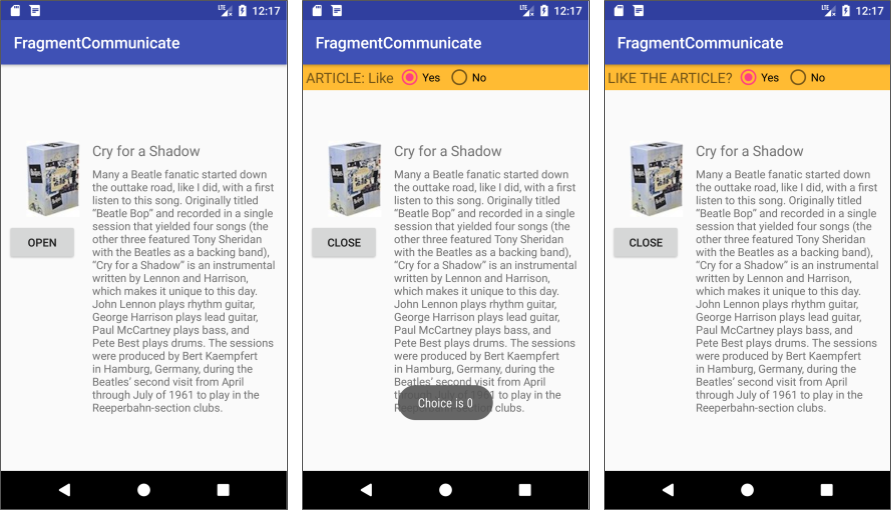
Task 1 solution code
Android Studio project: FragmentCommunicate
Task 2. Changing an app to a master/detail layout
This task demonstrates how you can use a Fragment to implement a two-pane master/detail layout for a horizontal tablet display. It also shows how to take code from an Activity and encapsulate it within a Fragment, thereby simplifying the Activity.
In this task you use a starter app called SongDetail_start that displays song titles that the user can tap to see song details.

On a tablet, the app doesn't take advantage of the full screen size, as shown in the following figure:
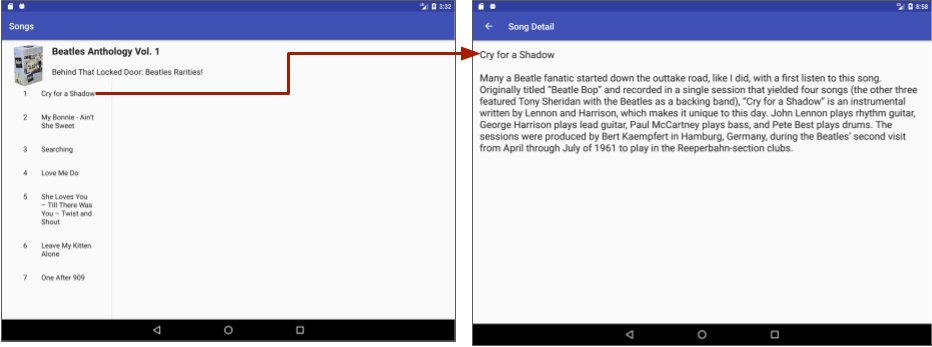
When set to a horizontal orientation, a tablet device is wide enough to show information in a master/detail layout. You will modify the app to show a master/detail layout if the device is wide enough, with the song list as the master, and the Fragment as the detail, as shown in the following figure.

The following diagram shows the difference in the code for the SongDetail starter app (1), and the final version of the app for both mobile phone and wide tablets (2-3).
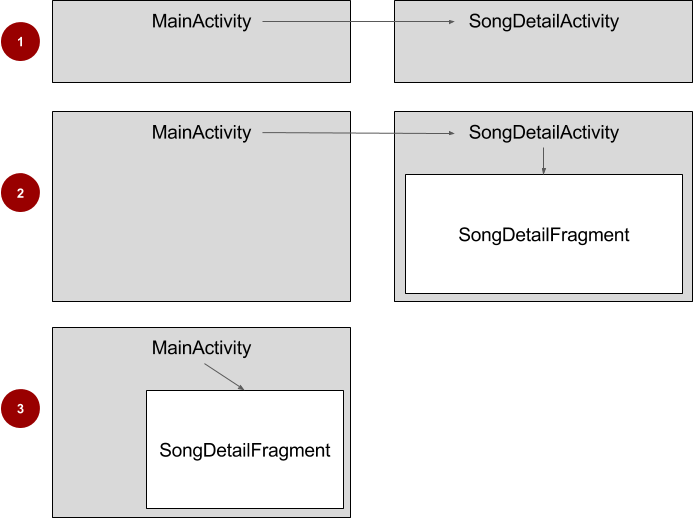
In the above figure:
- Phone or tablet: The SongDetail_start app displays the song details in a vertical layout in
SongDetailActivity, which is called fromMainActivity. - Phone or small screen: The final version of SongDetail displays the song details in
SongDetailFragment.MainActivitycallsSongDetailActivity, which then hosts theFragmentin a vertical layout. - Tablet or larger screen in horizontal orientation: If the screen is wide enough for the master/detail layout, the final version of SongDetail displays the song details in
SongDetailFragment.MainActivityhosts theFragmentdirectly.
2.1 Examine the starter app layout
To save time, download the SongDetail_start starter app, which has been prepared with data, layouts, and a RecyclerView.
- Open the SongDetail_start app in Android Studio, and rename and refactor the project to
SongDetail(for help with copying projects and refactoring and renaming, see "Copy and rename a project"). Run the app on a tablet or a tablet emulator in horizontal orientation. For instructions on using the emulator, see Run Apps on the Android Emulator. The starter app uses the same layout for tablets and mobile phones—it doesn't take advantage of a wide screen.

Examine the layouts. Although you don't need to change them, you will reference the
android:idvalues in your code.
The song_list.xml layout is included within activity_song_list.xml to define the layout of the song list. You can expand it to show:
song_list.xmlas the default for any screen size.song_list.xml (w900dp)for devices with screens that have a width of 900dp or larger. It differs fromsong_list.xmlbecause it includes aFrameLayoutwith an id ofsong_detail_containerfor displaying theFragmenton a wide screen.
The activity_song_detail.xml layout for SongDetailActivity includes song_detail.xml. Provided is a FrameLayout with the same id of song_detail_container for displaying the Fragment on a screen that is not wide.
The following layouts are also provided, which you don't have to change:
song_detail.xml: Included withinactivity_song_detail.xmlto define the layout of theTextViewfor the detailed song information.activity_song_list.xml: Layout forMainActivity. This layout includessong_list.xml.song_list_content.xml: Item layout for theRecyclerViewadapter.
2.2 Examine the starter app code
Open SongDetailActivity and find the code in the onCreate() method that displays the song detail:
// ...
// This activity displays the detail. In a real-world scenario,
// get the data from a content repository.
mSong = SongUtils.SONG_ITEMS.get
                (getIntent().getIntExtra(SongUtils.SONG_ID_KEY, 0));

// Show the detail information in a TextView.
if (mSong != null) {
    ((TextView) findViewById(R.id.song_detail))
                    .setText(mSong.details);
}
// ...
In the next step you will add a new Fragment, and copy the if (mSong != null) block with setText() to the new Fragment, so that the Fragment controls how the song detail is displayed.
The SongUtils.java class in the content folder creates an array of fixed entries for the song title and song detail information. You can modify this class to refer to different types of data. However, in a real-world production app, you would most likely get data from a repository or server, rather than hardcoding it in the app.
2.3 Add the fragment
Add a new blank Fragment, and move code from SongDetailActivity to the Fragment, so that the Fragment can take over the job of displaying the song detail.
- Select the app package name within
javain the Project: Android view, add a new Fragment (Blank), and name theFragmentSongDetailFragment. Uncheck the Include fragment factory methods and Include interface callbacks options. - Open
SongDetailActivity, and Edit > Cut themSongvariable declaration from theActivity. Some of the code inSongDetailActivitythat relies on it will be underlined in red, but you will replace that code in subsequent steps.public SongUtils.Song mSong; - Open
SongDetailFragment, and Edit > Paste the above declaration at the top of the class. - In
SongDetailFragment, remove all code in theonCreateView()method and change it to inflate thesong_detail.xml layout:@Override public View onCreateView(LayoutInflater inflater, ViewGroup container, Bundle savedInstanceState) { View rootView = inflater.inflate(R.layout.song_detail, container, false); // TODO: Show the detail information in a TextView. return rootView; } - To use the song detail in the
Fragment, replace theTODOcomment with theif (mSong != null)block fromSongDetailActivity, which includes thesetText()method to show the detail information in thesong_detailTextView. You need to addrootViewto use thefindViewById()method; otherwise, the block is the same as the one formerly used inSongDetailActivity:if (mSong != null) { ((TextView) rootView.findViewById(R.id.song_detail)) .setText(mSong.details); }
2.4 Check if the screen is wide enough for a two-pane layout
MainActivity in the starter app provides the data to a second Activity (SongDetailActivity) to display the song detail on a separate Activity display. To change the app to provide data for the Fragment, you will change the code that displays the song detail.
- If the display is wide enough for a two-pane layout,
MainActivitywill host theFragment, and send the position of the selected song in the list directly to theFragment. - If the screen is not wide enough for a two-pane layout,
MainActivitywill use an intent with extra data—the position of the selected song—to startSongDetailActivity.SongDetailActivitywill then host theFragment, and send the position of the selected song to theFragment.
In other words, the Fragment will take over the job of displaying the song detail. Therefore, your code needs to host the Fragment in MainActivity if the screen is wide enough for a two-pane display, or in SongDetailActivity if the screen is not wide enough.
Open MainActivity, and follow these steps:
- To serve as a check for the size of the screen, add a
privatebooleanto theMainActivityclass calledmTwoPane:private boolean mTwoPane = false; - Add the following to the end of the
MainActivityonCreate()method:
The above code checks for the screen size and orientation. Theif (findViewById(R.id.song_detail_container) != null) { mTwoPane = true; }song_detail_containerview forMainActivitywill be present only if the screen's width is 900dp or larger, because it is defined only in thesong_list.xml (w900dp)layout, not in the defaultsong_list.xmllayout for smaller screen sizes. If this view is present, then theActivityshould be in two-pane mode.
If a tablet is set to portrait orientation, its width will most likely be lower than 900dp, and so it will not show a two-pane layout. If the tablet is set to horizontal orientation and its width is 900dp or larger, it will show a two-pane layout.
2.5 Use the fragment to show song detail
The Fragment needs to know which song title the user selected. To use the same best practice for creating an instance of a Fragment, as in the previous exercises, create a newInstance() factory method in the Fragment.
In the newInstance() method you can set a Bundle and use the Fragment.setArguments(Bundle) method to supply the construction arguments for the Fragment. In a following step, you will use the Fragment.getArguments() method in the Fragment to get the arguments supplied by setArguments(Bundle).
Open
SongDetailFragment, and add the following method to it:public static SongDetailFragment newInstance (int selectedSong) { SongDetailFragment fragment = new SongDetailFragment(); // Set the bundle arguments for the fragment. Bundle arguments = new Bundle(); arguments.putInt(SongUtils.SONG_ID_KEY, selectedSong); fragment.setArguments(arguments); return fragment; }The above method receives the
selectedSong(the integer position of the song title in the list), and creates theargumentsBundlewithSONG_ID_KEYandselectedSong. It then usessetArguments(arguments)to set the arguments for theFragment, and returns theFragment.Open
MainActivity, and find theonBindViewHolder()method that implements a listener withsetOnClickListener(). When the user taps a song title, the starter app code startsSongDetailActivityusing an intent with extra data (the position of the selected song in the list):holder.mView.setOnClickListener(new View.OnClickListener() { @Override public void onClick(View v) { Context context = v.getContext(); Intent intent = new Intent(context, SongDetailActivity.class); intent.putExtra(SongUtils.SONG_ID_KEY, holder.getAdapterPosition()); context.startActivity(intent); } });This code sends the extra data—
SongUtils.SONG_ID_KEYandholder.getAdapterPosition())—thatSongDetailActivityuses to show the correct detail for the tapped song title. You will have to send this data to the newFragment.Change the code within the
onClick()method to create a new instance of theFragmentfor two-pane display, or to use the intent (as before) to launch the secondActivityif not a two-pane display.if (mTwoPane) { int selectedSong = holder.getAdapterPosition(); SongDetailFragment fragment = SongDetailFragment.newInstance(selectedSong); getSupportFragmentManager().beginTransaction() .replace(R.id.song_detail_container, fragment) .addToBackStack(null) .commit(); } else { Context context = v.getContext(); Intent intent = new Intent(context, SongDetailActivity.class); intent.putExtra(SongUtils.SONG_ID_KEY, holder.getAdapterPosition()); context.startActivity(intent); }If
mTwoPaneis true, the code gets the selected song position (selectedSong) in the song title list, and passes it to the new instance ofSongDetailFragmentusing thenewInstance()method in theFragment. It then usesgetSupportFragmentManager()with areplacetransaction to show a new version of theFragment.The transaction code for managing a
Fragmentshould be familiar, as you performed such operations in a previous lesson. By replacing theFragment, you can refresh with new data aFragmentthat is already running.If
mTwoPaneis false, the code does exactly the same thing it did in the starter app: it startsSongDetailActivitywith an intent andSONG_ID_KEYandholder.getAdapterPosition()as extra data.Open
SongDetailActivity, and find the code in theonCreate()method that no longer works due to the removal of themSongdeclaration. In the next step you will replace it.// This activity displays the detail. In a real-world scenario, // get the data from a content repository. mSong = SongUtils.SONG_ITEMS.get (getIntent().getIntExtra(SongUtils.SONG_ID_KEY, 0)); // Show the detail information in a TextView. if (mSong != null) { ((TextView) findViewById(R.id.song_detail)) .setText(mSong.details); }Previously you cut the
if (mSong != null)block that followed the above code and pasted it into theFragment, so that theFragmentcould display the song detail. You can now replace the above code in the next step so thatSongDetailActivitywill use theFragmentto display the song detail.Replace the above code in
onCreate()with the following code. It first checks ifsavedInstanceStateisnull, which means theActivitystarted but its state was not saved. If it isnull, it creates an instance of theFragment, passing it theselectedSong. (IfsavedInstanceStateis notnull, theActivitystate has been saved—such as when the screen is rotated. In such cases, you don't need to add theFragment.)if (savedInstanceState == null) { int selectedSong = getIntent().getIntExtra(SongUtils.SONG_ID_KEY, 0); SongDetailFragment fragment = SongDetailFragment.newInstance(selectedSong); getSupportFragmentManager().beginTransaction() .add(R.id.song_detail_container, fragment) .commit(); }The code first gets the selected song title position from the intent extra data. It then creates an instance of the
Fragmentand adds it to theActivityusing aFragmenttransaction.SongDetailActivitywill now use theSongDetailFragmentto display the detail.To set up the data in the
Fragment, openSongDetailFragmentand add the entireonCreate()method before theonCreateView()method. ThegetArguments()method in theonCreate()method gets the arguments supplied to theFragmentusingsetArguments(Bundle).@Override public void onCreate(Bundle savedInstanceState) { super.onCreate(savedInstanceState); if (getArguments().containsKey(SongUtils.SONG_ID_KEY)) { // Load the content specified by the fragment arguments. mSong = SongUtils.SONG_ITEMS.get(getArguments() .getInt(SongUtils.SONG_ID_KEY)); } }- Run the app on a mobile phone or phone emulator. It should look the same as it did before. (Refer to the figure at the beginning of this task.)
- Run the app on a tablet or tablet emulator in horizontal orientation. It should display the master/detail layout as shown in the following figure.

Task 2 solution code
Android Studio project: SongDetail
Summary
Adding a Fragment dynamically:
- When adding a
Fragmentdynamically to anActivity, the best practice for representing theFragmentas an instance in theActivityis to create the instance with anewinstance()factory method in theFragment. - The
newinstance()method can set aBundleand usesetArguments(Bundle)to supply the construction arguments for theFragment. - Call the
newinstance()method from theActivityto create a new instance, and pass the specific data you need for thisBundle.
Fragment lifecycle:
- The system calls
onAttach()when aFragmentis first associated with anActivity. UseonAttach()to initialize essential components of theFragment, such as a listener. - The system calls
onCreate()when creating aFragment. UseonCreate()to initialize components of theFragmentthat you want to retain when theFragmentis paused or stopped, then resumed. - The system calls
onCreateView()to draw aFragmentUI for the first time. To draw a UI for yourFragment, you must return the rootViewof yourFragmentlayout from this method. You can returnnullif theFragmentdoes not provide a UI. - When a
Fragmentis in the active or resumed state, it can access the hostActivityinstance withgetActivity()and easily perform tasks such as finding aViewin theActivitylayout.
Calling Fragment methods and saving its state:
- The host
Activitycan call methods in aFragmentby acquiring a reference to theFragmentfromFragmentManager, usingfindFragmentById(). - Save the
Fragmentstate during the onSaveInstanceState() callback and restore it during eitheronCreate(),onCreateView(), oronActivityCreated().
To communicate from the host Activity to a Fragment, use a Bundle and the following:
setArguments(Bundle): Supply the construction arguments for aFragment. The arguments are retained across theFragmentlifecycle.getArguments(): Return the arguments supplied tosetArguments(Bundle), if any.
To have a Fragment communicate to its host Activity, declare an interface in the Fragment, and implement it in the Activity.
- The interface in the
Fragmentdefines a callback method to communicate to its hostActivity. - The host
Activityimplements the callback method.
Related concept
The related concept documentation is Fragment lifecycle and communications.
Learn more
Android developer documentation:
- Fragment
- Fragments
- FragmentManager
- FragmentTransaction
- Creating a Fragment
- Communicating with Other Fragments
- The Activity Lifecycle
- Building a Flexible UI
- Building a Dynamic UI with Fragments
- Handling Configuration Changes
- Tasks and Back Stack
Videos:
- What the Fragment? (Google I/O 2016)
- Fragment Tricks (Google I/O '17)
- Por que Precisamos de Fragments?
