10.1B: Creating a custom view from scratch
Contents:
- What you should already KNOW
- What you will LEARN
- What you will DO
- App overview
- Task 1. Create a custom view from scratch
- Task 1 solution code
- Coding challenge 1
- Challenge 1 solution code
- Coding challenge 2
- Challenge 2 solution code
- Summary
- Related concept
- Learn more
By extending View directly, you can create an interactive UI element of any size and shape by overriding the onDraw() method for the View to draw it. After you create a custom view, you can add it to different layouts in the same way you would add any other View. This lesson shows you how to create a custom view from scratch by extending View directly.
What you should already KNOW
You should be able to:
- Create and run apps in Android Studio.
- Use the Layout Editor to create a UI.
- Edit a layout in XML.
- Use touch, text, and click listeners in your code.
- Create an app with an options menu
What you will LEARN
You will learn how to:
- Extend
Viewto create a custom view. - Draw a simple custom view that is circular in shape.
- Use listeners to handle user interaction with the custom view.
- Use a custom view in a layout.
What you will DO
- Extend
Viewto create a custom view. - Initialize the custom view with drawing and painting values.
- Override
onDraw()to draw the view. - Use listeners to provide the custom view's behavior.
- Add the custom view to a layout.
App overview
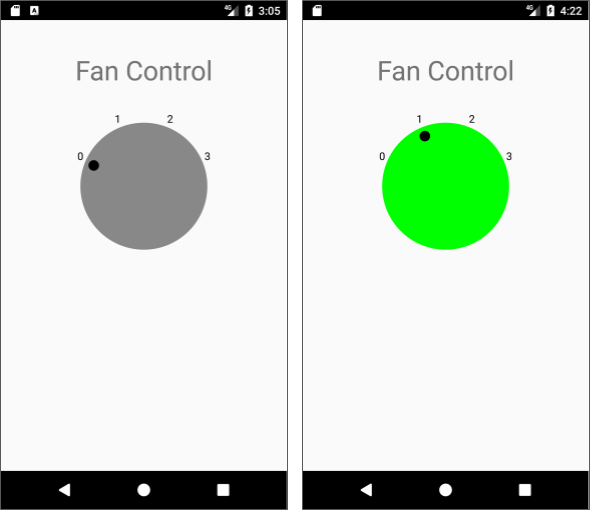
The CustomFanController app demonstrates how to create a custom view subclass from scratch by extending the View class. The app displays a circular UI element that resembles a physical fan control, with settings for off (0), low (1), medium (2), and high (3). You can modify the subclass to change the number of settings, and use standard XML attributes to define its appearance.
Task 1. Create a custom view from scratch
In this task you will:
- Create an app with an
ImageViewas a placeholder for the custom view. - Extend
Viewto create the custom view. - Initialize the custom view with drawing and painting values.
- Override
onDraw()to draw the dial with an indicator and text labels for the settings: 0 (off), 1 (low), 2 (medium), and 3 (high). - Use the
View.OnClickListenerinterface to move the dial indicator to the next selection, and change the dial's color from gray to green for selections 1 through 3 (indicating that the fan power is on). - In the layout, replace the
ImageViewplaceholder with the custom view.
All the code to draw the custom view is provided in this task. (You learn more about onDraw() and drawing on a Canvas object with a Paint object in another lesson.)
1.1 Create an app with an ImageView placeholder
- Create an app with the title
CustomFanControllerusing the Empty Activity template, and make sure the Generate Layout File option is selected. - Open
activity_main.xml. The "Hello World"TextViewappears centered within aConstraintLayout. Click the Text tab to edit the XML code, and delete theapp:layout_constraintBottom_toBottomOfattribute from theTextView. Add or change the following
TextViewattributes, leaving the other layout attributes (such aslayout_constraintTop_toTopOf) the same:TextViewattributeValue android:id"@+id/customViewLabel"android:textAppearance"@style/Base.TextAppearance.AppCompat.Display1"android:padding"16dp"android:layout_marginLeft"8dp"android:layout_marginStart"8dp"android:layout_marginEnd"8dp"android:layout_marginRight"8dp"android:layout_marginTop"24dp"android:text"Fan Control"Add an
ImageViewas a placeholder, with the following attributes:ImageViewattributeValue android:id"@+id/dialView"android:layout_width"200dp"android:layout_height"200dp"android:background"@android:color/darker_gray"app:layout_constraintTop_toBottomOf"@+id/customViewLabel"app:layout_constraintLeft_toLeftOf"parent"app:layout_constraintRight_toRightOf"parent"android:layout_marginLeft"8dp"android:layout_marginRight"8dp"android:layout_marginTop"8dp"Extract string and dimension resources in both UI elements.
The layout should look like the figure below.
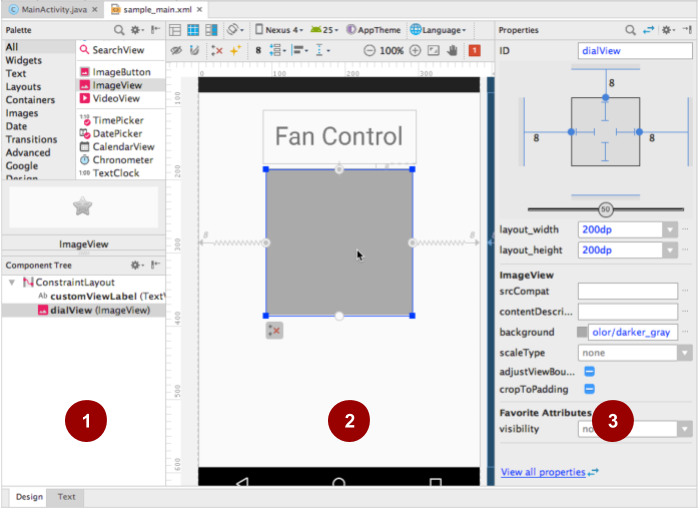
In the above figure:
- Component Tree with layout elements in
activity_main.xml ImageViewto be replaced with a custom viewImageViewattributes
1.2 Extend View and initialize the view
- Create a new Java class called
DialView, whose superclass isandroid.view.View. - Click the red bulb for the new
DialViewclass, and choose Create constructor matching super. Select the first three constructors in the popup menu (the fourth constructor requires API 21 and is not needed for this example). At the top of
DialViewdefine the member variables you need in order to draw the custom view:private static int SELECTION_COUNT = 4; // Total number of selections. private float mWidth; // Custom view width. private float mHeight; // Custom view height. private Paint mTextPaint; // For text in the view. private Paint mDialPaint; // For dial circle in the view. private float mRadius; // Radius of the circle. private int mActiveSelection; // The active selection. // String buffer for dial labels and float for ComputeXY result. private final StringBuffer mTempLabel = new StringBuffer(8); private final float[] mTempResult = new float[2];The
SELECTION_COUNTdefines the total number of selections for this custom view. The code is designed so that you can change this value to create a control with more or fewer selections.The
mTempLabelandmTempResultmember variables provide temporary storage for the result of calculations, and are used to reduce the memory allocations while drawing.As in the previous app, use a separate method to initialize the view. This
init()helper initializes the above instance variables:private void init() { mTextPaint = new Paint(Paint.ANTI_ALIAS_FLAG); mTextPaint.setColor(Color.BLACK); mTextPaint.setStyle(Paint.Style.FILL_AND_STROKE); mTextPaint.setTextAlign(Paint.Align.CENTER); mTextPaint.setTextSize(40f); mDialPaint = new Paint(Paint.ANTI_ALIAS_FLAG); mDialPaint.setColor(Color.GRAY); // Initialize current selection. mActiveSelection = 0; // TODO: Set up onClick listener for this view. }Paintstyles for rendering the custom view are created in theinit()method rather than at render-time withonDraw(). This is to improve performance, becauseonDraw()is called frequently. (You learn more aboutonDraw()and drawing on aCanvasobject with aPaintobject in another lesson.)Call
init()from each constructor.- Because a custom view extends
View, you can overrideViewmethods such asonSizeChanged()to control its behavior. In this case you want to determine the drawing bounds for the custom view's dial by setting its width and height, and calculating its radius, when the view size changes, which includes the first time it is drawn. Add the following toDialView:
The@Override protected void onSizeChanged(int w, int h, int oldw, int oldh) { // Calculate the radius from the width and height. mWidth = w; mHeight = h; mRadius = (float) (Math.min(mWidth, mHeight) / 2 * 0.8); }onSizeChanged()method is called when the layout is inflated and when the view has changed. Its parameters are the current width and height of the view, and the "old" (previous) width and height.
1.3 Draw the custom view
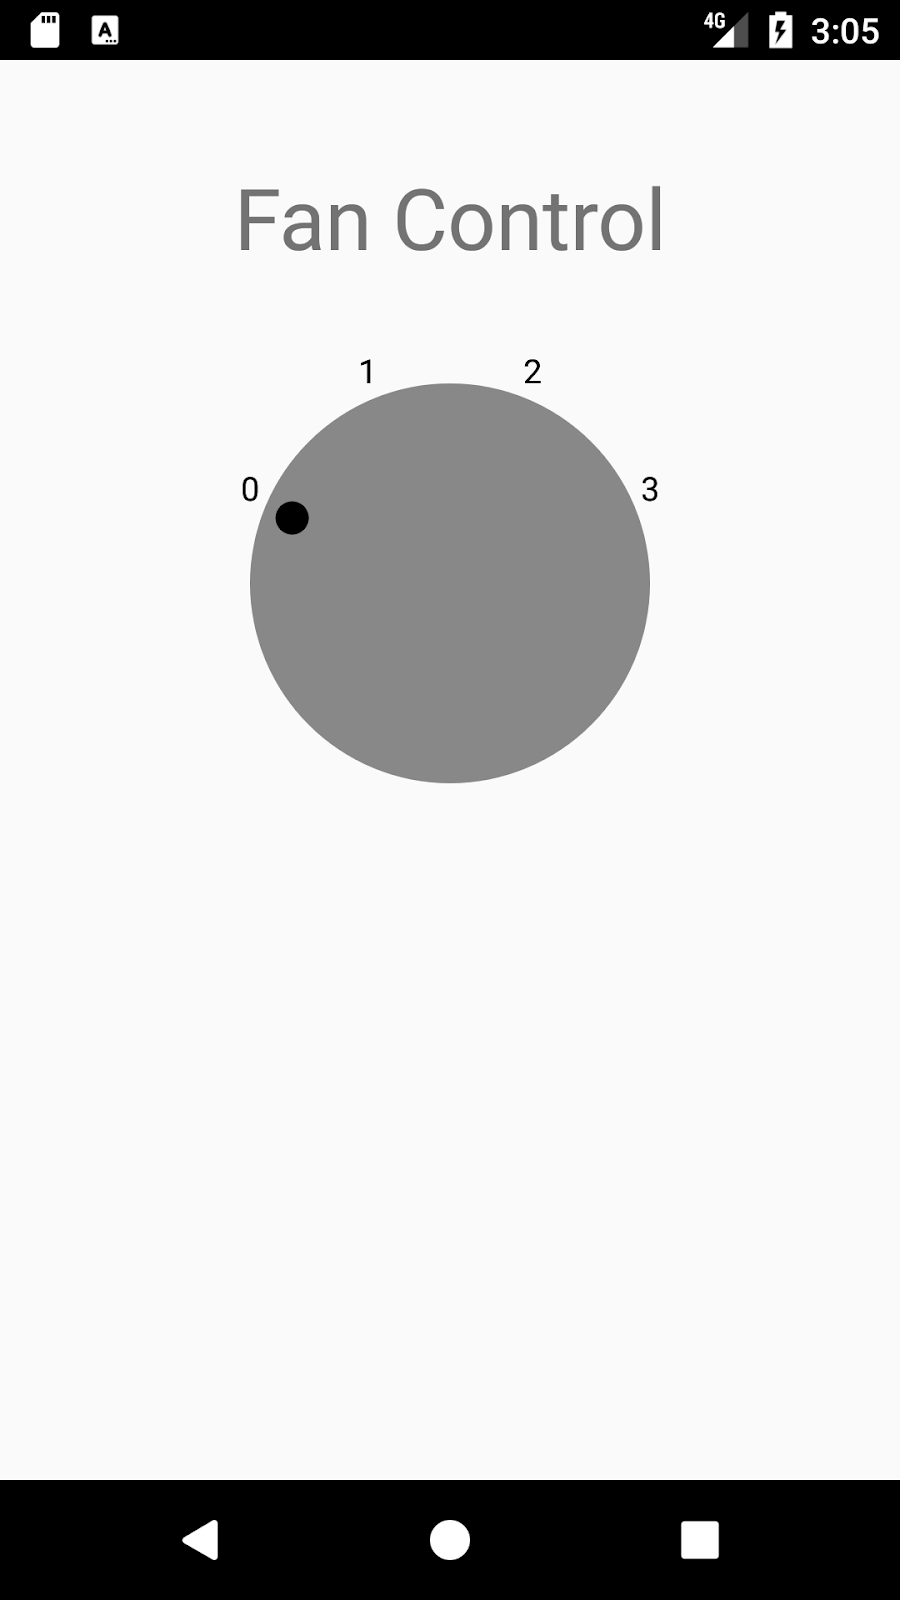
To draw the custom view, your code needs to render an outer grey circle to serve as the dial, and a smaller black circle to serve as the indicator. The position of the indicator is based on the user's selection captured in mActiveSelection. Your code must calculate the indicator position before rendering the view. After adding the code to calculate the position, override the onDraw() method to render the view.
The code for drawing this view is provided without explanation because the focus of this lesson is creating and using a custom view. The code uses the Canvas methods drawCircle() and drawText().
Add the following
computeXYForPosition()method toDialViewto compute the X and Y coordinates for the text label and indicator (0, 1, 2, or 3) of the chosen selection, given the position number and radius:private float[] computeXYForPosition (final int pos, final float radius) { float[] result = mTempResult; Double startAngle = Math.PI * (9 / 8d); // Angles are in radians. Double angle = startAngle + (pos * (Math.PI / 4)); result[0] = (float) (radius * Math.cos(angle)) + (mWidth / 2); result[1] = (float) (radius * Math.sin(angle)) + (mHeight / 2); return result; }The
posparameter is a position index (starting at 0). Theradiusparameter is for the outer circle.You will use the
computeXYForPosition()method in theonDraw()method. It returns a two-element array for the position, in which element 0 is the X coordinate, and element 1 is the Y coordinate.To render the view on the screen, use the following code to override the
onDraw()method for the view. It usesdrawCircle()to draw a circle for the dial, and to draw the indicator mark. It usesdrawText()to place text for labels, using aStringBufferfor the label text.@Override protected void onDraw(Canvas canvas) { super.onDraw(canvas); // Draw the dial. canvas.drawCircle(mWidth / 2, mHeight / 2, mRadius, mDialPaint); // Draw the text labels. final float labelRadius = mRadius + 20; StringBuffer label = mTempLabel; for (int i = 0; i < SELECTION_COUNT; i++) { float[] xyData = computeXYForPosition(i, labelRadius); float x = xyData[0]; float y = xyData[1]; label.setLength(0); label.append(i); canvas.drawText(label, 0, label.length(), x, y, mTextPaint); } // Draw the indicator mark. final float markerRadius = mRadius - 35; float[] xyData = computeXYForPosition(mActiveSelection, markerRadius); float x = xyData[0]; float y = xyData[1]; canvas.drawCircle(x, y, 20, mTextPaint); }(You learn more about drawing on a
Canvasobject in another lesson.)
1.4 Add the custom view to the layout
You can now replace the ImageView with the custom DialView class in the layout, in order to see what it looks like:
In
activity_main.xml, change theImageViewtag for thedialViewtocom.example.customfancontroller.DialView, and delete theandroid:backgroundattribute.The
DialViewclass inherits the attributes defined for the originalImageView, so there is no need to change the other attributes.Run the app.
1.5 Add a click listener
To add behavior to the custom view, add an OnClickListener() to the DialView init() method to perform an action when the user taps the view. Each tap should move the selection indicator to the next position: 0-1-2-3 and back to 0. Also, if the selection is 1 or higher, change the background from gray to green (indicating that the fan power is on):
Add the following after the
TODOcomment in theinit()method:setOnClickListener(new OnClickListener() { @Override public void onClick(View v) { // Rotate selection to the next valid choice. mActiveSelection = (mActiveSelection + 1) % SELECTION_COUNT; // Set dial background color to green if selection is >= 1. if (mActiveSelection >= 1) { mDialPaint.setColor(Color.GREEN); } else { mDialPaint.setColor(Color.GRAY); } // Redraw the view. invalidate(); } });The
invalidate()method ofViewinvalidates the entire view, forcing a call toonDraw()to redraw the view. If something in your custom view changes and the change needs to be displayed, you need to callinvalidate().Run the app. Tap the
DialViewelement to move the indicator from 0 to 1. The dial should turn green. With each tap, the indicator should move to the next position. When the indicator reaches 0, the dial should turn gray.
Task 1 solution code
Android Studio project: CustomFanController
Coding challenge 1
Challenge: Define two custom attributes for the DialView custom view dial colors: fanOnColor for the color when the fan is set to the "on" position, and fanOffColor for the color when the fan is set to the "off" position.
Hints
For this challenge you need to do the following:
- Create the
attrs.xmlfile in thevaluesfolder to define the custom attributes:
<resources>
    <declare-styleable name="DialView">
        <attr name="fanOnColor" format="reference|color" />
        <attr name="fanOffColor" format="reference|color" />
    </declare-styleable>
</resources>
- Define color values in the
colors.xmlfile in thevaluesfolder:
<resources>
    <color name="red1">#FF2222</color>
    <color name="green1">#22FF22</color>
    <color name="blue1">#2222FF</color>
    <color name="cyan1">#22FFFF</color>
    <color name="gray1">#8888AA</color>
    <color name="yellow1">#ffff22</color>
</resources>
- Specify the
fanOnColorandfanOffColorcustom attributes withDialViewin the layout:
<com.example.customfancontroller.DialView
        android:id="@+id/dialView"
        android:layout_width="@dimen/dial_width"
        android:layout_height="@dimen/dial_height"
        android:layout_marginTop="@dimen/standard_margin"
        android:layout_marginRight="@dimen/standard_margin"
        android:layout_marginLeft="@dimen/standard_margin"
        app:fanOffColor="@color/gray1"
        app:fanOnColor="@color/cyan1"
        app:layout_constraintTop_toBottomOf="@+id/customViewLabel"
        app:layout_constraintRight_toRightOf="parent"
        app:layout_constraintLeft_toLeftOf="parent" />
- Create three constructors for
DialView, which call theinit()method. Include in theinit()method the default color settings, and paint the initial "off" state of theDialViewwithmFanOffColor:
// Set default fan on and fan off colors
mFanOnColor = Color.CYAN;
mFanOffColor = Color.GRAY;
// ... Rest of init() code to paint the DialView.
mDialPaint.setColor(mFanOffColor);
- Use the following code in the
init()method to supply the attributes to the custom view. The code uses a typed array for the attributes:
// Get the custom attributes (fanOnColor and fanOffColor) if available.
if (attrs! = null) {
    TypedArray typedArray = getContext().obtainStyledAttributes(attrs,
                            R.styleable.DialView,
                            0, 0);
    // Set the fan on and fan off colors from the attribute values.
    mFanOnColor = typedArray.getColor(R.styleable.DialView_fanOnColor,
                    mFanOnColor);
    mFanOffColor = typedArray.getColor(R.styleable.DialView_fanOffColor,
                    mFanOffColor);
    typedArray.recycle();
- In the
init()method, change theonClick()method for theDialViewto usemFanOnColorandmFanOffColorto set the colors when the dial is clicked:
// Set up onClick listener for the DialView.
setOnClickListener(new OnClickListener() {
    @Override
    public void onClick(View view) {
        // Rotate selection forward to the next valid choice.
        mActiveSelection = (mActiveSelection + 1) % SELECTION_COUNT;
        // Set dial background color if selection is >= 1.
        if (mActiveSelection >= 1) {
            mDialPaint.setColor(mFanOnColor);
        } else {
            mDialPaint.setColor(mFanOffColor);
        }
        // Redraw the view.
        invalidate();
    }
});
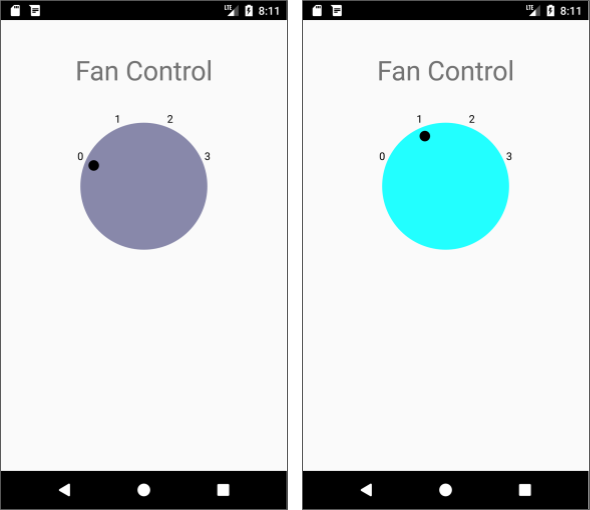
Run the app. The dial's color for the "off" position should be gray (as before), and the color for any of the "on" positions should be cyan—defined as the default colors for mFanOnColor and mFanOffColor.
Change the fanOnColor and fanOffColor custom attributes in the layout:
app:fanOffColor="@color/blue1"
app:fanOnColor="@color/red1"
Run the app again. The dial's color for the "off" position should be blue, and the color for any of the "on" positions should be red. Try other combinations of colors that you defined in colors.xml.
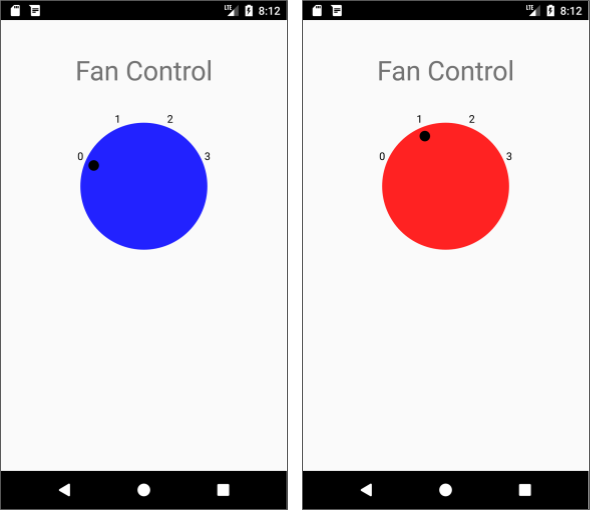
You have successfully created custom attributes for DialView that you can change in your layout to suit the color choices for the overall UI that will include the DialView.
Challenge 1 solution code
Android Studio project: CustomFanChallenge
Coding challenge 2
Challenge: Enable the app user to change the number of selections on the circular dial in the DialView, as shown in the figure below.
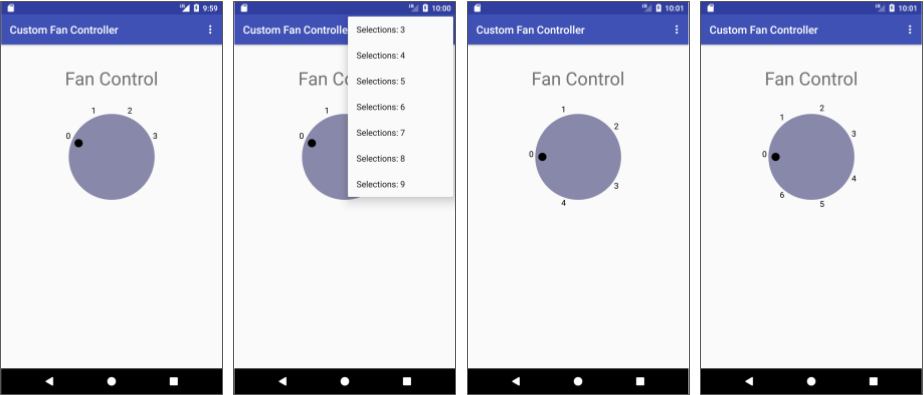
For four selections (0, 1, 2, and 3) or fewer, the selections should still appear as before along the top half of the circular dial. For more than four selections, the selections should be symmetrical around the dial.
To enable the user to change the number of selections, use the options menu in MainActivity. Note that because you are adding the number of selections as a custom attribute, you can set the initial number of selections in the XML layout file (as you did with colors).
Preliminary steps
Add an options menu to the app. Because this involves also changing the styles.xml file and the code for showing the app bar, you may find it easier to do the following:
- Start a new app using the Basic Activity template, which provides a
MainActivitywith an options menu and a floating action button. Remove the floating action button. - Add a new
Activityusing the Empty Activity template. Copy theDialViewcustom view code from the CustomFanController app or CustomFanChallenge app and paste it into the newActivity. - Add the elements of the
activity_main.xmllayout from the CustomFanController app or CustomFanChallenge app tocontent_main.xmlin the new app.
Hints
The DialView custom view is hardcoded to have 4 selections (0, 1, 2, and 3), which are defined by the integer constant SELECTION_COUNT. However, if you change the code to use an integer variable (mSelectionCount) and expose a method to set the number of selections, then the user can customize the number of selections for the dial. The following code elements are all you need:
- A custom attribute,
selectionIndicators, in theres/values/attrs.xmlfile - A "setter" method,
setSelectionCount(int count), in theDialViewclass. This method sets or updates the value of theselectionIndicatorsattribute. - A simple UI (the options menu) in
MainActivityfor choosing the number of selections
In DialView.java:
- Set
mSelectionCountto the attribute value in theTypedArray:
mSelectionCount =
          typedArray.getInt(R.styleable.DialView_selectionIndicators,
          mSelectionCount);
- Use
mSelectionCountin place of theSELECTION_COUNTconstant in theonClick(),onDraw(), andcomputeXYForPosition()methods. - Change the
computeXYForPosition()method to calculate selection positions for selections greater than 4, and add a parameter calledisLabel. TheisLabelparameter will betrueif drawing the text labels, andfalseif drawing the dot indicator mark:
private float[] computeXYForPosition(final int pos, final float radius , boolean isLabel) {
    float[] result = mTempResult;
    Double startAngle;
    Double angle;
    if (mSelectionCount > 4) {
        startAngle = Math.PI * (3 / 2d);
        angle= startAngle + (pos * (Math.PI / mSelectionCount));
        result[0] = (float) (radius * Math.cos(angle * 2))
                                                 + (mWidth / 2);
        result[1] = (float) (radius * Math.sin(angle * 2))
                                                 + (mHeight / 2);
        if((angle > Math.toRadians(360)) && isLabel) {
            result[1] += 20;
        }
    } else {
        startAngle = Math.PI * (9 / 8d);
        angle= startAngle + (pos * (Math.PI / mSelectionCount));
        result[0] = (float) (radius * Math.cos(angle))
                                                 + (mWidth / 2);
        result[1] = (float) (radius * Math.sin(angle))
                                                + (mHeight / 2);
    }
    return result;
}
- Change the
onDraw()code that callscomputeXYForPosition()to include theisLabelargument:
//... For text labels:
float[] xyData = computeXYForPosition(i, labelRadius, true);
//... For the indicator mark:
float[] xyData = computeXYForPosition(mActiveSelection, markerRadius, false);
- Add a "setter" method that sets the selection count, and resets the active selection to zero and the color to the "off" color:
public void setSelectionCount(int count) {
        this.mSelectionCount = count;
        this.mActiveSelection = 0;
        mDialPaint.setColor(mFanOffColor);
        invalidate();
}
In the menu_main.xml file, add menu items for the options menu:
- Provide the text for a menu item for each dial selection from 3 through 9.
- Use the
android:orderInCategoryattribute to order the menu items from 3 through 9. For example, for "Selections: 4," which corresponds to the string resourcedial_settings4:
<item
        android:orderInCategory="4"
        android:title="@string/dial_settings4"
        app:showAsAction="never" />
In MainActivity.java:
- Create an instance of the custom view in
MainActivity:
DialView mCustomView;
- After setting the content view in
onCreate(), assign thedialViewresource in the layout tomCustomView:
mCustomView = findViewById(R.id.dialView);
Use the
onOptionsItemSelected()method to call the "setter" methodsetSelectionCount(). Useitem.getOrder()to get the selection count from theandroid:orderInCategoryattribute of the menu items:int n = item.getOrder();
      mCustomView.setSelectionCount(n);
      return super.onOptionsItemSelected(item);
Run the app. You can now change the number of selections on the dial using the options menu, as shown in the previous figure.
Challenge 2 solution code
Android Studio project: CustomFanControllerSettings
Summary
- To create a custom view of any size and shape, add a new class that extends
View. - Override
Viewmethods such asonDraw()to define the view's shape and basic appearance. - Use
invalidate()to force a draw or redraw of the view. - To optimize performance, assign any required values for drawing and painting before using them in
onDraw(), such as in the constructor or theinit()helper method. - Add listeners such as
View.OnClickListenerto the custom view to define the view's interactive behavior. - Add the custom view to an XML layout file with attributes to define its appearance, as you would with other UI elements.
- Create the
attrs.xmlfile in thevaluesfolder to define custom attributes. You can then use the custom attributes for the custom view in the XML layout file.
Related concept
The related concept documentation is Custom views.
Learn more
Android developer documentation:
- Creating Custom Views
- Custom Components
- View
- Input Events
- onDraw()
- Canvas
- drawCircle()
- drawText()
- Paint
Video:
