5.2: Using the locale to format information
Contents:
- What you should already KNOW
- What you will LEARN
- What you will DO
- App overview
- Task 1. Use the locale's date format
- Task 2. Use the locale's number format
- Task 3. Use the locale's currency
- Solution code
- Coding challenge
- Challenge solution code
- Summary
- Related concept
- Learn more
To provide the best experience for Android users in different regions, your app should handle not only text but also numbers, dates, times, and currencies in ways appropriate to those regions.
When users choose a language, they also choose a locale for that language, such as English (United States) or English (United Kingdom). Your app should change to show the formats for that locale: for dates, times, numbers, currencies, and similar information. Dates can appear in different formats (such as dd / mm / yyyy or yyyy - mm - dd ), depending on the locale. Numbers appear with different punctuation, and currency formatting also varies.
What you should already KNOW
You should be able to:
- Create and run apps in Android Studio.
- Add different languages and edit translations in the Translations Editor.
- Modify layouts to accommodate right-to-left (RTL) languages.
What you will LEARN
You will learn how to:
- Use the current locale to set the format for the date and for numbers.
- Parse a number from a locale-formatted string.
- Show different currencies based on the locale.
What you will DO
- Use
DateFormatto format a date (a product's expiration date) according to the user-chosen locale. - Use
NumberFormatto format numbers and currencies according to the user-chosen locale. - Use the current locale's country code to determine which currency to use.
App overview
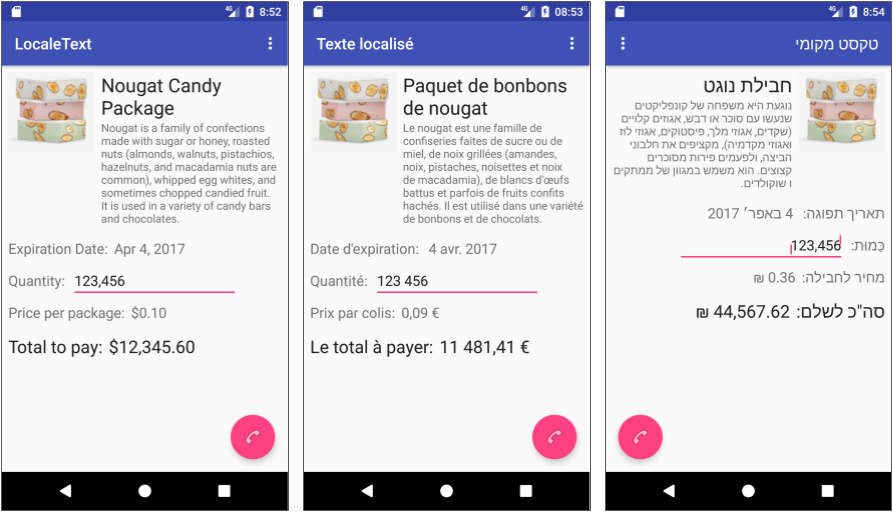
The LocaleText app (from the lesson about using language resources) offers localized language resources, but there are other aspects of localization that need to be addressed. Dates, numbers, and currencies are the most important aspects.
You will use LocaleText3_start as the starter code. It already contains extra UI elements and strings translated into French and Hebrew, and the RTL layout adjustments ("start" and "end" attributes) that are described in the previous lesson. You will do the following:
- Convert a product expiration date to the format for the user's chosen locale.
- Format the user's quantity for the user's chosen locale, so that the quantity properly displays thousands and higher numbers with the right separators.
- Set the currency format for the language and locale, and use it to display the price.
The figure below shows the fully finished LocaleText3 app.
Task 1. Use the locale's date format
In this task you learn how to get the current Date and format it for current Locale using DateFormat. You add two views to the layout for the expiration date and its label, then localize the views by translating a string and adding RTL attributes to the layout.
1.1 Examine the layout
Download the LocaleText3_start app project, rename the project folder to LocaleText3, and open the project in Android Studio.
Open content_main.xml to see the layout and become familiar with the UI elements:
date_label: Label for the expiration date.date: Expiration date.quantity_label: Label for the quantity.quantity: Quantity entered by the user.price_label: Label for the single-package price.price: Single-package price.total_label: Label for the total amount.total: Total amount, calculated by multiplying thequantityby theprice.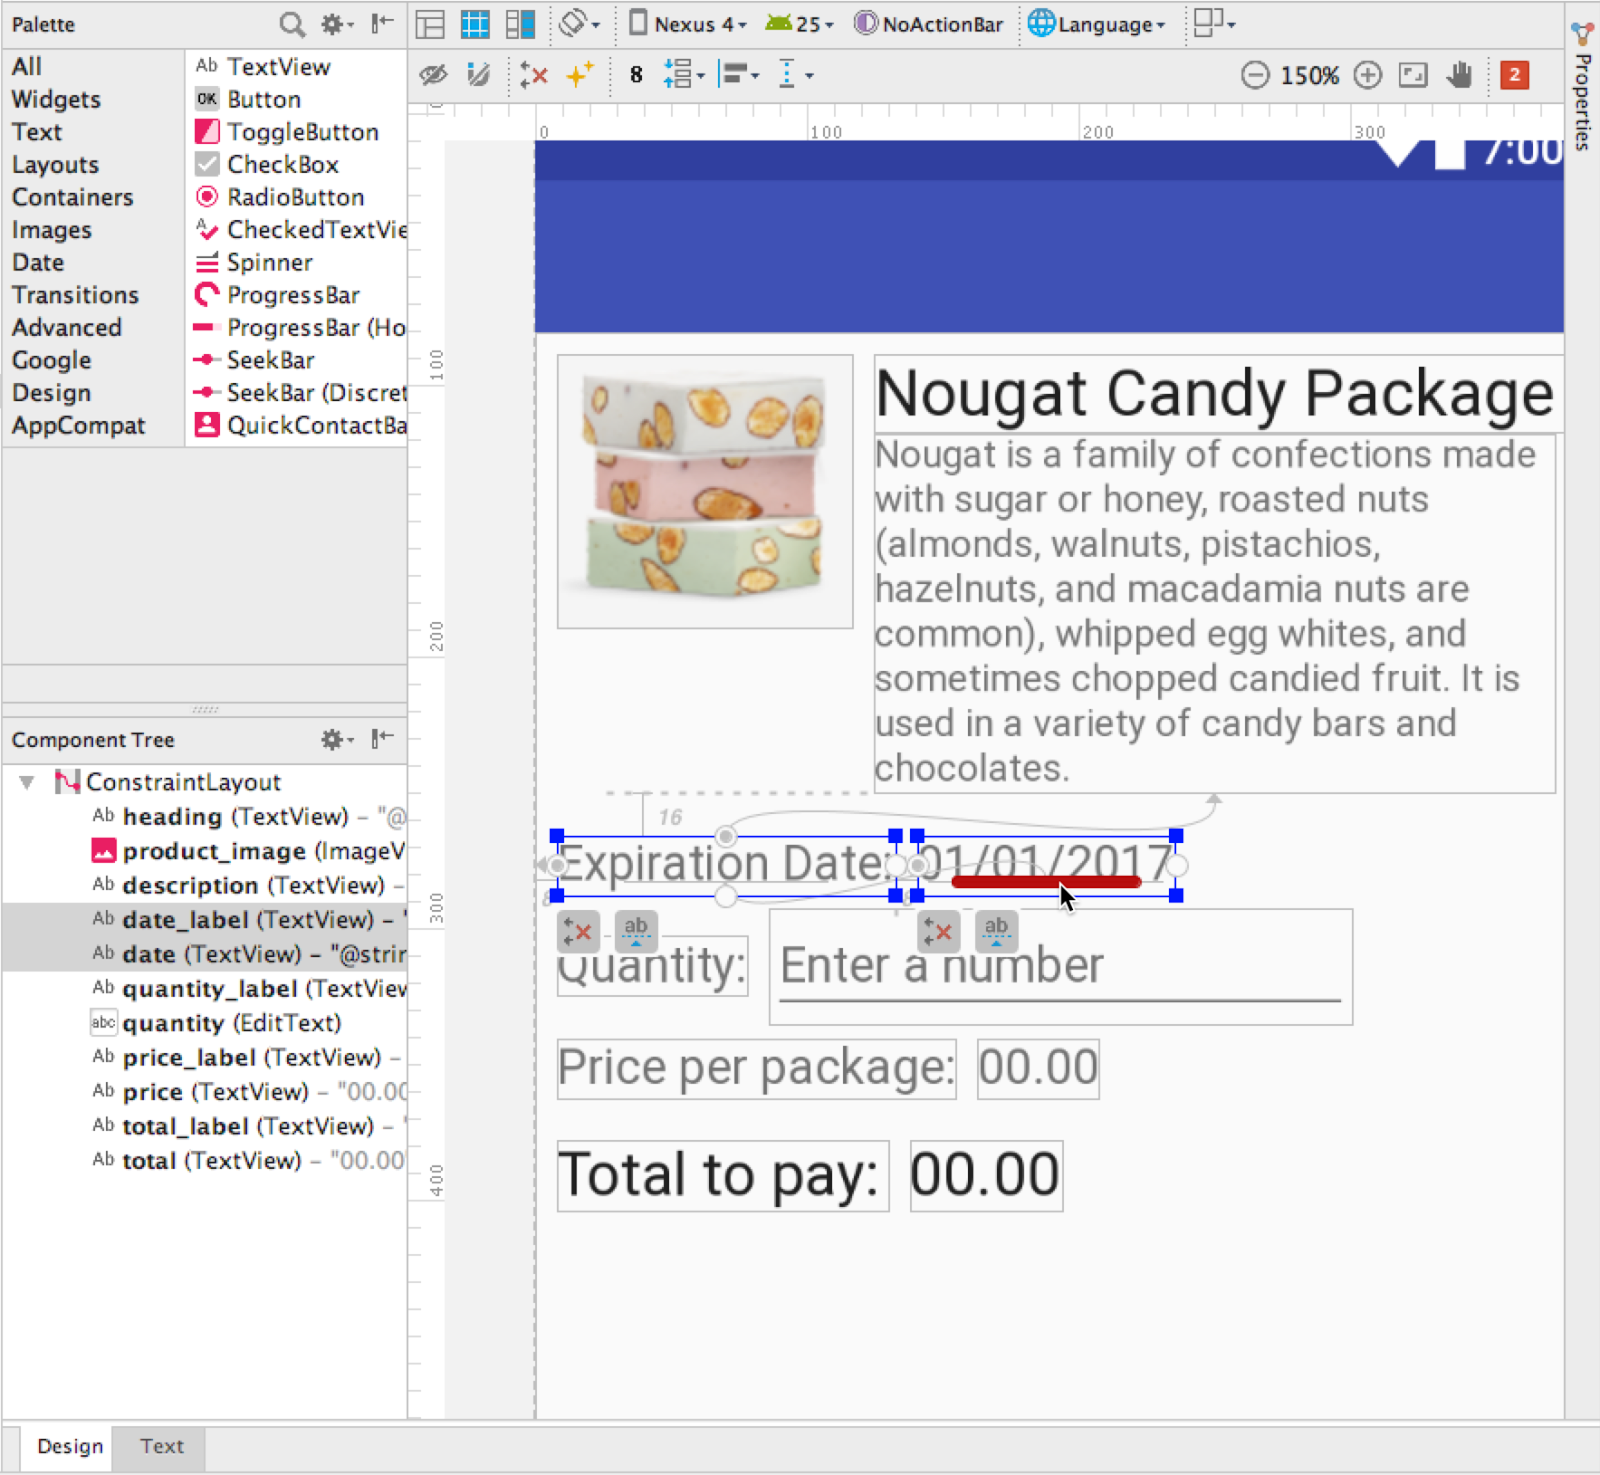
Open the Translations Editor to see French and Hebrew translations for the new string resources. (For instructions on adding a language, see the lesson about using language resources.) You will not be translating the date, so the Untranslatable checkbox for the date key is already selected.
Since there is no translation for the date key, the default value will be used in the layout no matter what language and locale the user chooses. You will add code to format the date so that it appears in the locale's date format.
1.2 Use DateFormat to format the date
The code in MainActivity.java adds five days to the current date to get the expiration date. You will add code to format the expiration date for the locale.
TODO comments. After adding the code, you can delete or edit the TODO comments.
Open
MainActivity, and find the the code at the end of theonCreate()method after thefab.setOnClickListener()section:protected void onCreate(Bundle savedInstanceState) { // ... Rest of the onCreate code. fab.setOnClickListener(new View.OnClickListener() { // ... Rest of the setOnClickListener code. }); // Get the current date. final Date myDate = new Date(); // Add 5 days in milliseconds to create the expiration date. final long expirationDate = myDate.getTime() + TimeUnit.DAYS.toMillis(5); // Set the expiration date as the date to display. myDate.setTime(expirationDate); // TODO: Format the date for the locale.This code adds five days to the current date to get the expiration date.
Add the following to format and display the date:
     // TODO: Format the date for the locale.
     String myFormattedDate =
                       DateFormat.getDateInstance().format(myDate);
     // Display the formatted date.
     TextView expirationDateView = (TextView) findViewById(R.id.date);
     expirationDateView.setText(myFormattedDate);
 }
As you enter
DateFormat, thejava.text.DateFormatclass should be imported. If it doesn't automatically import, click the red warning bulb in Android Studio and import it.The
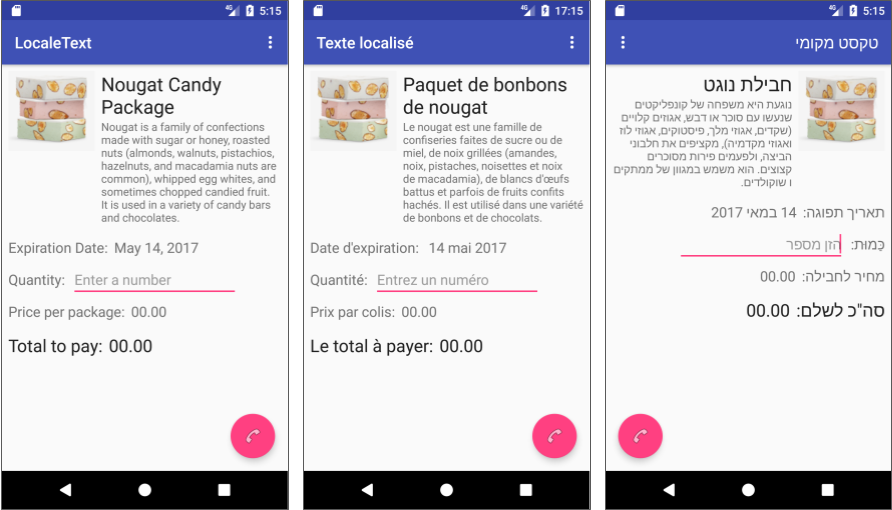
DateFormat.getDateInstance()method gets the default formatting style for the user's selected language and locale. TheDateFormatformat()method formats a date string.Run the app, and switch languages. The date is formatted in each specific language as shown in the figure.
Task 2. Use the locale's number format
Numbers appear with different punctuation in different locales. In U.S. English, the thousands separator is a comma, whereas in France, the thousands separator is a space, and in Spain the thousands separator is a period. The decimal separator also varies between period and comma.
Use the Java class NumberFormat to format numbers and to parse formatted strings to retrieve numbers. You will use the quantity, which is provided for entering an integer quantity amount.
MainActivity already includes OnEditorActionListener, which closes the keyboard when the user taps the Done key (the checkmark icon in a green circle):
![]()
You will add code to parse the quantity, convert it to a number, and then format the number according to the Locale.
2.1 Examine the listener code
Open MainActivity, and find the following listener code at the end of the onCreate() method. This is where you will put your code to get and format the quantity:
// Add an OnEditorActionListener to the EditText view.
enteredQuantity.setOnEditorActionListener(new
                              EditText.OnEditorActionListener() {

    @Override
    public boolean onEditorAction(TextView v, int actionId,
                                                KeyEvent event) {
        if (actionId == EditorInfo.IME_ACTION_DONE) {
             // Close the keyboard.
             InputMethodManager imm = (InputMethodManager)
                            v.getContext().getSystemService
                            (Context.INPUT_METHOD_SERVICE);

             imm.hideSoftInputFromWindow(v.getWindowToken(), 0);
             // TODO: Parse string in view v to a number.
//...
The listener defines callbacks to be invoked when an action is performed on the editor. In this case, when the user taps the Done key, it triggers the EditorInfo.IME_ACTION_DONE action, and the callback closes the keyboard.
EditorInfo.IME_ACTION_DONE constant may not work for some smartphones that implement a proprietary soft keyboard that ignores imeOptions (as described in Stack Overflow tip, "How do I handle ImeOptions' done button click?"). For more information about setting input method actions, see Specify the Input Method Action, and for details about the EditorInfo class, see EditorInfo.
2.2 Use the locale's number format to parse the string to a number
The quantity value is a string, perhaps entered in a different language. In this step you write code to parse the string to a number, so that your code can use it in a calculation. If the value doesn't parse properly, you will throw an exception and show a message asking the user to enter a number.
Follow these steps:
Open
MainActivity. At the top, declaremNumberFormatto get an instance of the number format for the user-chosen locale, and add aTAGfor reporting an exception with the entered quantity:private NumberFormat mNumberFormat = NumberFormat.getInstance(); private static final String TAG = MainActivity.class.getSimpleName();After you enter
NumberFormat, the expression appears in red. Click it and press Option-Return on a Mac, or Alt-Return on Windows, to choosejava.text.NumberFormat.The
NumberFormat.getInstance()method returns a general-purpose number format for the user-selected language and locale.In the listener code in
MainActivity, change thequantityto a number (if theviewis not empty) by using theNumberFormat.parse()method withintValue()to return an integer.// Parse string in view v to a number. mInputQuantity = mNumberFormat.parse(v.getText() .toString()).intValue(); // TODO: Convert to string using locale's number format.- Android Studio displays a red bulb in the left margin of the
numberFormat.parsestatement because the statement requires an exception handler. Although the keyboard is restricted to a numeric keypad, the code still needs to handle an exception when parsing the string to convert it to a number. Click the bulb and choose Surround with try/catch to create a simpletryandcatchblock to handle exceptions. Android Studio automatically importsjava.text.ParseException.// Parse string in view v to a number. try { // Use the number format for the locale. mInputQuantity = mNumberFormat.parse(v.getText() .toString()).intValue(); } catch (ParseException e) { e.printStackTrace(); } // TODO: Convert to string using locale's number format. - The exception handling is not yet finished. The best practice is to display a message to the user. The
TextEditsetError()method provides a popup warning if, for some reason, a number was not entered. Change the code in the previous step to the following, using the string resourceenter_number(provided in thestrings.xmlfile and previously translated).
If the user runs the app and taps the Done key without entering a number, the// Parse string in view v to a number. try { // Use the number format for the locale. mInputQuantity = mNumberFormat.parse(v.getText() .toString()).intValue(); v.setError(null); } catch (ParseException e) { Log.e(TAG,Log.getStackTraceString(e)); v.setError(getText(R.string.enter_number)); return false; } // TODO: Convert to string using locale's number format.enter_numbermessage appears. Since this is a string resource, the translated version appears in French or Hebrew if the user chooses French or Hebrew for the device's language.
2.3 Convert the number to a string formatted for the locale
In this step you convert the number back into a string that is formatted correctly for the current locale.
In the listener code in MainActivity, add the following to convert the number to a string using the format for the current locale, and show the string:
// Convert to string using locale's number format.
String myFormattedQuantity = mNumberFormat.format(mInputQuantity);
// Show the locale-formatted quantity.
v.setText(myFormattedQuantity);
Run the app:
- Enter a quantity and tap the Done key to close the keyboard.
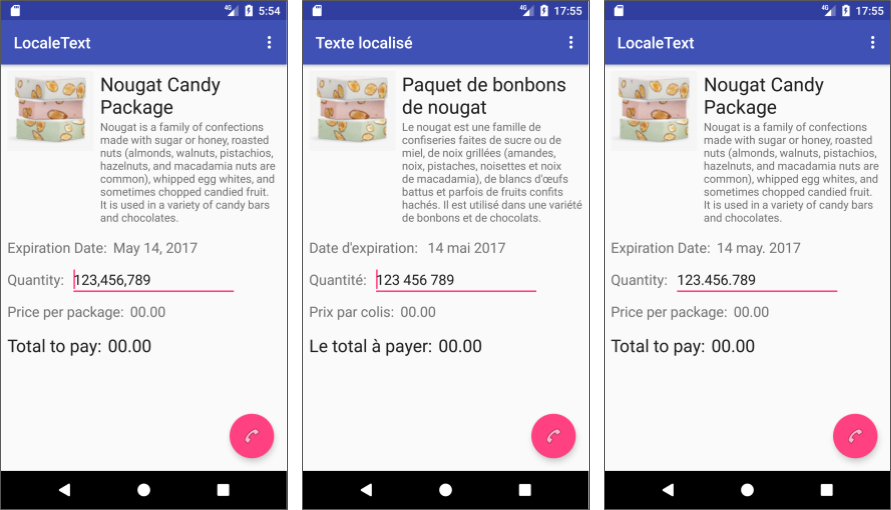
- Switch the language. First choose English (United States), run the app again, and enter a quantity again. The thousands separator is a comma.
- Switch the language to Français (France), run the app again, and enter a quantity again. The thousands separator is a space.
- Switch the language to Español (España), run the app again, and enter a quantity again. The thousands separator is a period. Note that even though you have no Spanish string resources (which is why the text appears in English), the date and the number are both formatted for the Spain locale.
Task 3. Use the locale's currency
Currencies are different in some locales. Use the NumberFormat class to format currency numbers. The NumberFormat.getCurrencyInstance() method returns the currency format for the user-selected language and Locale, and the NumberFormat.format() method applies the format to create a string.
To demonstrate how to show amounts in a currency format for the user's chosen locale, you will add code that will show the price in the locale's currency. Given the complexities of multiple currencies and daily fluctuations in exchange rates, you may want to limit the currencies in an app to specific locales. To keep this example simple, you will use a fixed exchange rate for just the France and Israel locales, based on the U.S. dollar. The starter app already includes fixed (fake) exchange rates.
3.1 Get the current locale and its country code
You can retrieve the country code of the user-chosen locale to determine whether the country is one whose currency your app supports (that is, France or Israel). If it is, use the locale's currency format and exchange rate. For all other unsupported countries and the U.S., set the currency format to U.S. (dollar).
The starter app already includes variables for the France and Israel currency exchange rates. You will use this to calculate and show the price. Pricing information would likely come from a database or a web service, but to keep this app simple and focused on localization, a fixed price in U.S. dollars has already been added to the starter app.
- Open
MainActivityand find the fixed price and exchange rates at the top of the class:// Fixed price in U.S. dollars and cents: ten cents. private double mPrice = 0.10; // Exchange rates for France (FR) and Israel (IW). private double mFrExchangeRate = 0.93; // 0.93 euros = $1. private double mIwExchangeRate = 3.61; // 3.61 new shekels = $1. - Add the following to the top of
MainActivityto get an instance (mCurrencyFormat) of the currency for the user's chosen locale:
The// Get locale's currency. private NumberFormat mCurrencyFormat = NumberFormat.getCurrencyInstance();NumberFormat.getCurrencyInstance()method returns the currency format for the user-selected locale.
3.2 Calculate and show the price in different currencies
To calculate the price at a specific exchange rate, open
MainActivityand add the following code to theonCreate()method after theTODOcomment:// TODO: Set up the price and currency format. String myFormattedPrice; String deviceLocale = Locale.getDefault().getCountry(); // If country code is France or Israel, calculate price // with exchange rate and change to the country's currency format. if (deviceLocale.equals("FR") || deviceLocale.equals("IL")) { if (deviceLocale.equals("FR")) { // Calculate mPrice in euros. mPrice *= mFrExchangeRate; } else { // Calculate mPrice in new shekels. mPrice *= mIwExchangeRate; } // Use the user-chosen locale's currency format, which // is either France or Israel. myFormattedPrice = mCurrencyFormat.format(mPrice); } else { // mPrice is the same (based on U.S. dollar). // Use the currency format for the U.S. mCurrencyFormat = NumberFormat.getCurrencyInstance(Locale.US); myFormattedPrice = mCurrencyFormat.format(mPrice); } // TODO: Show the price string.The
Locale.getDefault()method gets the current value of theLocale, and theLocale.getCountry()method returns the country/region code for thisLocale. Used together, they provide the country code that you need to check. The codeFRis for France, andILis for Israel. The code tests only for those locales, because all other locales, including the U.S., use the default currency (U.S. dollars).The code then uses the currency format to create the string
myFormattedPrice.After the above code, add code to show the price string:
// TODO: Show the price string. TextView localePrice = (TextView) findViewById(R.id.price); localePrice.setText(myFormattedPrice);- Run the app. The "Price per package" appears in U.S. dollars (left side of the figure below) because the device or emulator is set to English (United States).
- Change the language and locale to Français (France), and navigate back to the app. The price appears in euros (center of the figure below).
- Change the language to Français (Canada), and the price appears in U.S. dollars (right side of the figure below) because the app doesn't support Canadian currency.
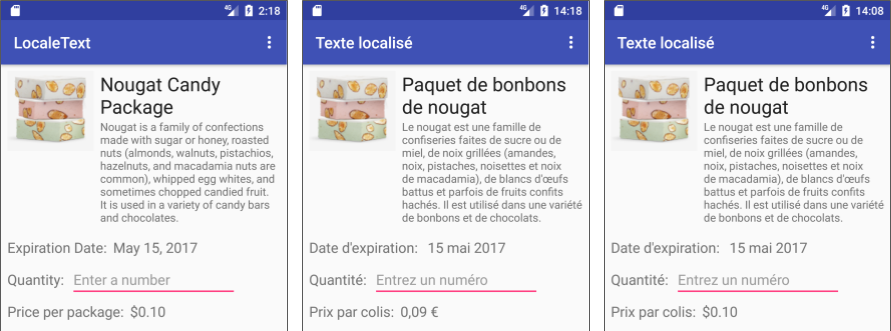
When the user chooses the Français (Canada) locale, the language changes to French because French language resource strings are provided. The locale, however, is Canada. Since Canadian currency is not supported, the code uses the default locale's currency, which is the United States dollar. This demonstrates how the language and the locale can be treated differently.
Solution code
Android Studio project: LocaleText3
Coding challenge
Challenge: This challenge demonstrates how to change colors and text styles based on the locale. Download the Scorekeeper_start app (shown below), and rename and refactor the project to ScorekeepLocale.
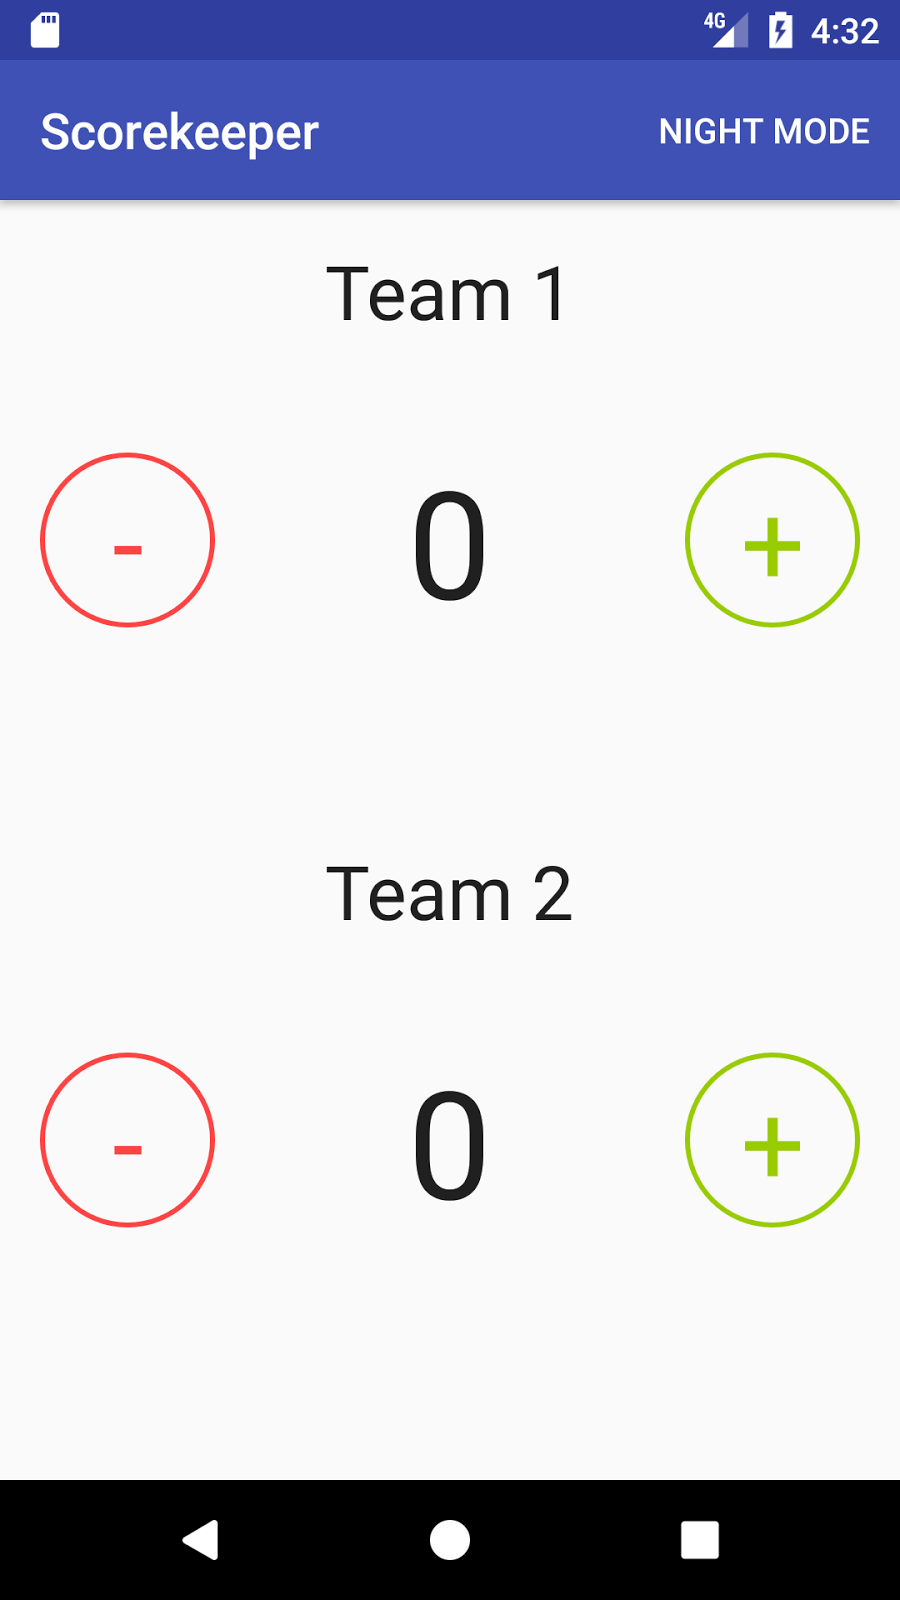
The Locales concept chapter explains how to change colors and styles for different locales.
In the Scorekeeper app, the text size is controlled by a style in styles.xml in the values directory, and the color for a Button background is set in an XML file in the drawable directory. An app can include multiple resource directories, each customized for a different language and locale. Android picks the appropriate resource directory depending on the user's choice for language and locale. For example, if the user chooses French, and French has been added to the app as a language using the Translations Editor (which creates the values-fr directory to hold it), then:
- The
strings.xmlfile invalues-fris used rather than thestrings.xmlfile in the defaultvaluesdirectory, as you would expect. - The
colors.xmlanddimens.xmlfiles invalues-fr(if they have been added to the directory) are used rather than the versions in the defaultvaluesdirectory. - The
drawablesindrawable-fr(if this directory has been added to the app) are used rather than the versions in the defaultdrawabledirectory.
For this challenge, do the following:
- Add the Afrikaans and Hebrew languages.
- Change the text size for the team names to
40spin Hebrew only (as shown on the left side of the figure below). - In South Africa, red is one of the colors of mourning, and is therefore not appropriate as the color for the minus buttons. Change the minus button color to light orange, but only for the Afrikaans language in the South Africa locale (as shown on the right side of the figure below).
Hints:
- The size is controlled in the
TeamTextstyle instyles.xmlin thevaluesdirectory. Add a newstyles.xmlfile to thevalues-iwdirectory and edit it. - The color for the
Buttonbackground (the circle around the minus sign) is set inminus_button_background.xmlin theres>drawabledirectory. To create a different language version, copy thedrawablesubdirectory and rename the copy drawable-af-rZA. You can then change theminus_button_background.xmlfile in the copied directory to change the color. - The minus sign color is set in the
MinusButtonsstyle instyles.xml. - Use
"@android:color/holo_orange_light"for the new color.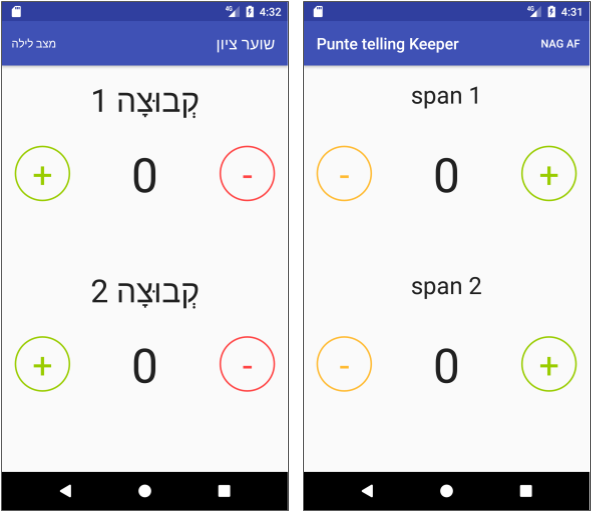
Challenge solution code
Android Studio project: ScorekeepLocale
Summary
To format a date for current locale, use DateFormat.
- The
DateFormatgetDateInstance()method gets the default formatting style for the user's selected language and locale. - The
DateFormatformat()method formats a date string.
Use the NumberFormat class to format numbers and to parse formatted strings to retrieve numbers.
- The
NumberFormatgetInstance()method returns a general-purpose number format for the user-selected language and locale. - Use the
NumberFormatparse()method to get an integer from a formatted number string.
Use the NumberFormat class to format currency numbers.
- The
NumberFormatgetCurrencyInstance()method returns the currency format for the user-selected language and locale. - The
NumberFormatformat()method applies the format to create a string.
Use the Locale:
- Get the current value of the default
LocalewithLocale.getDefault(). - Get the country/region code by specifying the current
LocalewithLocale.getCountry().
Use resource directories:
- Resources are defined within specially named directories inside the project's res directory. The path is project_name
/app/src/main/res/. Add resource directories using the following general format:
<resource type>-<language code>[-r<country code>]<resource type>: The resource subdirectory, such asvaluesordrawable.<language code>: The language code, such asenfor English orfrfor French.<country code>: Optional: The country code, such asUSfor the U.S. orFRfor France.
Related concept
The related concept documentation is Locales.
Learn more
Android developer documentation:
- Supporting Different Languages and Cultures
- Localizing with Resources
- Localization checklist
- Language and Locale
- Testing for Default Resources
Material Design: Usability - Bidirectionality
Android Developers Blog:
Android Play Console: Translate & localize your app
Other:
