13.1: Playing video with VideoView
Contents:
- What you should already KNOW
- What you will LEARN
- What you will DO
- App overview
- Task 1. Play video with VideoView
- Task 2. Play video from the internet
- Solution code
- Coding challenge
- Summary
- Related concept
- Learn more
A multimedia app that plays audio or video usually has two parts:
- A player that, given a media source, downloads and decodes that media, and renders it as video and/or audio.
- A user interface (UI) with transport controls to run the player and optionally display the player's state.
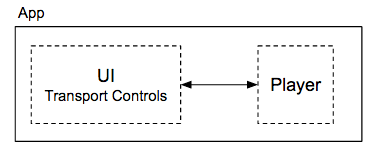
The architecture of a media app can get a lot more complicated, especially if your app's entire purpose is to play audio or video. Android provides an overall architecture for audio and video apps, and large number of media-related classes, which you can learn about in Media Apps Overview.
The simplest possible way to play a video clip in your app, however, is to use the VideoView class to play the video, and the MediaController class as the UI to control it. In this practical you build a simple app that plays a video clip that is either embedded in the app's resources, or available on the internet.
What you should already KNOW
You should be familiar with:
- Creating, building, and running apps in Android Studio
- The
Activitylifecycle, and how configuration changes such as changes to the device screen orientation affect that lifecycle - Making data persistent across configuration changes with the instance state bundle
What you will LEARN
- How to use the
VideoViewclass to play video in your app - How to use the
MediaControllerclass to control video playing in aVideoView - How activity state changes affect video playback state in the
VideoView - About event listeners and callbacks for media events
- How to play media files from different locations (embedded in the app, or streamed from the internet)
What you will DO
- Build an app called SimpleVideoView that plays a video clip by using the
VideoViewandMediaControllerclasses. - Preserve the playback position for the video playback across activity state changes.
- React to the end of the video playback with an event listener.
- Handle the time period in your app where the media is being prepared (buffering or decoding), and provide a helpful message to the user.
- Play media files as embedded files in the app, or streamed from the internet.
App overview
In this practical you build the SimpleVideoView app from scratch. SimpleVideoView plays a video file in its own view in your app:
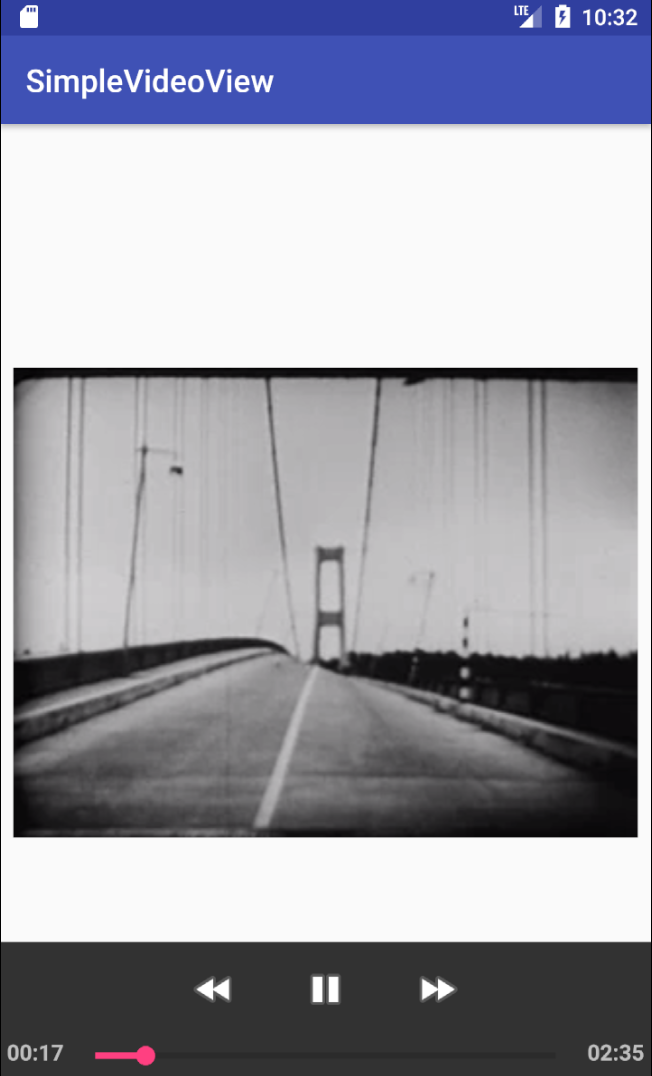
The SimpleVideoView app includes a familiar set of media controls. The controls allow you to play, pause, rewind, fast-forward, and use the progress slider to skip forward or back to specific places in the video.
You start by playing a video file embedded with the app's resources. In the second task, you modify the app to buffer and play a video file from the internet.
Task 1. Play video with VideoView
The simplest way to play video in your app is to use a VideoView object, which is part of the Android platform. The VideoView class combines a media player (the MediaPlayer class) with a SurfaceView to actually display the video. Although it does not provide a lot of features or customization, VideoView class implements a lot of the basic behavior you need to play a video in your app.
Your app can play media files from a variety of sources, including embedded in the app's resources, stored on external media such as an SD card, or streamed from the internet. In this example, to keep things simple, you embed the video file in the app itself.
For the video playback UI, Android provides the MediaController view. The MediaController view provides a set of common media-control buttons that can control a media player (the VideoView object).
In this task you build the first iteration of the SimpleVideoView app, which plays a video clip.
1.1 Create the project and initial layout
This first iteration of the app starts playing a video clip when it launches, and plays the clip to the end.
- Create a new Android project. Call it SimpleVideoView and use the Empty activity template. You can leave all other defaults the same.
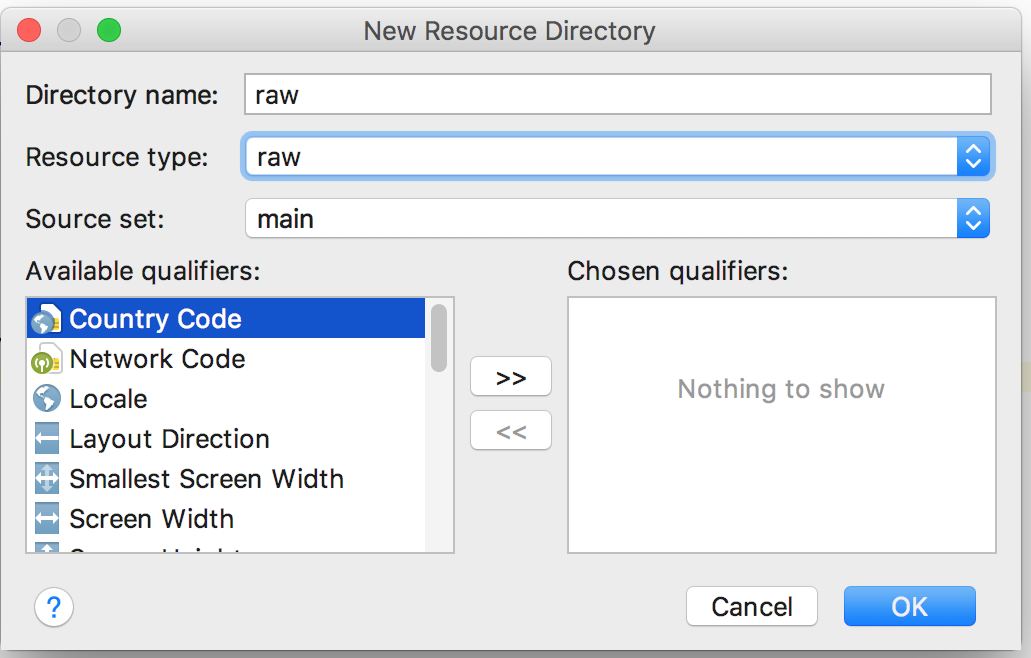
- Create a new raw resource directory to hold the video file the app will play: click the res directory in the Project view and select File > New > Android resource directory.
Change both the Directory name and Resource type to "raw". Leave all other options as is and click OK.
Download the Tacoma Narrows MP4 video file. If the video begins to play in your browser rather than downloading, you can use File > Save Page As... to save the file.
- Move the
tacoma_narrows.mp4file into therawdirectory in your project. - In
activity_main.xml, delete the existingTextView, and replace it with aVideoViewelement with these attributes:
When<VideoView android:id="@+id/videoview" android:layout_width="0dp" android:layout_height="0dp" android:layout_margin="8dp" app:layout_constraintBottom_toBottomOf="parent" app:layout_constraintDimensionRatio="4:3" app:layout_constraintEnd_toEndOf="parent" app:layout_constraintStart_toStartOf="parent" app:layout_constraintTop_toTopOf="parent"/>layout_widthandlayout_heightare0dp, the size and position of theVideoVieware calculated dynamically based on the other constraints. Thelayout_constraintDimensionRatioattribute indicates that when the app calculates the size of theVideoView, the ratio of the width to the height should be 4:3. This constraint keeps the aspect ratio of the video the same and prevents the view from being stretched too far in either direction (depending on how the device is rotated).
1.2 Implement MainActivity
- In
MainActivity.java, add a constant for the name of the video sample file, and a member variable to hold theVideoViewinstance.private static final String VIDEO_SAMPLE = "tacoma_narrows"; private VideoView mVideoView; Also in
MainActivity, create a private method calledgetMedia()that takes aStringand returns aUri. The implementation looks like this:private Uri getMedia(String mediaName) { return Uri.parse("android.resource://" + getPackageName() + "/raw/" + mediaName); }This method converts the name of the sample media file (a string) into a full URI object representing the path to the sample in your app's resources. Note that although the actual filename in the app's resource directory is
tacoma_narrows.mp4, the string name and resulting resource name do not include the extension.In
onCreate(), get a reference to theVideoViewin the layout:mVideoView = findViewById(R.id.videoview);Create a new private method called
initializePlayer()that takes no arguments and returnsvoid.private void initializePlayer() { }- Inside
initializePlayer(), use thegetMedia()andsetVideoUri()methods to set the media URI that theVideoViewwill play.Uri videoUri = getMedia(VIDEO_SAMPLE); mVideoView.setVideoURI(videoUri); - Call
start()on theVideoViewto start playing.mVideoView.start(); - Create a private method called
releasePlayer(), and call thestopPlayback()method on theVideoView. This stops the video from playing and releases all the resources held by theVideoView.private void releasePlayer() { mVideoView.stopPlayback(); }
1.3 Implement Activity lifecycle methods
Media playback uses many more system resources than most apps. It is critical that your app completely release those resources when it's not using them, even if the app is paused in the background. Implement the Activity lifecycle method for onStop() to release the media resources when the app is stopped. Implement onStart() to initialize the resources when the app is started again.
Override the
onStart()method and callinitializePlayer().@Override protected void onStart() { super.onStart(); initializePlayer(); }Override the
onStop()method and callreleasePlayer().@Override protected void onStop() { super.onStop(); releasePlayer(); }Override
onPause()and add a test for versions of Android older than N (lower than 7.0, API 24). If the app is running on an older version of Android, pause theVideoViewhere.@Override protected void onPause() { super.onPause(); if (Build.VERSION.SDK_INT < Build.VERSION_CODES.N) { mVideoView.pause(); } }This test is required because the behavior of
onPause()andonStop()changed in Android N (7.0, API 24). In older versions of Android,onPause()was the end of the visual lifecycle of your app, and you could start releasing resources when the app was paused.In newer versions of Android, your app may be paused but still visible on the screen, as with multi-window or picture-in-picture (PIP) mode. In those cases the user likely wants the video to continue playing in the background. If the video is being played in multi-window or PIP mode, then it is
onStop()that indicates the end of the visible life cycle of the app, and your video playback should indeed stop at that time.If you only stop playing your video in
onStop(), as in the previous step, then on older devices there may be a few seconds where even though the app is no longer visible on screen, the video's audio track continues to play whileonStop()catches up. This test for older versions of Android pauses the actual playback inonPause()to prevent the sound from playing after the app has disappeared from the screen.Build and run the app.
When the app starts, the video file is opened and decoded, begins playing, and plays to the end. There is no way to control the media playback, for example using pause, play, fast-forward, or rewind. You add these capabilities in the next task.
Note: If you test the SimpleVideoView app on an emulator, use an AVD that supports API 23 or higher. Older versions of the emulator support fewer types of video formats, and may also suffer from degraded performance during playback. If you run the app on a physical device that runs a version of Android older than API 23, you should not have either of these problems.
1.4 Add a MediaController
An app that plays video but does not provide a way for the user to control that video is less than useful. The Android platform provides a way to control media using the MediaController view, which is in the android.widget package. A MediaController view combines the most common media control UI elements (buttons for play, pause, fast-forward, and rewind, as well as a seek or progress bar) with the ability to control an underlying media player, such as a VideoView.
To use a MediaController view, you don't define it in your layout as you would other views. Instead you instantiate it programmatically in your app's onCreate() method and then attach it to a media player. The controller floats above your app's layout and enables the user to start, stop, fast-forward, rewind, and seek within the video.
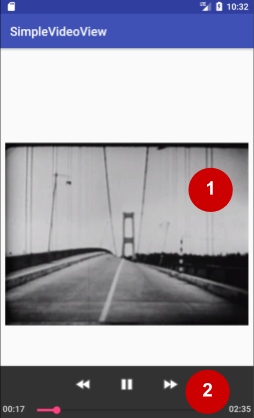
In the figure above:
- A
VideoView, which includes aMediaPlayerto decode and play video, and aSurfaceViewto display the video on the screen - A
MediaControllerview, which includes UI elements for video transport controls (play, pause, fast-forward, rewind, progress slider) and the ability to control the video
In this task you add a MediaController to the SimpleVideoView app.
Locate the
onCreate()method inMainActivity. Below the assignment of themVideoViewvariable, create a newMediaControllerobject and usesetMediaPlayer()to connect the object to theVideoView.MediaController controller = new MediaController(this); controller.setMediaPlayer(mVideoView);Note: When you add theMediaControllerclass make sure that you importandroid.widget.MediaController, notandroid.media.session.MediaController.Use
setMediaController()to do the reverse connection, that is, to tell theVideoViewthat theMediaControllerwill be used to control it:mVideoView.setMediaController(controller);- Build and run the app. As before, the video begins to play when the app starts. Tap the
VideoViewto make theMediaControllerappear. You can then use any of the elements in that controller to control media playback. TheMediaControllerdisappears on its own after three seconds.
1.5 Preserve playback position throughout the activity lifecycle
When the onStop() method is called and your app goes into the background, or restarts because of a configuration change, the VideoView class releases all its resources and does not preserve any video playback state such as the current position. This means that each time the app starts or comes into the foreground, the video is reopened and plays from the beginning.
To get a baseline for comparison, run the app, if it's not already running. With your app in the foreground, try the following tasks:
- Rotate the device.
- Tap the Home button and then use the task switcher to bring the app back to the foreground.
- If your device or emulator is running Android 7.0 (API level 24) or higher, press and hold the task switcher to enable multi-window mode.
Note in each of these cases how the video restarts from the beginning.
In this task you keep track of the current playback position, in milliseconds, throughout the app's lifecycle. If the video resources are released, the video can restart where it left off.
- In
MainActivity, add a member variable to hold the video's current position (initially 0). The playback position is recorded in milliseconds from 0.private int mCurrentPosition = 0; - Add a member variable to hold the key for the playback position in the instance state bundle:
private static final String PLAYBACK_TIME = "play_time"; In
initializePlayer(), aftersetVideoUri()but beforestart(), check to see whether the current position is greater than 0, which indicates that the video was playing at some point. Use theseekTo()method to move the playback position to the current position.if (mCurrentPosition > 0) { mVideoView.seekTo(mCurrentPosition); } else { // Skipping to 1 shows the first frame of the video. mVideoView.seekTo(1); }If the current position is 0, the video has not yet played. Use
seekTo()to set the playback position to 1 millisecond. This will show the first frame of the video rather than a black screen.Override the
onSaveInstanceState()method to save the value ofmCurrentTimeto the instance state bundle. Get the current playback position with thegetCurrentPosition()method.@Override protected void onSaveInstanceState(Bundle outState) { super.onSaveInstanceState(outState); outState.putInt(PLAYBACK_TIME, mVideoView.getCurrentPosition()); }- In
onCreate(), check for the existence of the instance state bundle, and update the value ofmCurrentTimewith the value from that bundle. Add these lines before you create theMediaController.if (savedInstanceState != null) { mCurrentPosition = savedInstanceState.getInt(PLAYBACK_TIME); } - Build and run the app. Repeat the baseline tasks and note how the playback position is saved in each case.
1.6 Add an onCompletion() callback
The VideoView class (and the MediaPlayer it contains) lets you define listeners for several events related to media playback. For example:
- The media has been prepared (buffered, decoded, uncompressed, and so on) and is ready to play.
- An error has occurred during media playback.
- The media source has reported information such as a buffering delay during playback, for example when media is streaming over the internet.
- The media has finished playing.
Listeners for the preparation and completion events are the most common listeners to implement in a media app. You haven't yet needed to handle media preparation in the SimpleVideoView app, because the video clip is embedded in the app and is fairly small, so it plays quickly. This may not be the case for larger video clips or those you play directly from the internet. You come back to preparing media in a later task.
When media playback is finished, the completion event occurs, and the onCompletion() callback is called. In this task you implement a listener for onCompletion() events to display a toast when the playback finishes.
- At the end of the
initializePlayer()method, create a newMediaPlayer.OnCompletionListener, override theonCompletion()method, and usesetOnCompletionListenter()to add that listener to theVideoView.mVideoView.setOnCompletionListener(new MediaPlayer.OnCompletionListener() { @Override public void onCompletion(MediaPlayer mediaPlayer) { // Implementation here. } }); - Inside the
onCompletion()method, add aToastto display the message "Playback completed." After the toast, add a call to
seekTo()to reset the playback and theMediaControllerto the beginning of the clip.mVideoView.setOnCompletionListener(new MediaPlayer.OnCompletionListener() { @Override public void onCompletion(MediaPlayer mediaPlayer) { Toast.makeText(MainActivity.this, "Playback completed", Toast.LENGTH_SHORT).show(); mVideoView.seekTo(1); } });By default, when the media finishes playing, both the
VideoViewand theMediaControllershow the end state of the media. The code shown above resets both the player and the controller to the start of the video so that the video can be played again.Build and run the app. Tap the video to display the
MediaController, and move the slider nearly all the way to the end. When the video finishes playing, the toast appears and the controller resets to the beginning of the clip.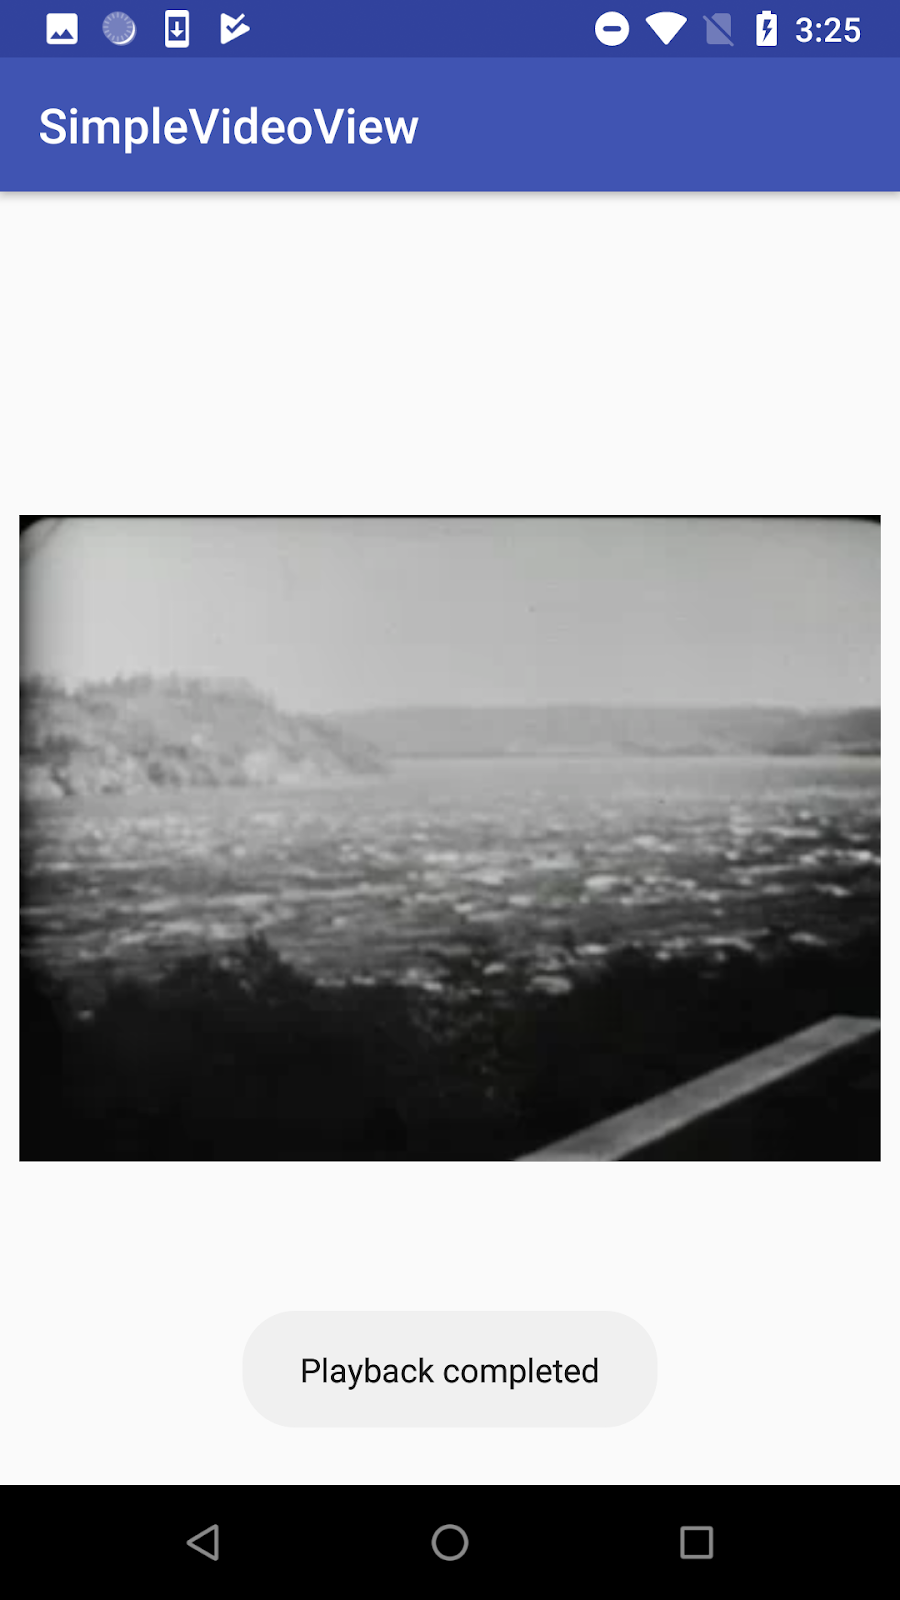
Task 2. Play video from the internet
In a real-world app, many media files are too large to embed directly in your app as you did with the video in the SimpleVideoView app. More commonly, if your app plays media it will get the files it needs from external storage such as an SD card, or locate and buffer the media file from a server on the internet.
If you play media from the internet, the VideoView class and the underlying MediaPlayer implement a lot of the background work for you. When you use VideoView you don't need to open a network connection, or set up a background task to buffer the media file.
You do, however, need to handle the time period between when you tell your app to play the media file and when the content in that file is actually available to play. If you do nothing, your app may appear to freeze for quite a long time while the file is buffering, especially on slow network connections. Even a message to the user that something is going on provides a better user experience.
VideoView (and MediaPlayer) provide a preparation event listener to handle this case. To use the onPrepared() callback, set the URI of the media the VideoView will play, then receive a callback when that media is ready to play.
In this task you modify the SimpleVideoView app to play a video from a URL on the internet. You use the preparation event listener to handle updating the app's UI while the file is being loaded.
2.1 Add a buffering message
In this task you modify the app layout to display a simple buffering message, and you use view visibility to show and hide the message at the appropriate time.
- In the main layout file, add a
TextViewelement. The newTextViewis centered in the layout, same as theVideoView, and appears on top.<TextView android:id="@+id/buffering_textview" android:layout_width="wrap_content" android:layout_height="wrap_content" android:layout_margin="8dp" android:text="Buffering..." android:textSize="18sp" android:textStyle="bold" android:textColor="@android:color/white" app:layout_constraintBottom_toBottomOf="parent" app:layout_constraintEnd_toEndOf="parent" app:layout_constraintStart_toStartOf="parent" app:layout_constraintTop_toTopOf="parent"/> In
MainActivity, change theVIDEO_SAMPLEconstant to indicate the URL for the media file.private static final String VIDEO_SAMPLE = "https://developers.google.com/training/images/tacoma_narrows.mp4";You can use any URL for any video that is available as a file on the internet.
Note: If you use your own URL for the video file, make sure that the video format is supported by Android, by the specific version of Android your emulator or device is running. See Supported Media Formats for a list of video codecs and file types that Android supports.Add a member variable to hold the
TextViewthat shows the buffering message.private TextView mBufferingTextView;- In
onCreate(), get a reference to theTextViewin the layout:mBufferingTextView = findViewById(R.id.buffering_textview); - In the
getMedia()method, change the implementation to test whether the incoming string is a URL or a raw resource. Return the appropriate URI.private Uri getMedia(String mediaName) { if (URLUtil.isValidUrl(mediaName)) { // media name is an external URL return Uri.parse(mediaName); } else { // media name is a raw resource embedded in the app return Uri.parse("android.resource://" + getPackageName() + "/raw/" + mediaName); } }
2.2 Add the internet permission
In the Android manifest file, add an internet permission to enable the app to access the media file on the internet.
- In
AndroidManifest.xml, add this line just before the<application>element, at the top level of the manifest.<uses-permission android:name="android.permission.INTERNET" />
2.3 Add an onPrepared() callback
Preparing video or other media can involve streaming it, buffering it in memory, and decoding it to make it ready to play. With VideoView and MediaPlayer, the preparation step happens asynchronously in a separate thread, so your app does not have to pause and wait. Use the onPrepared() callback to enable your app to be notified when the preparation step has completed and the media is ready to play.
- In the
initializePlayer()method, before the definition forsetOnCompletionListener(), create a newMediaPlayer.onPreparedListener, override theonPrepared()method, and usesetOnPreparedListener()to add that listener to theVideoView.mVideoView.setOnPreparedListener( new MediaPlayer.OnPreparedListener() { @Override public void onPrepared(MediaPlayer mediaPlayer) { // Implementation here. } }); - Inside the
onPrepared()method, set the visibility of theTextViewto invisible. This removes the "Buffering..." message.mBufferingTextView.setVisibility(VideoView.INVISIBLE); In
initializePlayer(), locate the lines of code that test for the current position, seek to that position, and start playback. Move those lines into theonPrepared()method, placing them after the calls tosetVisibility(). The finalonPrepared()definition looks like this:mVideoView.setOnPreparedListener( new MediaPlayer.OnPreparedListener() { @Override public void onPrepared(MediaPlayer mediaPlayer) { mBufferingTextView.setVisibility(VideoView.INVISIBLE); if (mCurrentPosition > 0) { mVideoView.seekTo(mCurrentPosition); } else { mVideoView.seekTo(1); } mVideoView.start(); } });At the top of
initializePlayer(), before setting the media URI to play, restore the visibility of the bufferingTextView:mBufferingTextView.setVisibility(VideoView.VISIBLE);Each time
initializePlayer()is called, the buffering message should be turned on. It is turned off only whenonPrepared()is called and the media is ready to play.Build and run the app. Initially the "Buffering..." message appears on the screen. Depending on the speed of your network connection, after some moments the video will appear and start playing.
Solution code
Android Studio project: SimpleVideoView
Coding challenge
Challenge: Replace the MediaController in the SimpleVideoView app with a single button.
- When the user taps the button, the text should toggle between "Play" and "Pause."
- Change SimpleVideoView such that the video does not play automatically when the app is started. Only start playing the media when the user clicks the "Play" button.
- If the button is in the "Play" state the button should be disabled until the media has been prepared and is ready to play.
- Make sure that you update the button's Play/Pause state in response to activity state changes.
Challenge: Add a "Skip 10s" button. When the user taps the button, the current position of the media playback should skip ahead ten seconds.
Summary
- Media apps in Android have a standard set of components, including a UI and a media player.
- Media (audio and video) files can be played from a variety of sources, including embedded in the app's resources, stored on external media such as an SD card, or played as a streaming media from the internet.
- The easiest way to play video in your app is to use the
VideoViewclass. TheVideoViewclass wraps aMediaPlayerand aSurfaceView.VideoViewcan be added to a layout like any other view. - Use
VideoView.setVideoURI()to specify the URI of the video file to play, whether that URI is in the app's resources, or on the internet. This method preloads the video sample data in an asynchronous thread. - Use
VideoView.start()to start the video playback, once the video is available for playing. - Use
VideoView.stopPlayback()to stop the video playback and release the resources theVideoViewis using. - Use
VideoView.getCurrentPosition()to retrieve the current playback position, in milliseconds. UseVideoView.seekTo()to seek to a specific playback position, in milliseconds. - The
MediaControllerwidget (android.widget.MediaController) provides a set of common controls (play, pause, fast-forward, rewind, and a progress slider) for media playback.MediaControlleris aViewGroupthat can be added programmatically to any layout to control aVideoView. - Use
MediaController.setMediaPlayer()to attach a media player such as aVideoViewto the controller. - Use
VideoView.setMediaController()to attach aMediaControllerto theVideoView. - Use the
onStart()andonStop()lifecycle methods to start and stop video playback in your app. These methods represent the visible lifecycle of your app. - In versions of Android lower than Nougat,
onPause()represents the end of the app's visible lifecycle, but audio may continue to play for several seconds untilonStop()is called. Add a test for the Android version to pause video playback inonPause()on older versions of Android. - The
VideoViewclass does not preserve the state of video playback across any lifecycle transition, including changes to background/foreground, device orientation, and multi-window mode. To retain this state information, save and restore the current video position in the activity instance state bundle. - Media playback uses a lot of system resources. Make sure that you release these resources as soon as possible, usually in
onStop(). Resources used byVideoVieware released when you callstopPlayback(). - The
MediaPlayerclass (and thusVideoView) provides a set of media event callbacks for various events, includingonCompletion()andonPrepared(). - The
onCompletion()callback is invoked when the media playback is complete. Use this callback to announce the end of the media or reset the UI to a default state. - The
onPrepared()callback is invoked when the media is ready to play. Depending on the media and its location (embedded in the app, available on local storage, played from the internet), it may take some time for the media to be available. Use theonPrepared()callback to keep the user informed about the state of the media by providing a "Buffering" message or some other status message.
Related concept
The related concept documentation is Simple media playback.
Learn more
Android developer documentation:
Android API reference:
VideoViewMediaPlayerMediaPlayer.OnCompletionListenerMediaPlayer.OnPreparedListenerMediaController
Other:
